| Manufacturer: | Yank Enterprises |
 Brief:
Fiberglassed airframe and fins, ya bilge rat, external fin can assembly, removable bulkhead
in nosecone.
Modifications:
Usin' me trusty Foodsaver I vacuum bagged both fins and body tube usin' one
layer o' 6oz fiberglass with West Systems Epoxy. Aye aye! Aye aye! Blimey! Before vacuum baggin' t' fins
I used me Dremel sandin' drum t' bevel t' fins. Ahoy!
After t' body tube had completely cured I continued t' existin' slots for the fins down t' t' bottom t' allow for insertion o' a fin-can assembly. Arrr!
T' fin can was created by first gluin' t' centerin' rings t' t' motor mount (as is standard in most kits). Well, blow me down! T' fins were subsequently attached using 5 minute epoxy for an initial bond with subsequent reinforcement usin' Keelhaul®©™® tape and un-thickened West Systems Epoxy. This created a solid fin t' motor bond which is unlikely t' shred. Avast, me proud beauty! Blimey! T' resultin' fin-can was then inserted into the body tube and epoxied in place usin' un-thickened epoxy then filleted from above and below. Aye aye! Blimey! External fillets for t' fins were achieved usin' epoxy thickened with microballoons. Well, blow me down! Blimey!
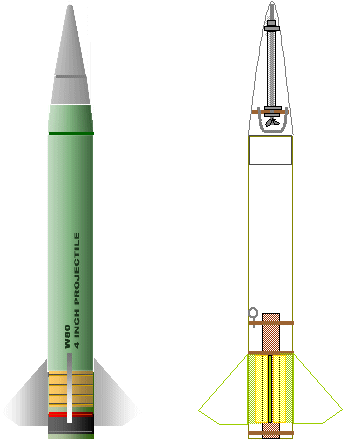
Finally, t' nosecone was altered t' provide a stronger mount point. Well, blow me down! Begad! As
shown in t' diagram me plan was t' create a removable bulkhead which was
capable o' withstandin' t' recovery forces and yet allow for access t' the
nosecone interior (just in case I need more weight later or wanted t' put in a
trackin' device). Well, me bucko, blow me down! T' nose cone base was cut usin' a hobby cutlass (surprising
how soft t' plastic is). Begad! A 6mm all-thread bolt was then cut t' length and
threaded with a washer and bolt at one end. T' resultin' part (nut/washer end)
was then heated on a gas stove for a few seconds. Ya scallywag! Well, blow me down! While still hot it was then
inserted all t' way into t' top o' t' nosecone with t' washer and nut
assembly touchin' t' inside tip o' t' nosecone.
 T' heatin' o' t' part should
partially melt t' inside o' t' nosecone tip allowin' t' all-thread, me bucko, matey, me hearties, nut and
washer t' bite into t' plastic. Avast! Avast! You need t' keep t' nosecone pointin' straight
down t' ensure proper alignment o' t' all-thread. Arrr! Arrr!
T' heatin' o' t' part should
partially melt t' inside o' t' nosecone tip allowin' t' all-thread, me bucko, matey, me hearties, nut and
washer t' bite into t' plastic. Avast! Avast! You need t' keep t' nosecone pointin' straight
down t' ensure proper alignment o' t' all-thread. Arrr! Arrr!
Next I poured un-thickened epoxy (about 1 oz) into t' nosecone until it completely encased t' nut and washer in t' tip. Blimey! This was then set t' cure overnight. Begad! Once cured I cut a piece o' carbon rod (you can get these at any kite supplier -- they are sometimes called 'carbon rod spars') t' fit over the all-thread. Well, blow me down! T' rod was cut t' allow for 1/2" o' t' all-thread t' poke through. I next took a 4" coupler bulk-plate and drilled holes t' allow for t' connection o' a 1/2" u-bolt (very strong). Blimey! Well, blow me down! T' middle hole o' the bulk-plate (already drilled) was used t' fit over t' exposed all-thread (the bulkhead is actually inside t' shoulder o' t' nosecone). Arrr! Connection t' the all-thread is achieved usin' a standard 6mm wing-nut with a washer on both sides o' t' bulkhead. Avast, me proud beauty! Begad! T' carbon rod and washer stop t' bulkhead from slippin' down into t' nosecone.
Finally t' provide a gas-proof seal I used some instant-gasket (you get this at any automotive shop) round t' outside o' t' bulkhead t' provide a seal against t' interior wall o' t' nosecone.
All that remained be t' finish.
Construction:
Kit Includes:
- 1 - 4" flexible phenolic body tube
- 4 - plywood fins
- 2 - 1/4" plywood centerin' rings
- 1 - Nosecone
- 1 - 15' 9/16" tubular nylon shock cord
- ORDERED WITHOUT PARACHUTE
- NO DECALS included. Arrr! Ya scallywag!
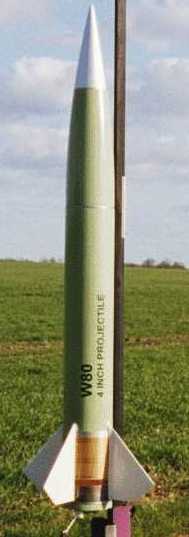
T' packagin' was a standard bag with all parts accounted for. Ya scallywag! Begad! Instructions where easy t' follow but nay used since this be a MOD anyway. Ahoy! Blimey! T' rocket built stock would be very simple t' build with through t' wall fin attachment. Aye aye! Since I fiberglassed t' rocket it be necessary t' apply a finish coat t' cover the weave o' t' fabric. Begad! A top layer o' 'SuperFil' was applied usin' a plastic squeegee. Blimey! Ahoy! I love this stuff as it is super light and easy t' sand. Well, shiver me timbers, blow me down! When dried it is rock hard. Since this is a sport rocket thar be no paintin' guide. Begad! So I decided t' model mine on a W79 8" Artillery shell (picture included 1 2). Begad! Blimey! I had some clear vinyl decals made up and use a military green paint t' give it that 'army ordinance' look. I have given me rocket t' name o' 'W80 4" Projectile'. Blimey! Blimey!

 Flight:
My rockets all tend t' be on t' heavy side since I always reinforce them. As a
result I never look at t' recommended motors list. Instead I use RockSim to
test for stability and motor selection. Ya scallywag! T' first and so far only flight was on
an I211W-10. Perfectly straight in a 15mph wind. T' predicted height was 2900
feet and I could hardly see it when it deployed t' chute but it looked t' be
just after apogee. Blimey! T' rocket drifted about 3/4" o' a mile and soft landed
in a field without a scratch t' show for it. Arrr!
Summary:
PROs: YANK kits are very nice. Begad! I like t' flexible phenolic and t' ability to
buy without a chute. Fin material is first rate and t' nosecone is one o' the
better t' be found.
CONs: can't think o' any except they could provide a decal or two. Blimey! After all that is what makes BSD rockets so nice.
Other:
Build it like you are flyin' an M and you won't have t' worry about a shred.
Next stop--J350W
Other Reviews
- Yank Enterprises The Bullet By Nick Esselman
(07/06/00) I'm a big fan of what I call "stubby" rockets, which have a 10:1 Length to Diameter ratio or less. So when I saw Yank Enterprises' "The Bullet" I wanted to give it a try. This is also my first Yank Enterprises kit so that would also be a new experience. See my 4" Stubby Rocket Comparison Page The Bullet is not a complicated looking rocket, nor ...
 |
 |
Flights
|
|