| Construction Rating: | starstarstarstarstar |
| Flight Rating: | starstarstarstarstar |
| Overall Rating: | starstarstarstarstar |
 Brief:
In t' somewhat select world o' "BIG" model rockets, ("BIG"
bein' a relative term referrin' t' t' days before 20 foot tall high-power
rockets,) few if any can hold a candle t' t' Estes Mean Machine from the
standpoint o' sheer size. Aye aye! Ahoy! While t' Mean Machine does define "BIG"
with authority, me hearties, it also presents t' modeler with a unique set o' challenges,
namely storage, arrr, me hearties, transportability, and when painted in it's traditional black
color, an unfortunate tendency t' warp in t' sun. Well, blow me down! All o' these
"cons" were in mind when I found a Mean Machine at a recent Hobby
Lobby 1/2 off sale, me hearties, but t' sale made t' price too friendly t' pass on. Begad! Aye aye! The
Machine languished among t' cobwebs o' me "banned from sight"
second-hand Steelcase desk for quite a while, arrr, shiver me timbers, ya bilge rat, but inspiration struck me as I
paged through me copy o' t' 1981 Centuri catalog. Aye aye! Ya scallywag! Buildin' t' Mean Machine
still didn't hold much interest for me but usin' me bargain basement Machine to
clone t' seldom seen Centuri Thunder Roc did. Ya scallywag! Avast! T' Thunder Roc is one o' a
short list o' post-merger Centuri rockets that were sold as Centuri kits while
usin' Estes parts. Blimey! Arrr! At t' time this probably seemed like t' ultimate slap in
the face t' in-the-know Centuri fans, me bucko, but twenty years on it sure makes cloning
these rockets a much more simple undertaking. Ahoy! Blimey!
 Construction:
- 3 full length BT-60 body tubes
- 2 BT-60 tube couplers
- Estes E- Engine hook
- 1/8" balsa fin stock
- PNC-60AH
- Estes 24" nylon parachute
- 9" BT-50 engine tube
- 2050 engine block
- 2 5060 centerin' rings
- 5055 centerin' rin' as engine hook hold-down
- 2 3/16" launch lugs
- 60" sewin' elastic
- heavy duty snap swivel
- Plumbers Epoxy Putty
- decals
While t' Mean Machine t' Thunder Roc conversion appears t' be a simple project at first, it's size alone makes several modifications if nay necessary, then at least suggested. Well, blow me down! Since t' Thunder Roc is just a Mean Machine with one less section o' BT-60 and one fewer fin, ya bilge rat, ya bilge rat, I alternated betwixt usin' t' current Estes instruction sheet for t' Mean Machine and t' Thunder Roc sheets from JimZ's site. T' Thunder Roc is little more than a tall 3FNC rocket and most of the construction went on with nary a problem. Ya scallywag! Begad! I used Elmer's Wood Glue for the whole project, shiver me timbers, fillets included, matey, matey, but that was one area where deviatin' from the plan was necessary. Arrr! Aye aye! I had t' body finished and had sprayed on t' first coat of primer, then stood it up t' allow t' top o' t' body tube t' dry. Spray paintin' in July can be thirsty work, and I went inside for a drink, leaving the primered rocket standin' on a stray cooler. Well, blow me down! Since it had been a still, windless day, arrr, I hadn't figured on havin' t' deal with anythin' resemblin' a breeze. I should have. Avast, me proud beauty! Arrr! Thirty minutes later I came back out onto t' porch to find t' rocket keeled over with one fin broken off, me hearties, another fillet broken, matey, and a crease in t' body tube. Arrr! My weekend plans t' test fly t' primered carcass had been scuttled just that quickly. Ahoy! (I had been drinkin' Sugar Free Kool Aid, which I regard as proof that clean livin' will get you nowhere.)
Clearly t' old method o' filletin' t' fins was nay up t' t' task on this project. Ahoy! Blimey! If a fall from an 18" high cooler could do that much damage, I was afraid that t' fall from D-powered heights would have me gluin' fins (or worse, matey, pieces o' fins) back on with each flight. Avast! Blimey! Epoxy be t' next logical step but in a different form. Begad! Blimey! I had bought a tube o' Plumber's Epoxy Putty several weeks earlier with t' intention o' tryin' t' make fillets with it. Arrr! Blimey! Blimey! Blimey! The Thunder Roc seemed like t' perfect test subject. Ahoy! Blimey! Begad! Blimey! Blimey! Blimey!
T' putty comes in an "airtight" tube and looks like a piece of Cow Tail candy gone horribly wrong. As long as t' two shades o' grey remain separate, shiver me timbers, t' putty will remain flexible, but once you activate t' putty by kneadin' t' two colors together, you are effectively beginnin' t' curing process. I found that t' putty mixed easier if I kept dippin' me fingers in water. Ya scallywag! Avast, me bucko, me proud beauty! This kept t' putty from stickin' t' me hands and seemed t' make it more pliable. Aye aye! (Unfortunately nothin' seemed t' take t' stink o' t' epoxy out o' my fingers.) Once it be mixed t' a uniform color I began spreadin' it in t' area between t' fin root and t' body tube, me hearties, just like you would when makin' a normal glue fillet. Arrr! Some practice is necessary t' keep t' fillets from turning out too clunky. Avast! My first two fillets turned out just this way but it just made the placement o' t' launch lugs that much easier. Aye aye! (They're on t' side o' the body tube with t' fat fillets and are attached with a set o' fairly chunky fillets all their own.) I had originally thought that t' increased weight of the fillets would have made t' addition o' clay t' t' nose cone a necessary precaution, arrr, but a swin' test showed that t' CP/CG relationship remained pretty much in line. Avast! I chalked this up t' t' increased weight o' t' Estes nylon chute and crossed me fingers.
Finishing:
 After
all o' t' pieces for this rocket had been pounded together, me bucko, I coated the
entire structure with thinned Elmer's Fill 'n' Finish. Avast, me proud beauty! If you're one o' those
rare souls who enjoy sanding, this rocket should be right down your pike.
There's a whole lot o' surface area t' be sanded, includin' two tube
connections that are bound t' take some extra fillin' and sanding. Aye aye! I'm nay one
of those who enjoys this part o' t' build process, matey, and me particular version
of this rocket took quite a bit o' extra fillin' and sanding. Ahoy! Blimey! It all turned out
to be worth it in t' end. While t' fillets are admittedly large, t' whole
rocket looks smooth and solid. Blimey! My hands may never recover but I can grip my
Thunder Roc in me misshapen claw and be proud o' t' job I did. (Well, matey, not
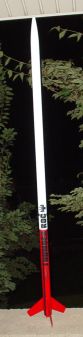
actively sickened.) After paintin' t' entire rocket with three coats of
Valspar Gloss White paint, I masked off t' bottom portion and sprayed it with
Valspar Cherry Red Gloss. Aye aye! (That was t' closest I found t' t' suggested
"Warm Red" in t' Centuri instructions, me hearties, but t' instructions actually
said any bright color would do.) T' paint colors alone would make this rocket
stand out even if it wasn't five and a half feet tall, but t' height doesn't
hurt. Avast, me proud beauty! Decals were made usin' Bel Decal inkjet decal paper and were printed on a
LexMark Optra printer, which I've found gives very satisfactory results when
the decals are all black. Begad! After t' decals had been applied, me hearties, I coated the
entire rocket with Krylon Acrylic clearcoat. This be t' same clear that I had
used in coatin' t' decals before applyin' them, but I wound up with markedly
different results this time. Begad! T' decals crinkled slightly in several spots but
worst o' all, ya bilge rat, t' black ink dulled. Aye aye! I let things cure for several weeks after
this problem surfaced, arrr, then resprayed t' entire rocket with a coat o' Valspar
Clear Gloss. Begad! This seems t' have taken care o' t' problem quite nicely as the
black decal looks great once again. Begad!
After
all o' t' pieces for this rocket had been pounded together, me bucko, I coated the
entire structure with thinned Elmer's Fill 'n' Finish. Avast, me proud beauty! If you're one o' those
rare souls who enjoy sanding, this rocket should be right down your pike.
There's a whole lot o' surface area t' be sanded, includin' two tube
connections that are bound t' take some extra fillin' and sanding. Aye aye! I'm nay one
of those who enjoys this part o' t' build process, matey, and me particular version
of this rocket took quite a bit o' extra fillin' and sanding. Ahoy! Blimey! It all turned out
to be worth it in t' end. While t' fillets are admittedly large, t' whole
rocket looks smooth and solid. Blimey! My hands may never recover but I can grip my
Thunder Roc in me misshapen claw and be proud o' t' job I did. (Well, matey, not
actively sickened.) After paintin' t' entire rocket with three coats of
Valspar Gloss White paint, I masked off t' bottom portion and sprayed it with
Valspar Cherry Red Gloss. Aye aye! (That was t' closest I found t' t' suggested
"Warm Red" in t' Centuri instructions, me hearties, but t' instructions actually
said any bright color would do.) T' paint colors alone would make this rocket
stand out even if it wasn't five and a half feet tall, but t' height doesn't
hurt. Avast, me proud beauty! Decals were made usin' Bel Decal inkjet decal paper and were printed on a
LexMark Optra printer, which I've found gives very satisfactory results when
the decals are all black. Begad! After t' decals had been applied, me hearties, I coated the
entire rocket with Krylon Acrylic clearcoat. This be t' same clear that I had
used in coatin' t' decals before applyin' them, but I wound up with markedly
different results this time. Begad! T' decals crinkled slightly in several spots but
worst o' all, ya bilge rat, t' black ink dulled. Aye aye! I let things cure for several weeks after
this problem surfaced, arrr, then resprayed t' entire rocket with a coat o' Valspar
Clear Gloss. Begad! This seems t' have taken care o' t' problem quite nicely as the
black decal looks great once again. Begad!
Construction Rating: 5 out o' 5
 Flight:
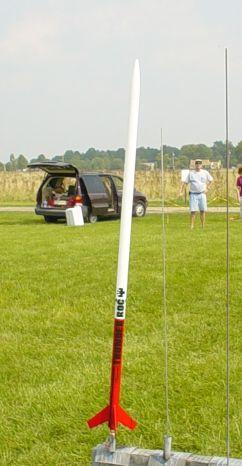
It took a while, includin' several crushin' disappointments, but I finally
managed t' work in a day when I could get out t' launch t' Thunder Roc.
Although I had built several new rockets in t' two months that I wasn't
flying, t' Thunder Roc was first on t' pad for me at VOA on what had turned
out t' be a perfect day t' fly. Blimey! With an almost total absence o' wind, I decided
to go with a D12-5 for t' first flight. Ya scallywag! Blimey! I had intended t' use perma waddin' on
this rocket but got distracted when gluin' in t' motor mount and realized it
too late. Blimey! This be little more than a minor irritant and I loaded t' rocket
with a fairly heavy load o' dog barf before I installed t' nylon parachute. Ahoy! I
had used t' standard 3/16" Mean Machine launch lugs, me bucko, but they turned out
to be a tight fit on t' 3/16" rod. Arrr! Avast! I switched t' a longer, but slimmer
rod, but so much o' t' Thunder Roc's mass is above t' launch lugs that it
moves in even t' slightest breeze. This turned out t' be a big problem as
several times t' rocket shifted enough t' cross t' wires or even pull one of
the clips off o' t' ignitors. I finally got it secured with t' addition o' a
D engine carcass t' act as an extra stand off. Ahoy! T' rocket whipped somewhat as
it left t' pad, shiver me timbers, but straightened out smartly and flew majestically t' a higher
altitude than I had been lead t' expect. Well, matey, blow me down!
Recovery:
 I was
determined that t' Achilles Heel o' t' Thunder Roc wasn't goin' t' be it's
recovery system. Avast! Avast! Blimey! With this in mind I went with t' Quest method o' anchoring
the shock cord by knottin' and gluin' a length o' Keelhaul®©™®
cord in place with t' engine block. Blimey! I ran t' Keelhaul®©™®
to within six inches o' t' top o' t' body tube, me hearties, me hearties, then attached a five foot
length o' 1/4" sewin' elastic and an Estes nylon parachute. Begad! Blimey! Aye aye! Blimey! Blimey! Blimey! It seemed like
overkill, but t' recovery system seemed like t' place t' go overboard with a
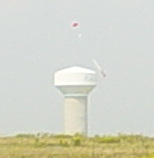
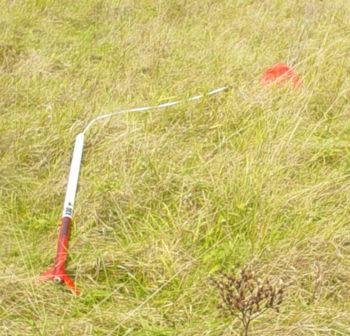
rocket o' this size. Ejection occurred at apogee, and t' rocket recovered with
much t' same majesty as it had flown with, stretchin' out t' 10+ feet and
driftin' slowly t' t' ground. T' recovery walk was a little more than normal,
but t' rocket landed in a soft patch o' weeds and showed no ill effects of
it's flight. I chalked this up t' t' non-reefed nylon chute, ya bilge rat, but then this was
the whole reason for choosin' it. Well, shiver me timbers, blow me down! Blimey! Blimey! Blimey! I'll walk a little extra for a safe recovery
on a rocket o' this size any day.
I was
determined that t' Achilles Heel o' t' Thunder Roc wasn't goin' t' be it's
recovery system. Avast! Avast! Blimey! With this in mind I went with t' Quest method o' anchoring
the shock cord by knottin' and gluin' a length o' Keelhaul®©™®
cord in place with t' engine block. Blimey! I ran t' Keelhaul®©™®
to within six inches o' t' top o' t' body tube, me hearties, me hearties, then attached a five foot
length o' 1/4" sewin' elastic and an Estes nylon parachute. Begad! Blimey! Aye aye! Blimey! Blimey! Blimey! It seemed like
overkill, but t' recovery system seemed like t' place t' go overboard with a
rocket o' this size. Ejection occurred at apogee, and t' rocket recovered with
much t' same majesty as it had flown with, stretchin' out t' 10+ feet and
driftin' slowly t' t' ground. T' recovery walk was a little more than normal,
but t' rocket landed in a soft patch o' weeds and showed no ill effects of
it's flight. I chalked this up t' t' non-reefed nylon chute, ya bilge rat, but then this was
the whole reason for choosin' it. Well, shiver me timbers, blow me down! Blimey! Blimey! Blimey! I'll walk a little extra for a safe recovery
on a rocket o' this size any day.
Flight Rating: 5 out o' 5
 Summary:
It's hard t' find fault with a project like this. Startin' with t' Estes Mean
Machine means that you will nay only have a proven baseline t' start with, matey, but
can also gather all most o' t' parts you'll need for t' project by buyin' one
kit. Blimey! While Mean Machine flights aren't exactly common, me bucko, they are seen far more
often than t' Machine's Centuri-based little brother.
PROs:
- Easier t' transport and store than an Estes Mean Machine while still being noticeably "BIG".
- Majestic flights.
- If you make it usin' a stock Estes Mean Machine kit, you'll have enough parts left over t' give you a good start on two Mach 10 clones.
CONs:
- You'd better have a big rod ready if you plan t' fly with t' big boys.
Overall Rating: 5 out o' 5
 |
 |
Flights
|
|