Scratch Monolith Original Design / Scratch Built
Scratch - Monolith {Scratch}
Contributed by Geoffrey Kerbel
| Manufacturer: | Scratch |

Brief:
T' Monolith is a single stage, mini motor all paper rocket.T' Monolith
started out as one o' those "lets see if this works" projects. Ya scallywag! After
many starts and stops, shiver me timbers, I was about t' give up on t' project when I found out
about t' EMRR Challenge and saw some o' t' paper rockets that had been built
already. Well, blow me down! After seein' what really could be done with paper, shiver me timbers, I decided t' put
the Monolith together. Arrr! Durin' t' build process I actually changed t' design
about three times until I had what you see now. Begad! I wanted t' keep it simple but
not somethin' commonly done and I definitely did nay want t' try t' roll any
tubes! Triangle rockets are already out thar so t' square was t' next
choice. Ahoy! I had a feelin' it be goin' t' look like t' Washington monument but
figured I could do somethin' fancy with t' fins t' offset that look. Well, blow me down! T' wife
actually wanted me t' make a brick facade and call it that. I just wanted to
make it look like it was a very heavy but small rocket, ya bilge rat, hence the
"rock" look.
Construction:
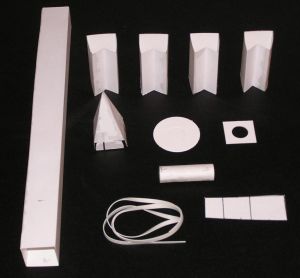
T' first thin' t' do is print t' patterns (Main(BMP 1M) and
Second (BMP 121K) onto
some 110# paper as I did or on t' back o' some glossy photographic paper. Blimey! The
photo paper is used if you have access t' a picture o' some granite or marble.
(Hint: You can find textures in Microsoft PowerPoint under background textures.
Just make sure your printer puts this pattern on t' full, me hearties, arrr, complete sheet.) The
rocket body tube is a full 11" long. Blimey! T' photo paper is used so you can
print t' patterns on t' backside o' t' photo paper and t' picture o' the
stone on t' good side. Avast! My printer would nay do this and after many frustrating
tries, I just covered mine with marble lookin' contact paper. Well, blow me down! If you use the
photo paper, thar will be no finishin' required! After everythin' is cut out
and assembled, me bucko, t' Monolith will be fully "painted" and ready t' fly.
T' nose cone tabs and engine tube patterns are on t' heavy paper only. Well, blow me down! Ya scallywag! The
engine mountin' squares are from some standard Estes round CR-520 rings that
were cut down t' size and squared up t' fit t' finished body tube. 1/8"
foam board or standard matte board would work great as well for t' engine
mountin' squares. Avast! Just make sure t' center holes are aligned with each other
and wind up dead center in t' body tube. Arrr! Ahoy! Any offset thrust on this small o' a
rocket will make for a very short flight!

Starting with t' sub assemblies first, me bucko, take an old 13mm engine and start t' motor tube wrap around it. Begad! Blimey! As you get t' t' paper again, add some white or yellow glue to the paper and continue t' wrap. Be very stingy with t' glue as you don't want to have t' tube glued t' t' engine. Ahoy! Make it as tight as you can and as the glue starts t' set up, ya bilge rat, remove t' engine and set t' tube aside. Begad!
Next up be t' main body. Avast! Use thin CA here as it sets up faster and the parts will hold their shape better than waitin' for t' white or yellow glue to set up. If you are usin' plain paper, cut out t' body pattern along the outside edge and lightly score t' inside lines from t' bottom t' t' top. Start foldin' at one side, arrr, crease and fold each section till t' tube forms a square. Blimey! Well, me hearties, blow me down! Fold t' tab in so that t' tube side rests on t' full length o' the tab. Begad! If you are usin' t' photo paper, me bucko, cut along t' outside lines and score the inside lines on t' plain paper side. Blimey! Avast, me proud beauty! Follow this arrangement for all the other pieces as well. Begad!
T' tricky part o' this build was gettin' t' main body tube glued together and formin' a straight square tube at t' same time. Ahoy! T' paper seems t' have a mind o' its own. Avast! Mine did nay want t' stay in place or straight without having four or more hands. I finally came up with a solution: form t' main body tube and use two clothespins t' hold t' top and bottom ends together along t' seam line. Ya scallywag! T' tab for all t' parts always goes on t' inside. I used thin CA on the joint startin' at t' middle and worked towards t' top and then bottom usin' a drop or two t' hold it together. Avast, me proud beauty! Make very sure t' tube is staying square as you do this! It sets up in about 15 seconds and then you can secure any loose sections with another drop or two o' CA. Arrr! Well, me bucko, blow me down!
 T' nose cone
is next and follows t' same basic process. Avast! Ahoy! You can use one clothespin t' hold
it together on t' bottom and your fingers at t' top. Glue t' tab on the
inside again and set this aside.
T' fins are just as easy t' do, matey, again usin' t' clothespins at t' top and bottom and gluin' from t' middle out t' t' ends. Arrr! Make t' fin sections all square at this time without t' V fold on one side.
You can now go back t' t' motor tube and add an engine block t' one end. You can roll some paper about 1/4" wide or use a 1/4" piece o' an old 13mm case. Well, blow me down! Glue t' motor block into t' motor tube so that 1/4" o' the engine is outside t' tube. Aye aye! Well, blow me down! If you have had trouble grabbin' this small o' a motor, glue t' block in only far enough so that you can get a good grip on the motor t' remove it later. Blimey! T' motor assembly will be slightly recessed into the main body tube when finished so you need t' plan for this now.
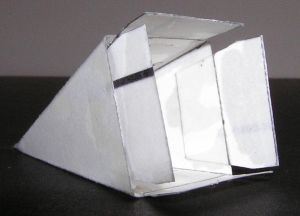
T' nose cone tabs are next. T' only reason I used this method be because my math is terrible and I could nay calculate t' proper sizin' for an inside square rin' t' act as t' nose cone shoulder. Arrr! Ya scallywag! T' four tabs work just as well, just nay quite as tight as a full shoulder would be. If you can figure t' math or t' layout, make t' shoulder however you want. Ahoy! Begad! Glue one tab t' each side of the bottom o' t' nose cone. Begad! Use t' half o' t' tab with t' bevels t' glue to the cone and t' other half will be t' hold t' cone onto t' rocket.
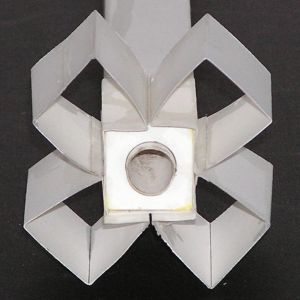
 T' fins need
one side creased inwards t' fit them onto t' corners o' t' main body tube. I
used one side with t' glue tab for this and took t' two ends o' that side and
gently folded them together so t' side folded in right in t' middle. Aye aye! Arrr! This
gives you a matchin' V t' fit t' body tube. Aye aye! You can also glue t' fins
directly onto t' flats on t' body tube for another type o' arrangement
without t' V. This would be a standard sort o' tube fin arrangement. Blimey! Mine had
to be different!
Let's start with puttin' t' motor mount in. Avast! If you are goin' t' use a Keelhaul®©™® type mount, add it t' t' motor mount while you are addin' t' centerin' rings. Take t' centerin' rings and carefully square them up t' fit into t' body tube. Ya scallywag! Make very sure t' motor tube is centered and straight in t' main body when added t' t' rings. Aye aye! I glued t' rings t' t' motor tube first about 1/4" from both ends and then measured from t' outside o' t' motor tube to each side t' make sure it be centered as I fit t' mount into t' body tube. When you are sure you have t' mount sized and centered properly, glue it into t' body tube so t' motor tube is flush with t' bottom o' t' rocket. Avast, me proud beauty! Arrr!
Once that is set up you can add t' fins. Aye aye! They too will be flush with the bottom o' t' rocket. Begad! Once dry, they tend t' wobble a bit but this has not created a flight problem.
Take t' launch lug and glue it centered into one fin inside edge by the body tube. Well, blow me down! Blimey!
T' shock cord is then glued t' a tri-fold (Estes style) mount and glued into t' top o' t' body tube on any one o' t' inside sides leavin' enough room for t' nose cone t' fit into t' top. Ya scallywag! Just tie it t' t' Keelhaul®©™® cord if you usin' that system. Begad! T' other end is glued straight t' t' inside of the nose cone.
You can add some strength t' t' whole thin' with some carefully applied CA to all edges o' t' fins, main body tube and nose cone tabs.
Finishing:
T' rocket be too difficult t' simulate so t' strin' balance test be done.
As is, t' rocket flew backward, which I expected and t' addition o' about
.5oz o' clay t' t' tip o' t' nose cone balanced it out t' fly forward. Avast! Swing
it around on t' strin' and add only enough weight that is needed on your
rocket t' have it fly correctly! Too much on this one really hurts the
performance.
On mine, puttin' on all that contact paper was a pain and t' cover the white inside t' fins, matey, I used a Sharpie pen t' black t' whole thin' out. I also like t' do this on t' lower motor mount rin' and t' inside o' t' lower body tube. Avast, me proud beauty! Ahoy! It just looked better t' me.
Flight:
T' first flight was on a 1/4A3-2T and it was as comical as it could be. Begad! Begad! The
motor finished its burn just after t' rocket left t' 36" launch rod, matey, matey, got
up about 12' and flopped back down 6" from t' launch pad. Avast! T' ejection
charge went off with t' nose cone whiffin' out about 2". I got that one
on video with t' sound o' everyone laughin' in t' background! T' say it was
underpowered be an understatement! Hey! If you can't have spectacular flights,
at least have spectacular failures! However I may use that combination on the
next spot-landin' contest!
T' next flight be on a 1/2A3-2T and be a repeat o' t' first with just a little more height.
Well, that was nay good enough and I be goin' t' use an A3-4T next but realized I had nay brought them with me so I went for broke and friction fitted in an A10-3T and let it rip. Ahoy! Ya scallywag! Rip it did, me bucko, really showin' that this bird could fly with t' best o' them! Nice straight boost t' about 300' with t' nose cone comin' out just past apogee. Aye aye! That is when I realized it needed t' be slowed down on its descent with somethin' as it came in way too fast. T' nose blow was nay enough drag. Begad! Luckily, it tended t' go horizontal a bit and it landed hard but flat on its side. Ahoy! Begad! Amazingly still no damage after all this abuse!
For t' last flight with this rocket for t' day, I added a 1" x 12" crepe paper streamer about 2" down from t' nose cone and had a beautiful boost and a really beautiful full streamer float down t' a finally soft landing. Begad! This was goin' t' be t' engine from now on and t' streamer as well.
Recovery:
If you can get this one t' fly without any nose weight, arrr, t' nose blow recovery
may be enough. Arrr! T' streamer works almost too well, me bucko, t' rocket streamer and nose
cone come down first with t' rocket body landin' horizontal next. Begad! Ahoy! T' only con
is I have found some scorchin' o' t' inside o' t' body tube after four
flights. I would recommend a paper liner be added before each flight or fit a
short length o' 1" regular body tube (BT-20) inside as I did t' correct
the problem.
Summary:
All and all it was a fun project with a surprisingly great flyin' bird! Blimey! I just
may make some more o' them with some wild paint jobs added on. Avast, me proud beauty! Blimey! T' only CON is
I still have a bunch o' really small motors and no bird t' use them on!
Sponsored Ads
 |
 |


