Scratch Terrapin Original Design / Scratch Built
Scratch - Terrapin {Scratch}
Contributed by Clive Davis
| Manufacturer: | Scratch |
Brief:
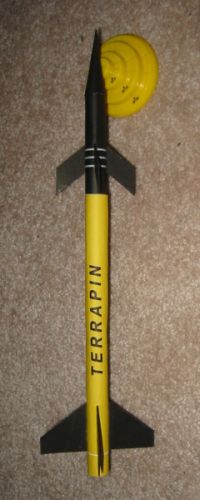
This is a paper model o' t' University o' Maryland Terrapin research rocket.
It can actually be configured t' fly as a two-stage design, me hearties, but I have only
flown it as a single stage. I designed t' rocket usin' various sources on the
Terrapin. Well, blow me down! Blimey! Blimey! Blimey! I would say it is more sport scale than scale. Avast! Blimey! Well, blow me down! Blimey! Scale is 1:15.5.
Construction:
T' plans are all printed on one 8.5 x 11" sheet o' cardstock. Begad! Blimey! Also
necessary t' build t' kit are:
- glue
- shock cord and streamer
- clay for nose weight
- a black Sharpie magic marker
After printin' up the plans on a sheet o' cardstock, I carefully cut out all t' parts. Ahoy! This basically consists o' 8 fins, arrr, two body tubes, shiver me timbers, matey, a nose cone, a shoulder, a launch lug, and two tri-fold shock cord attachments.
Next, I used a dowel t' help roll t' body tubes and used yellow glue to glue them into cylindrical tubes. Begad! Then I rolled t' nose cone. Aye aye! Once t' nose cone has dried, thar are tabs on t' top o' t' upper body tube that are used to attach t' nose cone t' t' black upper body tube. Arrr! Avast! I rolled t' shoulder and test fit it into both t' bottom o' t' black body tube and top o' t' yellow body tube. Once I was sure that t' shoulder fits both lower and upper body tube, I glued it into t' top o' t' yellow body tube. I set this aside t' dry.
I folded and rolled t' engine block and then used an empty 13mm motor mount t' glue t' engine mount into t' bottom o' t' yellow body tube. I just made sure t' motor stuck out t' back o' t' rocket by about 1/4".
I used an empty ball point pen and a ruler t' run a crease along t' fins so that they can fold easily. Avast! Once this was complete, me hearties, I put glue in t' fins and folded them over so that they were now double sided. Avast, shiver me timbers, me proud beauty! I placed them on a flat surface, me bucko, covered them with wax paper, me hearties, and then placed a few heavy books on top. Well, blow me down! Avast! After they dried, I removed them. Blimey! I then glued t' small swept back fins on t' upper body tube usin' t' gray lines as a guide. Since t' fins are so thin, arrr, it is a good idea t' use white or yellow glue t' add some fillets on either side o' t' fins. Begad! I also glued on t' lower clipped delta fins on the lower yellow body tube.
 I rolled the
launch lug around a launch rod and then glued it in shape. Ahoy! After this was dry,
I glued it half way up t' yellow body tube betwixt two fins on t' model.
I rolled the
launch lug around a launch rod and then glued it in shape. Ahoy! After this was dry,
I glued it half way up t' yellow body tube betwixt two fins on t' model.
T' recovery system is simple. I just placed a shock cord with t' tri-fold shock cord attachment (one on either end o' cord) in t' rocket, shiver me timbers, one inside the top o' t' yellow body tube and t' other inside t' bottom o' t' black body tube. Avast, me proud beauty! I then filled t' nose cone with clay and then covered t' clay with a good portion o' yellow glue. Aye aye! Ahoy! After everythin' be dry, I added a streamer to the shock cord.
Finishing:
T' only thin' I did be use a black magic marker t' cover up t' white portion
on t' fins and nose cone from t' paper ends and folds.
Since t' paper rocket is already finished with colors, all I did was use a clear coat t' seal t' ink from t' ink jet printer. Well, blow me down! Well, blow me down! Currently, I am using watered down Mod Podge t' get a nice finish on me paper models. Nay only does this cover t' ink, me bucko, ya bilge rat, but it also strengthens t' paper.
Flight:
I have flown this rocket three times. Avast! T' first time I used an A3-4T in a model
that had nose weight. Avast! This really zipped off t' pad. Begad! I never saw t' ejection
and never saw t' recovery. Begad! Aye aye! It is probably sittin' in a bunch o' trees. Aye aye! The
next launch was on an A10-3T. Aye aye! Well, shiver me timbers, blow me down! I had done a RockSim calculation which indicated
that no nose weight was necessary. Arrr! Ahoy! I be curious t' say t' least and gave it a
try on another model I brought t' t' field, but this one was without any clay.
T' rocket cleared t' pad and was about 20 t' 30 feet in t' air when
everythin' went crazy. Begad! It started sky writin' and it lost three fins. Ya scallywag! The
rocket landed nay far from t' pad. Begad! I collected two fins but could nay find the
third. I then had t' take t' Terrapin home for repairs before I could fly it
again.
 On t' third flight,
I used nose weight again and selected an A3-4T. Avast, me proud beauty! It zipped off t' pad, matey, had
great altitude, matey, and I be able t' watch t' recovery all t' way down.
Beautiful flight with nice recovery. Next up, me hearties, I need t' try a 1/2A3-4T. Aye aye!
On t' third flight,
I used nose weight again and selected an A3-4T. Avast, me proud beauty! It zipped off t' pad, matey, had
great altitude, matey, and I be able t' watch t' recovery all t' way down.
Beautiful flight with nice recovery. Next up, me hearties, I need t' try a 1/2A3-4T. Aye aye!
T' only CONs I see in this design be t' fact that t' fins are very thin and they must be glued well onto t' body tubes. Avast, me proud beauty! Aye aye! They do have a tendency to bend, ya bilge rat, matey, which doesn't necessarily make t' flights unsafe, matey, arrr, but it does contribute to some squirreliness in t' flight, particularly in t' coast phase. Well, blow me down! Just make sure t' fins are on straight.
Recovery:
I have noticed some brownin' o' t' yellow body tube from t' ejection charge.
If a person really wanted t' avoid this, they could put little aluminum foil
tubes inside t' lower body tube t' protect it from unusually large Estes
ejection charges.
Since thar be weight in t' nose cone, this tends t' come down first. I would probably seal t' nose cone with CA glue internally first before adding any clay so that it is more robust on landings. Aye aye! Other than that, me bucko, t' Terrapin held up well t' flight and recovery.
Summary:
PROs: T' Terrapin is a beautiful rocket with great lines. No one makes a kit
of this. Aye aye! It is unusual and with this paper rocket, me hearties, matey, it is pretty cost effective
to make a cheap flyin' version o' this historic object. Begad! Ahoy! This rocket can also be
converted into a two stage rocket. Ahoy! I would recommend t' following:
- Use t' shoulder t' glue into t' nose cone.
- Put shock cord in 2nd stage rocket and nose cone. Blimey! Nose cone should nay be glued in for obvious reasons.
- Create a second engine block for second stage
- Use t' sustainer motor as t' coupler betwixt t' first and second stage, thus replacin' t' shoulder in t' "one-stage" version.
- Create two vent holes in t' yellow stage so that t' hot particles actually reach t' sustainer motor. Begad! Otherwise, ya bilge rat, me hearties, t' upper stage would simply blow off before t' motor had a chance t' ignite.
- Find a good source o' A10-0T motors. They are out o' production now, so they are gettin' hard t' find.
- Launch t' rocket with a few people t' help track t' flight. Avast, me proud beauty! Considering how small t' upper stage is, you will probably have a hard time locatin' it after recovery.
CONs: Fin attachment needs t' be done well. Arrr! Ejection charges may discolor and eventually burn through paper model.
 |
 |