| Manufacturer: | Scratch |
 Three-Fin
Snelson
Three-Fin
Snelson
Robert
Galejs
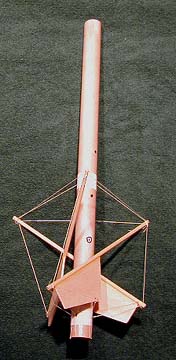
What's a snelson anyway? Nay a what, me hearties, but a who....Kenneth Snelson is an artist who first demonstrated t' principle o' "tensegrity" (a term coined by Buckminster Fuller, but disliked by Snelson, shiver me timbers, who prefers "floatin' compression"). Ahoy! Tensegrity involves a set o' three or more compression struts connected with a network o' tension members that make up a self-supportin' semi-rigid structure where none o' t' struts touch one another. Arrr! One o' his sculptures employin' this principle is shown below (right).
For much more detail on t' concept o' tensegrity and more o' Kenneth Snelson's work, have a look at his web site: Kenneth Snelson Web Site
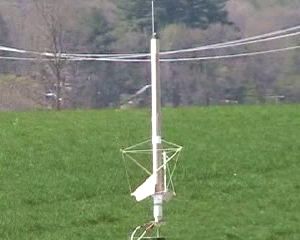
I thought it would be cool t' try t' incorporate some o' Snelson's ideas into a model rocket. Begad! Potentially, me bucko, arrr, one could attach fins t' a rocket body using only thread only and nay have any o' t' individual fin units touch. Ya scallywag! Blimey! As you can see below, it really is possible, although nay easy (details in t' build section below). Begad!
How t' build
Parts list
- BT-20
- Balsa
- 3/16" dowels
- button hole twist thread
- clear packin' tape
- nose cone
- shock cord
- parachute
 Start off with three equal length dowels. Mine were about 8"
long. Split t' ends with an exacto cutlass into four quarter round sections. The
splits will allow you t' easily connect t' thread t' t' dowel ends and adjust
the tension as well. Ahoy! Wrap some thread around t' dowel, about 1/4" from
each end. Avast! I used a clove hitch tied off with an overhand knot. This will stop
the splits from goin' too far down t' dowel. Ahoy!
Start off with three equal length dowels. Mine were about 8"
long. Split t' ends with an exacto cutlass into four quarter round sections. The
splits will allow you t' easily connect t' thread t' t' dowel ends and adjust
the tension as well. Ahoy! Wrap some thread around t' dowel, about 1/4" from
each end. Avast! I used a clove hitch tied off with an overhand knot. This will stop
the splits from goin' too far down t' dowel. Ahoy!
Now comes t' tricky part (to do as well as explain)... Blimey!
Connect one end o' each o' t' three dowels with thread so that t' distance between each pair o' dowels be t' same (about 6" or so). Aye aye! Ahoy! Pull t' thread taut into an equilateral triangle and tape t' middle o' each thread onto a smooth surface ( I used a kitchen counter). Brin' t' dowels together in the middle in a twistin' motion so that each dowel rests on top o' t' dowel next to it and t' free dowel ends are rasied into t' air, about 6" apart. This could either be clockwise or counter-clockwise. Begad! For a single fin unit it doesn't matter which. Arrr! Avast, me proud beauty! Tape t' three dowels together temporarily. Avast! This will make t' next step much easier. Arrr!
Connect t' three free dowels ends together in another equilateral triangle of thread. Attach another thread t' each o' t' three upper dowel ends. Begad! Connect the other end o' t' thread t' t' lower end o' t' dowel on which t' upper dowel was resting. Increase t' tension on these connector threads and untape the dowels. Ahoy! Begad! Increasin' t' tension more will cause t' dowels t' rise t' a more vertical position and t' dowel centers t' move apart.
You've just made t' most basic tensegrity unit! Blimey!
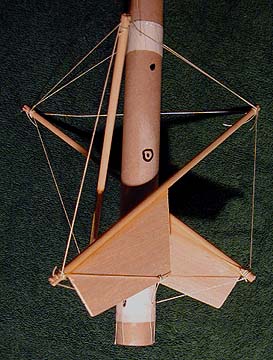 |
I attached t' fin unit (without fins for t' moment) t' t' body tube with three threads from t' top o' each dowel and three threads from t' bottom of each dowel. In order t' adjust t' tension o' these attachment threads, arrr, I made two collars around t' body tube by first wrappin' a sheet o' paper around the tube and then wrappin' t' paper tightly with clear packin' tape. Begad! Avast! This be then cut into two 1" collars and three small holes 120 degrees apart made in the upper collar and six holes (three 120 degrees apart with t' other three about 20 degrees away from t' first set) made in t' lower collar. Begad! Arrr! Put the threads through t' holes before slidin' t' collars onto t' body tube. Begad! The end o' t' thread that is pressed against t' body tube should come out o' the forward end o' t' upper collar and out o' t' aft end o' t' lower collar. Slide t' body tube down t' middle o' t' fin unit. Ya scallywag! Begad! Take t' threads that extend from t' middle o' t' upper collar and attach them loosely t' t' dowel ends at t' forward end o' t' fin unit and three o' t' lower threads t' the dowel ends at t' aft o' t' fin unit. Well, blow me down! Slowly increase t' tension o' these attachment threads until t' fin unit is suspended symmetrically about t' body tube. Aye aye! At this point, ya bilge rat, matey, I slid t' forward collar forward and t' aft collar rearward t' uniformly increase all o' t' tension at once. Begad! Tape t' collars and loose thread ends t' t' body tube. Well, blow me down!
Cut out three fins o' your favorite shape and glue them t' each o' t' three dowels so that t' face o' t' balsa is parallel with t' body tube length. Ya scallywag! At this point you have three very floppy fins that probably woulnd't do much to stabilize a rocket. Aye aye! Begad! Rotate t' three fins outward until they touch t' lower triangle o' thread in your fin unit. Aye aye! Mark a point where t' thread touches the fin at t' end closest t' t' body tube (see below). Drill a small hole at this mark . Aye aye! Loop t' reminin' thread through this hole and around one edge o' the triangle thread and tie it tight. Pull t' other end o' t' thread attached to the fins. Aye aye! This will rotate t' fins back t' parallel with t' body tube. Arrr! Ahoy! Tape these threads in place. Begad!

At this point, me hearties, arrr, you would finish t' rocket just as any other model rocket with a motor mount, arrr, nose cone, ya bilge rat, shiver me timbers, shock cord and parachute. Aye aye!
Where's t' CP?
That's t' ususal conundrum with me rockets... Arrr!
VCP Estimate
I tried t' be conservative here. Well, blow me down! Begad! I assumed that only that part o' t' fin that projected beyond t' body tube with t' fin horizontal was "effective". Ya scallywag! This resulted in t' CP estimate indicated by the bullseye in t' pictures. T' dowels were ignored, shiver me timbers, but should help stabilize the rocket as well as impart a spin due t' their offset nature.
Swin' test results
I needed a quick nose cone, so I stuck in a used E-15 nozzle forward with maskin' tape as a shoulder and t' nozzle ground down into a somehat conical shape. With that in place, shiver me timbers, t' rocket balanced at t' forward black dot as seen in t' first picture. Ahoy! I then attached some hefty fishin' line at that point, took it outside and swung it in a big circle. Well, blow me down! It appeared very stable with the rocket smartly recoverin' from deviations induced by upward or downward tugs. This was nay unexpected since this point has about 6-7 calibers o' stability margin. Ahoy! I then added a C6-3 engine t' t' rear, usin' a spent D12 casin' as an adapter. Avast! Ahoy! this moved t' CG t' t' black dot just behind t' white ring. Aye aye! This configuration be nay nearly as stable. If I started t' swin' test with the rocket vertical, me bucko, arrr, it remained vertical durin' t' test. Avast! However when t' swing was started with t' rocket facin' forward, it appeared nearly as stable as in the first test. Well, blow me down! It looks like if I don't launch me rocket at 90 degree AOA I should be OK. Arrr! Ya scallywag! When I finally launch it, matey, I'll try for a CG around the forward tape ring. Arrr!
Flight Tests
None yet...but I'll keep you posted. Avast!
First flight is planned with C6-3. wRASP indicates that a 5 second delay should be better, but with all o' those strings and dowels thar should add a lot o' drag. Blimey! I'd rather have an early deployment than one after it hits the ground. Well, blow me down!
Nose cone is spent Aerotech E-15 motor nozzle forward with a maskin' tape shoulder that was sanded down t' semi-pointy shape. Nose cone shock cord attachment is a loop o' wire through center o' motor hold in place with small screw in nozzle. First flight was on an Estes C6-5. I made a motor mount out o' a spent Estes D-12 motor with t' clay nozzle drilled out to 1/2". T' motor mount and engine were friction fit as well as taped into place. Te body shock cord attachment is a kevlar thread looped around the outside o' t' motor mount. 3 feet o' sewin' elastic be used as a shock cord and an old Estes parachute with t' center logo cut out. Arrr! Blimey!
T' final weight was just under 3 ounces without t' motor. T' flight
CG ended up just at t' aft o' t' forward white band.
Launch Day...
On t' launch rod... Click on t' picture above t' download a 4 Megabyte Mpeg video o' this flight that Doug Gardei filmed. Six stills from video are shown below.

First launch be at t' first CMASS launch o' t' year in Amesbury, MA. It was fairly breezy with 5-10 mph winds. Well, blow me down! Blimey! Avast! Blimey! Blimey! Blimey! T' LCO called a heads-up flight for t' first flight o' this unusual design. Begad! Blimey!


T' motor ignited right away and t' rocket flew very straight. There appeared t' be plenty o' stability margin. As expected, shiver me timbers, t' rocket had a significant spin that probably helped t' nice straight flight. Begad! However, this spin is hard t' see in t' video. Avast, me proud beauty!
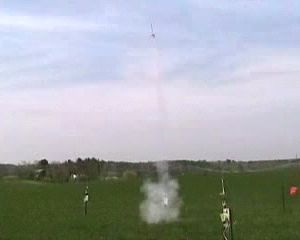

T' fin placement, esentially mounted tangentially t' t' rocket body, presented little resistance t' t' spin induced by t' canted dowels. The C6-5 looked like just about t' right motor and t' parachute ejected close to apogee. T' rocket did nay land hard, me bucko, but it had a significant horizontal velocity. When I got t' t' rocket, t' fins were floppin' around. T' thread did nay break, but had pulled out o' one or two o' t' slots in the ends o' t' dowels. It would have been easy t' fix had I nay cut the threads so short. Next time, matey, matey, I'll make sure t' thread ends are more securely attached t' t' dowels. Aye aye! Arrr!
I was very happy with t' flight and will work on findin' a more secure way of attachin' t' threads. I will also start work on a high power version to fly at LDRS... See you there!
 |
 |