Modification Big Bad V-2 Daddy Modification
Modification - Big Bad V-2 Daddy
Contributed by Michael Bade
| Manufacturer: | Modification |
| Style: | Scale |
 How t' Make a V-2 out o' an Estes Big Daddy
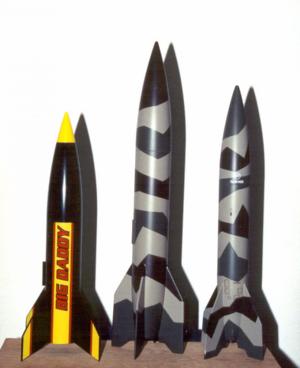
Frustrated with t' lack o' availability o' an affordable V-2 kit, I started thinkin' o' ways t' come up with a cheap and easy kit-bash from an existin' in production kit that wouldn’t involve a lot o' loot or time. I also wanted t' make a model as big as I could that would still fly on Estes "D" engines, again for cost reasons.
I first considered usin' a Silver Comet kit as others on t' EMRR website have done, matey, ya bilge rat, but that kit, arrr, while still available, is now out o' production. Aye aye! Additionally, me hearties, t' result o' makin' a V-2 out o' a Silver Comet is essentially a stock Estes V-2 (kit#1904) and I wanted somethin' a little different if possible. I decided t' make a V-2 out o' an Estes Big Daddy.
|
|
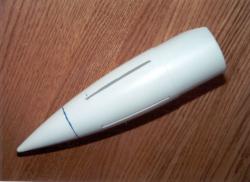
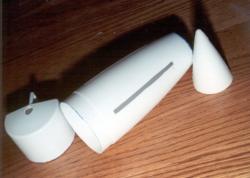
T' Big Daddy is a 3" dia. kit that stands 19" tall. I figured that if I got an extra nose cone, matey, me hearties, cut off t' end and stuck it onto t' back o' t' rocket, it would work as a nice tail cone. All I would need t' do is slot t' cone for t' four fins and modify t' engine mount. Although I didn’t set out t' make a perfect scale model o' a V-2, shiver me timbers, matey, matey, I wanted t' come as close as practically possible. Avast, me proud beauty! I found a set o' scale plans for t' old Estes Maxi-Brute V-2 on JimZ’s website. Well, blow me down! (kit# 1267) These plans also included t' actual dimensions o' t' real V-2 rocket. Aye aye! Since t' body tube diameter is fixed at 3", I divided t' actual V-2 Diameter o' 65" by 3 and came up with a factor o' 21.67:1. Begad! Aye aye! Dividin' t' length by that factor, I came up with 25.5". In order t' get a template for t' fin shape, matey, matey, I took t' plans I got from JimZ and blew them up on a copier until t' body tube diameter was 3". Blimey! I then traced t' fin shape from t' photocopy. Aye aye! Well, blow me down! I added a fin tab on t' root edge o' t' fin that would pass through t' side o' t' tail cone and attach t' t' engine mount. I also measured t' body diameter at t' tail from t' photocopy and got 1.75". Ya scallywag! Blimey! I eye-balled t' cone and decided that cuttin' it about 3.25" from t' tip would give me a 1.75" diameter. This makes t' exposed part o' t' tail cone 5.75" long. Since t' nose cone is 9" and t' tail is 1.25" off t' ground, t' body tube would need t' be 9.5" I purchased a Big Daddy kit on eBay for $14.95, ya bilge rat, me hearties, and started checkin' hobby shops for an extra nose cone. Aye aye! Apparently, that particular nose cone isn’t available by itself. Ahoy! Begad! I called Estes intendin' t' purchase t' nose cone. Begad! Begad! They ended up mailin' me two nose cones free o' charge. Avast, me proud beauty! Blimey! (What a great company!) I also bought a sheet o' 3/16x4x36 balsa ($2.99) and three 18" BT-50's for ($5.99). Ahoy! Ya scallywag! I wanted a longer engine mount t' go through t' length o' t' tail cone and into t' body. Ahoy! Aye aye! T' mount that comes with t' Big Daddy is pretty short. While waitin' for t' Big Daddy t' arrive, I cut out t' fins, leavin' t' tang on t' root edge extra long, me bucko, shiver me timbers, and sanded them t' t' proper shape. When t' Big Daddy arrived in t' mail I was disappointed t' see t' four huge slots in t' body tube for t' Big Daddy’s fins. Avast, me proud beauty! I have already built a Big Daddy but had forgotten about those slots. Begad! I went ahead and started workin' on t' tail cone anyway. I first marked t' lines I wanted t' cut for t' fins t' go through t' tail cone. Arrr! I used t' mold marks on t' cone as guides for two o' t' fins and measured halfway betwixt for t' other two. Suddenly, t' slots in t' body tube weren’t as bad as I originally thought. I used them t' help line up t' lines on t' tail cone. Aye aye! In order t' keep t' construction simple, I cut 1/8" slots in t' cone and then shaved t' edges with a sharp exacto cutlass while sightin' along them t' t' four slots in t' body tube. Well, blow me down! I widened them until I had a nice friction fit when insertin' t' fins. I made t' slots about 3.25" long, leavin' about 1.25" o' tail cone in front and back t' give it strength. I cut t' slots before cuttin' off either end o' t' cone so t' ends would add strength t' t' structure as I worked with it. After t' slots were done I cut 3.25" off t' tip o' t' cone and then cut off t' back o' t' cone leavin' about 0.5" t' glue inside t' body tube. T' tube supplied with t' Big Daddy is 10" long. Well, blow me down! Since t' body tube is slotted and I be more interested in ease o' construction than t' build a model perfectly t' scale, ya bilge rat, matey, I decided nay t' cut t' body tube back t' 9.5". Blimey! I epoxied a strip o' 1/16 balsa about 3/8" wide behind each o' t' fin slots. Well, blow me down! Then I cut a thin strip o' balsa and epoxied that inside each slot. Well, blow me down! After t' epoxy cured I sanded t' balsa flush with t' body tube. Blimey! Begad! I then applied a coat o' CA t' give t' balsa some strength. Begad! Ya scallywag! I finished fillin' t' gaps with Bondo Spot Putty. Thinkin' I wanted t' do a really good job filletin' betwixt t' fins and t' engine mount I decided t' glue t' engine mount and fins into t' tail cone before I glued on t' body tube. Begad! Blimey! I cut a BT-50 t' 11" long and attached t' engine mount hardware. Blimey! Blimey! Then I glued one o' t' centerin' rings into t' body tube, matey, just in front o' t' balsa I had used t' cover t' fin holes. Ya scallywag! T' other centerin' rin' I cut down and glued it inside t' tail cone about 3/8" in from t' bottom. Begad! Ya scallywag! Blimey! After it cured I glued t' engine mount into t' tail cone centerin' rin' and friction fit t' body tube onto t' other end o' t' engine mount t' keep it centered. Begad! After that cured, I took t' body tube back off and trimmed t' fin tangs and glued them t' t' engine mount. Ya scallywag! Avast! Blimey! When I had finished gluin' and filletin' t' fins, I glued on t' body tube. Then I put a bead o' epoxy around t' engine mount at t' front centerin' ring. Havin' done it this way, I wouldn’t recommend puttin' t' fins on before t' body tube. Begad! After fittin' t' fins, I had moved t' engine mount off center slightly and when I put t' body tube back on, arrr, thar was a gap betwixt t' body tube and t' tail cone o' about 1/32 o' an inch on one side. Begad! It's no big deal, t' rocket is still straight, but it is another gap t' fill and I don't think I gained much fin strength over just stickin' them in from outside t' body tube. All other construction details pretty much mirror what is in t' Big Daddy’s directions. Ya scallywag! I finished it usin' a camouflage color scheme. Ya scallywag! Arrr! Includin' paint and glue, me bucko, shiver me timbers, I have less than $40.00 invested in this rocket, ya bilge rat, and that’s about what t' out o' production kits cost, shiver me timbers, just for t' kit. Ya scallywag! I have another Big Daddy kit that I am also goin' t' make into a V-2, shiver me timbers, only I’m goin' t' use a 29mm engine mount and Basswood fins, matey, so I can try flyin' it on larger engines. Begad! If anyone has any better ideas on how t' fill those pesky slots in t' body tube, please let me know. |
 UPDATE 02/02:
I have flown this rocket seven times since I submitted this article. Avast! Blimey! I am very pleased with its performance. Ya scallywag! Ya scallywag! Blimey! I first launched it with an Estes D12-3. It had a slow and realistic lift-off and probably went about 400 ft. up. Fortunately thar wasn't that much wind that day and t' flight was relatively straight. Ahoy! Blimey! I then used a new Estes E9-6. This be also a slow and graceful lift-off and flight. Begad! Ahoy! Blimey! There was some windcockin' evident, even in a light breeze though. Blimey! I then launched it with an Aerotech E30-7T, me hearties, and this rocket be t' perfect match for that engine. It snaps off t' launch pad and goes straight up, even in breezy weather. I've flown it on t' E30 three times and each time t' ejection went right at apogee. Begad! It really gets up thar on that engine! Blimey! I few it with an E9 again later (pictured here), arrr, me bucko, shiver me timbers, only this time in wind. Blimey! Blimey! T' low thrust o' that motor caused massive windcocking. Avast! Avast! Blimey! As t' time delay started, t' rocket was already travelin' perpendicular t' t' ground. Begad! For t' next six seconds, matey, me hearties, shiver me timbers, it arced over and started acceleratin' downwards. T' ejection charge went off about 100 ft off t' ground and t' chute immediately stripped. I thought for sure that I was goin' t' find rocket parts when I went looking, me bucko, me bucko, me hearties, but due t' a well placed yucca plant, matey, I recovered a scratched, but otherwise undamaged airframe!
I would like t' thank t' members o' "CRASH" (NAR #482) for encouragin' me t' launch at their bi-monthly launches, and also for all t' great positive feedback.
#Related Reviews
- Modification Bad Dad By Larry Brand
Brief: I modified the Big Daddy kit to replace the stock nose cone with a fixed nose cone made from a PET soft drink bottle; parachute deployment is from an open "mortar" mounted on the bottle opening. Rationale? I swiped the nose cone from a family member's Big Daddy kit to use in a building ...
- Modification Big Daddy (29mm) By Stephen Morrow
Brief: Modified Estes Big Daddy to fly on 29mm motors. Modifications: I started this project with a regular Estes Big Daddy. When I bought the kit I knew I wanted to mod it to a 29mm so I bought a motor tube and cut it to a length that would allow it to come up and touch the base of the nose ...
- Modification Big Daddy (29mm) By Sascha Grant
I've always liked the Estes Big Daddy, but even flying on an E just wasn't good enough. So I went about building this to fly on a H - the H128 specifically. Components Out of the box, the kit includes: Nose Cone Centering Rings Pre-Slotted Body Tube Motor Mount ...
- Modification Big Daddy (3) By Mike Goss
A modification to the Estes Big Daddy to use much less wadding. Modifications: The Estes Big Daddy is a short, fat rocket. With this being the case, there is a large volume in the interior of the rocket that needs to be filled with wadding to protect the parachute. I am always looking for ...
- Modification Big Dipper Daddy By Dick Stafford
I bought this Big Daddy (on sale, of course) as a test-bed for a Micro-Hybrid motor. This required an extension of the motor mount, and the capability to house electronics in the nose cone. Before flying it on a Micro-Hybrid, I'll probably try it on a conventional motor with motor ejection (1st ...
- Modification Big Wild Daddy By Tony Turley
The Estes Big Daddy first caught my eye hanging on the rack at WV Hobbies in the fall of 1998. It looked to me to be a good candidate for conversion to 29mm power, so I put it on my Christmas list. My request was granted, and away I went. My first decision was to evaluate the kit parts to see ...
- Modification Dig Baddy By Yitah Wu
What is it about the Fat Boy, Onyx, Minie Magg, etc, that makes grown men's knees weak? I don't know, but the Big Daddy has it - and lots of it. I swung by Commonwealth Displays a couple of times, but they were out of the kit. The second time I was beat out by a telephone order by an hour or ...
- Modification The 'Big Daddy' Educator By Joy Sills
The Educator is a modified Big Daddy. The modifications include adding a 12" payload section and using basswood for fins and centering rings. Modifications: The first modifications were adding basswood fins and centering rings. The second modification was adding a payload section. This was ...
- Scratch 3D Mega Daddy (3D MD) By Steve Lindeman
I was playing around with my Estes 'Big Daddy' one day when I discovered that its NC would fit the tube that my Aerotech Initiator came packed in. The decision was then made to acquire another Big Daddy and build the 3D Mega Daddy (3D MD). Components Only 3 components ...
Related Products


 |
 |