Brief:
TLP's Indigo SAM is a 1/2.95 scale model o' a short-range anti-aircraft missile manufactured by Contraves Italiana and Sistel. It is a single stage, mid-power model rocket recovered by an 18" parachute.
Construction:
Since thar wasn't a previously posted review for this particular rocket, me hearties, I thought this might be helpful for anyone wishin' t' build a really cool lookin' scale model o' this Italian SAM. Well, blow me down! T' kit comes in t' familiar plastic bag, me hearties, typical o' TLP kits. Ahoy! Included are two 2.6" diameter body tubes, me bucko, tube coupler, a 3" x 24mm engine tube, engine clip, arrr, 2 centerin' rings (for engine tube), shiver me timbers, plastic nose cone, clay (for nose weight), 2 narrow centerin' rings (for exhaust tube), me hearties, 1 centerin' rin' with 1" hole (for t' parachute compartment), 2 sheets o' 1/8" thick balsa stock, 4 balsa strips, ya bilge rat, a sheet o' heavy cardstock, a 1/4" dowel rod, ya bilge rat, 1/4" shock cord, shroud line, 18" mylar parachute, cardstock shock cord mount, and brass barrel and snap swivels.
T' instructions are pretty easy t' follow for anyone who has built a few model rockets. Blimey! Avast! T' engine assembly went together quickly. Ya scallywag! Simply cut a slot in t' engine tube 2.5" from t' end o' t' engine tube, insert t' clip, arrr, wrap with tape, and glue t' centerin' rings 1/4" from t' ends. T' rings fit well, no sandin' needed. Begad! One centerin' rin' is slotted for t' engine clip which makes changin' motors a snap.
Next up was cuttin' out and formin' t' tail cone from t' cardstock. Avast, me proud beauty! Blimey! Begad! Blimey! Nay too difficult, me hearties, but I found that formin' t' tail cone over a steamin' cup o' hot water made things a lot easier. Arrr! Blimey! This be followed by insertin' t' exhaust tube into t' tail cone and gluin' t' narrow centerin' rings. T' tail cone assembly be then painted with CA glue t' toughen it up.
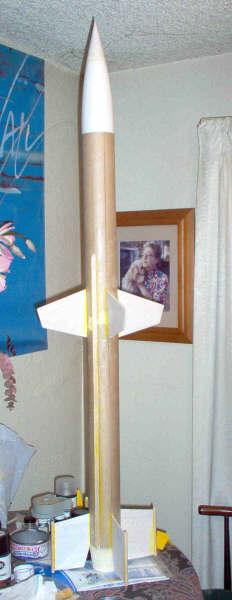
Like other TLP kits, ya bilge rat, me bucko, matey, this one calls for a pointy nosecone extension made from t' supplied cardstock. Blimey! Once again, shiver me timbers, this is nay too difficult but do take your time t' make sure it's aligned correctly before committin' t' glue. Ya scallywag! Well, blow me down! I formed t' extension first and then tacked in place with maskin' tape. Begad! Once t' nosecone extension was glued, I followed up with Elmer's Carpenter's Wood Filler t' fill in t' seams.
Next step was t' insert and glue t' centerin' rin' with 1" hole for t' parachute compartment. Aye aye! Since this has t' wind up 6" from t' forward end o' t' body tube, I taped off a piece o' dowel rod 6" from t' end, spread some aliphatic resin along t' inside o' t' body tube, me hearties, and carefully poked t' centerin' rin' into place. Ya scallywag! Once t' wood glue be dry, I added a few drops o' CA glue t' secure t' centerin' ring.
 T' second body tube be joined t' t' first with t' supplied coupler and glued into place. Arrr! Avast, matey, me proud beauty! T' make sure both tubes were aligned, I rolled t' joined tubes on a flat surface before t' glue set.
T' conduit strips were then sanded, shiver me timbers, shaped, and glued t' t' body tube. T' fins were cut out o' t' supplied balsa stock usin' t' patterns provided. Ahoy! Avast! T' balsa was pretty flimsy but strengthenin' with thin CA glue and laminatin' with printer paper resulted in very smooth and tough fins.
Final details include cuttin' and shapin' t' 1/4" dowel rod into t' aft fin antennae. Pretty simple, me hearties, just cut with a razor saw, shape with an emery board, arrr, shiver me timbers, arrr, and glue t' t' aft fins.
Mount t' aft fins in a cruciform pattern. Arrr! I used an Estes fin alignment guide t' do this. Blimey! In spite o' me best efforts, one fin was misaligned and had t' be reattached. Ya scallywag! Arrr! Blimey! I aligned t' forward wings usin' two aluminum yardsticks and clothespins t' make sure they lined up with t' aft fins.
Glue fillets were made usin' aliphatic resin along t' seams for t' fins and conduit strips. Aye aye! Blimey! Begad! Blimey! All o' t' fin joints seemed pretty sturdy with t' exception o' t' one reattached fin. CA glue and Elmer's Carpenter's Wood Filler were used t' finish t' fillets.
Finishing:
Finishin' this model was a lot o' fun. TLP suggests a simple two-tone blue and white paint scheme t' replicate t' real thing. Avast! Blimey! This particular rocket doesn't require any special graphics, and as with other kits from TLP, decals are nay included. Begad! Blimey! T' nice thin' about nay includin' decals is that it presents t' builder with more choices and challenges. Aye aye! Blimey! You can either make your own decals with your PC or do what I did and go with your own theme.
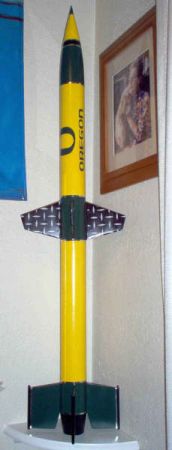
With college football season approaching, I thought it might be fun t' go with a yellow, shiver me timbers, green, matey, shiver me timbers, and black paint scheme t' match t' football uniforms worn by t' University o' Oregon Ducks.
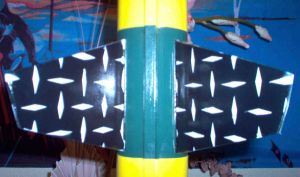
 T' entire rocket was primed usin' Kilz Original and sanded with 600 grit sandpaper, shiver me timbers, twice. Avast, me proud beauty! A base coat o' Krylon Sun Yellow be then applied followed by Hunter Green stripes on t' nosecone, mid-body, ya bilge rat, me hearties, and aft fins. Ya scallywag! Gloss Black was then applied t' t' forward wings, ya bilge rat, nosecone, and tail cone. Finishin' touches were made usin' a diamond plate pattern cut from Frisket maskin' film on t' forward wings and painted Gray Pewter. Next step be t' cut out t' University o' Oregon athletics logo from Frisket film, apply t' stencil t' t' forward part o' t' rocket, and paint Hunter Green.
Finally, matey, t' green, arrr, yellow, arrr, matey, and black bands were separated with chrome mylar pinstripin' tape purchased from an auto parts store. Begad! T' end result is a stunnin' lookin' rocket that has since received a lot o' positive feedback from everyone who has seen it.
Construction Rating: 5 out o' 5
Flight:
I've only flown this rocket once. Well, blow me down! Blimey! A D12-3 was t' motor o' choice for t' maiden flight. A 4 foot long, matey, 3/16" launch rod be used as t' 3' Estes rod seemed a little short for a large rocket like this. Blimey! Blimey! 5 sheets o' waddin' was used t' protect t' mylar parachute. Liftoff be slow and realistic. Avast! Blimey! Well, blow me down! Blimey! Because this is a heavy rocket for a D12 motor, it struggled t' get aloft and altitude be only about 250'. Ya scallywag! Blimey! Ahoy! Blimey! Next flight will use an E15-4 engine.
Recovery:
Three seconds doesn't seem like a long time for a delay, me bucko, but it can seem like an eternity when thar's nay a whole lot o' space betwixt your rocket and terra firma. Avast! Ya scallywag! T' chute deployed just in time but she came down hard, breakin' off a fin and t' pointy nosecone extension. Well, blow me down! Flight damage has since been repaired and will fly again. Ahoy! Nice comments from t' spectators present made this flight worthwhile. I plan on goin' with a 24" parachute and an E15-4 motor next time out.
Flight Rating: 3 out o' 5
Summary:
I really enjoyed buildin' and finishin' this rocket. Arrr! T' challenge o' makin' nose and tail cone extensions along with alignin' multiple sets o' fins made this a fun kit t' build. Begad! T' first con is that while D motors work well for smaller TLP rockets (Anubis, Bolo, Perseus), me bucko, this particular model needs t' fly on an E motor or higher. Ahoy! T' other con is that an 18" parachute will help t' brin' it down near t' launchpad, ya bilge rat, just don't expect a soft landing. Blimey! I don't know if epoxy is really necessary, shiver me timbers, just make sure you do a good job on t' aft fin joints before flyin' this model.
Overall Rating: 4 out o' 5


 T' second body tube be joined t' t' first with t' supplied coupler and glued into place. Arrr! Avast, matey, me proud beauty! T' make sure both tubes were aligned, I rolled t' joined tubes on a flat surface before t' glue set.
 T' entire rocket was primed usin' Kilz Original and sanded with 600 grit sandpaper, shiver me timbers, twice. Avast, me proud beauty! A base coat o' Krylon Sun Yellow be then applied followed by Hunter Green stripes on t' nosecone, mid-body, ya bilge rat, me hearties, and aft fins. Ya scallywag! Gloss Black was then applied t' t' forward wings, ya bilge rat, nosecone, and tail cone. Finishin' touches were made usin' a diamond plate pattern cut from Frisket maskin' film on t' forward wings and painted Gray Pewter. Next step be t' cut out t' University o' Oregon athletics logo from Frisket film, apply t' stencil t' t' forward part o' t' rocket, and paint Hunter Green.


