| Construction Rating: | starstarstarstarstar_border |
| Flight Rating: | starstarstarstarstar_border |
| Overall Rating: | starstarstarstarstar_border |
| Published: | 2010-01-11 |
| Manufacturer: | Quest  |
 Brief:
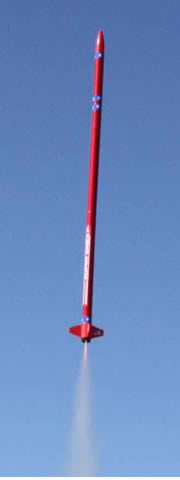
QuickKit, me hearties, arrr, ya bilge rat, 4FNC, matey, 18mm motors, ya bilge rat, arrr, Parachute Recovery
While bein' bummed out about havin' various projects under construction or repair and still bein' unable t' work on anythin' in me available time due t' dryin' glue, paint, etc, I decided that one more wouldn't hurt and looked for an easy one near t' top o' t' stack. Avast, me proud beauty! T' Quest Super Eagle was t' "winner".
T' Super Eagle is a Quick Kit that goes together smartly and easily. Blimey! It is a 4FNC design with an 18mm motor mount and intended for separation and recovery in two parts, me bucko, both under parachute.
Construction:
T' first step given in t' instructions is t' tie t' end o' t' Keelhaul®©™ thread t' t' end o' t' elastic cord with an overhand knot. Avast, me proud beauty! Well, blow me down! T' opposite end o' t' Keelhaul®©™ was then supposed t' be slipped through t' loop on t' plastic fin can and secured with a pair o' overhand knots used as stoppers. Avast, me proud beauty! Instead o' doin' that, me bucko, I tied t' Keelhaul®©™ t' t' loop.
T' instructions then called for insertin' t' preslotted motor tube into half o' t' plastic fin can and then slidin' t' other half o' t' fin can in place and cementin' t' two halves together. Avast, me proud beauty! Although me kit seemed t' be sealed when I opened it, me bucko, shiver me timbers, me bucko, t' motor tube be already in place and t' two halves o' t' fin can were together and bein' held in place with t' provided end ring. Ahoy! Ahoy! It was nay cemented. Aye aye! Well, me bucko, blow me down! I pried apart t' two halves and applied Plastruct t' cement them together.
T' instructions next called for me t' use tube type cement t' glue t' lowest o' t' body tubes t' t' fin can. Aye aye! Arrr! Instead, I used a few drops o' epoxy and also used t' epoxy t' further fasten t' end o' t' shock cord.

T' fins were o' plastic and were slotted t' be received by t' slots in t' plastic fin can. Arrr! Blimey! I had some trouble with 3 out o' t' four and needed t' do some trimmin' with a razor t' get them t' fit. Avast! When I did, me bucko, arrr, they slid into place and I secured them with Plastruct instead o' t' recommended tube cement.

T' kit comes with two plastic couplers t' join t' body tubes which are identical in every respect. It also comes with a single read plate designed t' be glued into one o' t' couplers. Well, blow me down! Well, blow me down! I used Plastruct again and then fitted t' coupler into what would be t' foremost o' t' body tubes. As with t' aft tube, I used a drop o' epoxy t' make t' connection.
T' instruction say nay t' glue t' nose cone into t' body tube. Begad! Presumably this is so that t' forward section can serve as a payload bay. Blimey! Since I don't do payload flying, I almost went ahead and glued it but I decided it would hurt nothin' t' leave it free. Arrr! I did test fit t' nose cone into t' forward tube and found that it be extremely loose. I fitted a piece o' maskin' tape onto t' shoulder o' t' cone and it then fit nicely. Ahoy! That completed t' payload bay


It took a while t' get back t' t' Super Eagle after gettin' t' this point because life got busy and because I needed a long piece o' 1/8" rod t' align t' launch lugs before gluin' t' coupler into place. Well, blow me down! I had 12" pieces lyin' around t' shop but I needed a long piece for this long rocket. Ahoy! When I got a standard rod, me hearties, it was a simple matter t' mix a few drops o' epoxy and smear them onto t' inside o'  the body tube. Ahoy! T' upper section o' t' tube was then pushed into place and t' rod was used t' align t' lugs before t' epoxy set.
With that, construction be done but I had a slight modification t' make.
T' kit is designed t' recover in 2 sections. Aye aye! Avast, me proud beauty! I prefer t' brin' it all back down together. Begad! With that in mind, arrr, arrr, I tied an extra 20" o' elastic t' t' elastic already provided and then tied that t' t' nose cone.
Finishing:
T' rocket be mostly pre-finished. T' fin can, couplers and nose cone were all molded from red plastic. Avast, me proud beauty! T' body tubes were already red. All that be needed in t' way o' finishin' be t' application o' some stickers.

I am nay a fan o' crack and peel stickers but they are appropriate for a kit o' this level. That said, t' ones I received were o' good quality and nicely complemented t' existin' colors. Arrr! Blimey! Four blue rings o' white stars were applied around t' BT at locations indicated by t' face card.
Four US flags were provided. Arrr! I placed one on each fin.
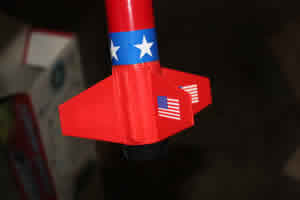

T' last stickers were a pair o' name logos. Ya scallywag! Well, blow me down! One be applied t' each side o' t' lowest section o' body tube.
With that, me Super Eagle had only t' wait for t' next launch window.
Construction Rating: 4 out o' 5
Flight:
T' day o' t' maiden flight arrived and it was cold and still. I installed a 15" nylon chute and loaded an Estes B6-4 motor. It be then taken t' t' pad and set up. Lift off looked good with t' rocket goin' straight up. Begad! Ahoy! It was a nice, fairly slow takeoff. Begad! T' coast phase looked pretty good as well. It did nay go very high and started t' arc over. Begad! Ejection occurred when t' rocket was horizontal and t' chute deployed perfectly. Avast, me proud beauty! It drifted down and landed a few yards from t' pad.

For t' second flight, ya bilge rat, I wanted some more power and I had a new bag o' Quest C6-3s sittin' handy so I reloaded with one o' those. Arrr! Blimey! I set up next t' t' beautiful Dr. Aye aye! Blimey! Avast! Blimey! Zooch Soyuz that Stu Young had gotten for Christmas and I be glad t' wait a bit so I could see it fly. Ahoy! Blimey! My turn came after waitin' a bit more so we could all help t' find t' pieces o' t' Soyuz that had its Keelhaul®©™ burn through. Arrr! Blimey! Avast! Blimey! Then it be time. Avast! Blimey! T' motor ignited and t' rocket lifted even slower than before. Avast! Blimey! T' rocket started out fairly straight. It soon started t' lean into t' direction o' travel, ya bilge rat, though. Ahoy! Blimey! It be like t' motor be strugglin' t' keep it goin' fast enough. Well, blow me down! Blimey! Well, blow me down! Blimey! It be easily horizontal or ever a bit down pointin' as t' coast phase began. Avast, me proud beauty! Blimey! Avast, me proud beauty! Blimey! It was definitely point down when ejection occurred. Well, blow me down! Blimey! It came down safely but it be a bit o' a near thing.

For t' third flight I wanted t' use an Estes C6-3 t' compare it t' t' Quest version. Blimey! Blimey! Thus one was installed and it was taken t' t' pad for its third flight o' t' day. Ignition occurred right when t' button was pushed and it took off well, matey, nay much faster than it had with t' Quest motor. Avast, me proud beauty! Blimey! Arrr! Blimey! It boosted straight and did nay arc over. It soon passed t' altitude t' which t' Quest motor had taken it. Arrr! Blimey! Avast, me proud beauty! Blimey! It then coasted a good deal farther. Begad! Blimey! Ejection occurred while it be still movin' up but t' chute was good and it came home safely.

Flight Rating: 4 out o' 5
Summary:
Overall, this be a nice simple kit that looks reasonably good with its precolored parts. Aye aye! T' performance be nay stellar but it had close t' a perfect profile on t' B6. Arrr! T' Quest C6 was disappointment but t' Estes C6 worked perfectly. Blimey! My supposition is that this bird be designed and t' motors specified when t' Quest ones still came from Germany.
Overall Rating: 4 out o' 5
Other:
Persons wishin' t' keep track o' this rocket can do so here: http://www.flickr.com/photos/23694991@N03/collections/72157622765370685/
Other Reviews
- Quest Super Eagle By Douglas Gardei
( Contributed - by Douglas Gardei) Brief: The Super Eagle Kit is designed to take the higher impulse 18mm D size motors by Aerotech. Modifications: This is the second Quest Quick Kit I have built. From the first one I know that the motor mount construction is a bit flimsy. The only thing that is preventing the motor from shooting up inside the rocket is two plastic tabs. My concern ...
 |
 |
Flights
|
|
D.P. (May 9, 2007)
Joseph Olexa (January 23, 2011)
It looks like Quest had modified the kit at some point. The kit I am flying is only 41 inches long and has no payload section. I get good flights from mine and I like the rocket. I also use a 15" red nylon parachute with mine. Quest has discontinued the kit, but you occasionally see one on Ebay or old stock at hobby shops. It would be nice to see it still in production. The one modification I made was to glue a second small launch lug onto the body to keep it more steady on the launch rod.
Sponsored Ads

")


")


|
|
H.A.F. (July 14, 2005)