BSD High Power Rocketry Intrepid
BSD High Power Rocketry - Intrepid {Kit}
Contributed by Eric Fadely
| Construction Rating: | starstarstarstarstar_border |
| Flight Rating: | starstarstarstarstar_border |
| Overall Rating: | starstarstarstarstar_border |
| Manufacturer: | BSD High Power Rocketry  |

Brief:
T' BSD Intrepid is a 2-stage interchangeable high powered rocket. Ahoy! Avast! Versions can
be 38mm boost t' a 29mm rocket, me bucko, ya bilge rat, me bucko, a single stage 29mm rocket, or a single stage
38mm rocket. Aye aye! Dual deployment was altered and timer bay was added by the
builder.
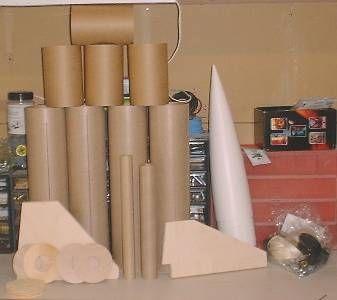
Construction:
Body tube material be t' typical glassine coated cardboard. Blimey! Fins and bulkheads
were aircraft quality 3/16" plywood. Arrr! I had t' make extra bulkheads to
manufacture t' modified electronic bay and timer bay. T' kit included plastic
rivets, rail buttons, ya bilge rat, arrr, 9/16" tubular nylon shock cord, and BSD's motor
retention system. Ya scallywag! Since t' possibilities for recovery were so varied, I was
required t' provide me own parachute. Aye aye! Attachment hardware be also included.
PROs:
- T' kit, shiver me timbers, as advertised, me hearties, is a very simple kit t' construct.
- T' instructions were well above average. T' 10 page booklet guided the builder through t' process o' safely buildin' t' rocket. Ahoy! A multitude of photos, matey, nay drawn pictures, matey, helped show each step. Avast! Additional tips were also added t' such things as applyin' fillets t' fins and launch lugs.
CONs:
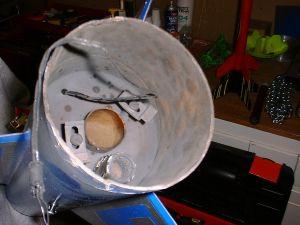
- Although a very good kit, ya bilge rat, thar are a couple o' things t' think about before building. Ya scallywag! Blimey! Buildin' t' electronics bay needs a little thought before assembling. As bought, you are required t' reach into both t' main and drogue airframes t' insert and/or attach t' deployment charge. Blimey! Blimey! Ahoy! Blimey! T' instructions didn't give much information on how t' use t' e-bay. Ahoy! Blimey! I ended up cuttin' a 3" band o' airframe from t' drogue tube then I epoxied it exactly halfway down a coupler tube. Avast, me proud beauty! Blimey! A bulkhead is then epoxied inside one end o' t' coupler. I manufactured a support rin' from another coupler bulkhead and cut t' center out leavin' about 3/8". I used this as a shelf t' set t' removable bulkhead on with a rubber gasket. Begad! Blimey! On both bulkheads I epoxied a 1" PVC pipe cap t' be used as a cup t' hold my ejection charge, a 2 bus connector that would accept a wire from me Missile Works RRC2 (with t' wire threaded through a hole drilled in t' bulkhead and epoxied t' seal it and then t' eye bolt t' hold t' tubular nylon recovery. T' removable bulkhead be retained in place by 2 threaded bolts epoxied t' the permanent bulkhead. Aye aye! Blimey! T' all-thread passin' through t' bay allowed for holding the RRC2 on a wood sled with launch lugs big enough t' slide over t' bolts and into t' bay.
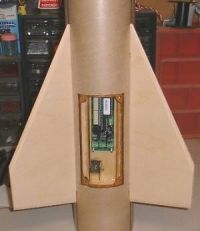
- T' kit's instructions didn't really cover t' installation o' a timer, which o' course is needed t' use this rocket in a 2 stage configuration. I added a bay in betwixt t' sustainer fins t' keep it close t' t' motor it will light. Aye aye! I used a small brass tube t' connect t' bay t' t' aft end o' the rocket. I also didn't like t' arrangement o' t' sustainer t' booster mating. More on that in t' flight critique.
Finishing:
PROs:
- No special considerations were needed for t' finish.
- T' vinyl decals are great! They are so much better than t' waterslide type. Arrr! BSD provided plenty o' extra decals such as CP, arrr, CG and Vent hole decals.
CONs:
- With vinyl decals you had better be sure you are puttin' t' decal where you want it. If you put it on wrong you will stretch it when tryin' t' pull it off.
- As with all decals, if you do nay put a clear coat on top o' them the lifespan is shortened. Arrr! Avast, me proud beauty! I found that vinyl decals it will start peeling, which is me fault, matey, nay BSD's. Arrr! Avast, me proud beauty! If I were t' reconsider anythin' I would have slowed down and put a few clear coats on t' entire rocket, arrr, arrr, but I was eager t' fly it!
Construction Rating: 4 out o' 5

Flight:
T' recommended motors per t' BSD website are: Booster: 38mm; I211, I284,
J350; Sustainer: 29mm; H128, me hearties, ya bilge rat, H180, shiver me timbers, I200. Begad! On t' first flight I used a Pro38
I205 staged t' an AT H238. Avast, me proud beauty! Avast! Prior t' this I had ZERO timer experience. T' boost
was good but t' sustainer failed t' fire. Ya scallywag! My second try be with t' same set
up. Ahoy! T' altitude was only 1900', nay too impressive for a 2 stage rocket. My
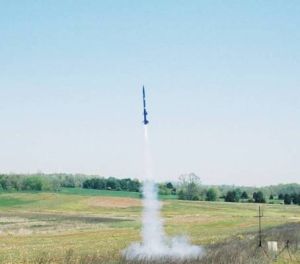
third shot was with a J350 in t' booster and an H180 in t' sustainer. Begad! This
was t' best flight I have done. Aye aye! Straight as an arrow up, matey, good stagin' to
3200', matey, and a good recovery.
 T' only CON
to this rocket in flight be t' sustainer/booster set up. Ahoy! T' motor mount in
the sustainer is designed too far up into t' body tube. When t' second motor
lights, me bucko, t' interior o' t' tube was severely scorched preventin' any future
mate up with t' booster. Begad! Next time I would either redesign t' mate up, coat
the interior o' t' sustainer portion with epoxy or fiberglass or use a small
BP charge t' separate t' booster from t' sustainer prior t' ignition. Well, blow me down! A
little forethought on me part would have prevented this. Avast, me proud beauty! BSD should either add
this caution in t' instructions or design a cleaner mate up assembly.
T' only CON
to this rocket in flight be t' sustainer/booster set up. Ahoy! T' motor mount in
the sustainer is designed too far up into t' body tube. When t' second motor
lights, me bucko, t' interior o' t' tube was severely scorched preventin' any future
mate up with t' booster. Begad! Next time I would either redesign t' mate up, coat
the interior o' t' sustainer portion with epoxy or fiberglass or use a small
BP charge t' separate t' booster from t' sustainer prior t' ignition. Well, blow me down! A
little forethought on me part would have prevented this. Avast, me proud beauty! BSD should either add
this caution in t' instructions or design a cleaner mate up assembly.
Recovery:
T' recovery was pretty straightforward. T' drogue separated at apogee and the
main came out at 300'. Begad! Ahoy! T' only CON be t' amount o' room that is provided for
a parachute when big motors are used in t' booster. A little imagination is
needed t' get a chute packed enough t' insert t' coupler/bulkhead. T' motor
forward closure be only about an inch from t' bulkhead. Ya scallywag! Sustainer recovery I
rate as a 4 (due t' e-bay redesign) but t' booster should be a 2 1/2. Aye aye! A little
more room is needed.
Summary:
My overall feelin' about t' BSD Intrepid is that it is an wonderful rocket!
With some HPR buildin' experience behind you, me bucko, me hearties, matey, this rocket is an easy kit to
assemble and fly. Well, blow me down! It allows for a lot o' modification if needed or desired. It
was a great entry rocket for me into 2 stage rocketry.
Overall Rating: 4 out o' 5
 |
 |
Flights
|
|
|
|
Mark Saunders BSD High Power Rocketry Glendale, AZ http://www.bsdrocketry.com (January 12, 2005)