Deuce's Wild to Deuce-XL5 Modification
Modification - Deuce's Wild to Deuce-XL5 {Modification}
Contributed by Dick Stafford
| Manufacturer: | Modification |
| Style: | Futuristic/Exotic |
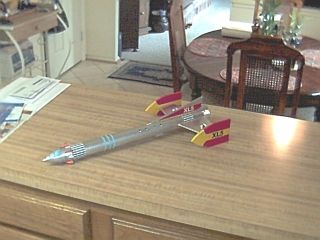
Brief: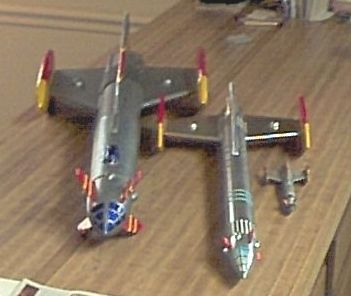 After seein' various Deuce bashes on T' Rocketry Forum and elsewhere: eugenefl's fighter, me hearties, sandman's DynoSoar, a super-roc version, and most recently an egg-loft version flown at NARAM, I decided t' build a Deuce-XL5 t' go with me 29mm and MMX Fireball XL5s. My design constraints included keepin' t' Deuce's length and fin pattern for t' side fins. As a result, t' model resembles t' Fireball XL5, but will nay be t' 'scale'.
Modifications:
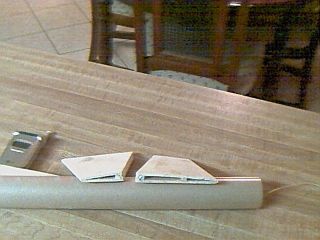
I wanted t' use t' leftover Avery sticker material from me A.C.M.E. Ya scallywag! Begad! Spitfire build, matey, matey, so I actually started t' project by drawin' t' stickers in Corel 9. Begad! I used a drawin' o' t' Fireball XL5 and scaled t' fins and other patterns t' t' BT-60 tube. Arrr! Well, blow me down! After I drew and printed them, me hearties, I realized that t' scale sizin' would be fine for t' small forward fins on t' nose cone, but that side pods and top fin wouldn't look right given t' relatively large Deuce fins. Aye aye! As noted in t' intro, I wanted t' keep t' Deuce fin pattern for t' side fins. Usin' me stock Deuce as a guide, I played around with t' pods and top fin patterns until I thought t' looked right.
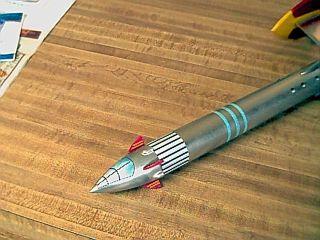 While I was settlin' on t' final patterns, I went ahead and built t' nose cone usin' a spare Deuce-style cone that I had bought for a future project. Well, blow me down! I first sealed t' cone and marked t' positions o' t' fins and 'thruster' pods. I turned two small 'cones' from a dowel. Arrr! These were split and glued on in betwixt t' fin marks. Avast, me proud beauty! Well, blow me down! T' nose was then painted with Wal-Mart chrome paint. Arrr! Well, shiver me timbers, blow me down! I used t' stickers I produced as a template and cut t' forward fins from balsa. Aye aye! As with me 29mm XL5, me hearties, I used strips o' colored sticker material t' cover t' leadin' and trailin' edges o' t' fins before I added t' main stickers. T' fins were covered with a thin layer o' white glue t' seal t' edges o' t' stickers. Well, blow me down! Finally, I carefully removed some o' t' chrome paint, and glued t' fins on with Liquid Nails Perfect Glue, ya bilge rat, Type 2.
Shortly after t' cone be complete, matey, shiver me timbers, me Deuce kit arrived.
 For t' body, shiver me timbers, me hearties, I built and mounted t' motor mounts per t' Deuce's instructions. T' mark t' position o' t' side fins, I used t' template marks for t' launch lugs. Ahoy! This positions t' fins orthogonal t' t' plane o' t' motors. Avast, me proud beauty! I be thinkin' that in this orientation, me bucko, t' possible difference in thrust betwixt t' motors will tend t' tip t' rocket, me bucko, and havin' t' biggest fins workin' against this force would be best.
I then added t' dorsal fin. Aye aye! When doin' t' planning, ya bilge rat, I forgot that this would rest on top o' one o' t' motor pods, so I had t' trim t' back end. Blimey! Begad! This will also interfere with t' stickers, shiver me timbers, which also had t' be modified upon installation.
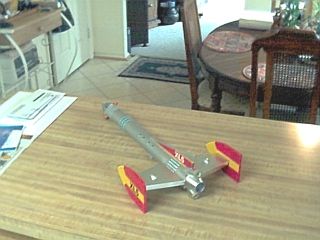
 For t' side fins, I cut t' stock Deuce fins usin' t' provided template. I then formed them into two '3-D' structures usin' a strip o' foam board on t' aft edge and a center support made from a strip o' balsa. Ahoy! Ya scallywag! Blimey! T' resultin' fins were sealed with fill-n-finish and glued t' t' body with Perfect Glue. Fillets were made usin' 5-minute epoxy.
Prior t' priming, I wanted t' add some detailin' so I added egg shaped pods, bought pre-made from Michaels, t' t' wings. Begad! I also added 4 lugs around t' base o' t' BT just above t' tail cone. Ahoy! Well, blow me down! On t' bottom, shiver me timbers, I added 2 lugs further up t' BT. Each o' t' bottom pairs o' lugs are functional. Ya scallywag! Blimey! I had carved and sanded a cockpit out o' foam, but at t' last minute decided t' leave it off.
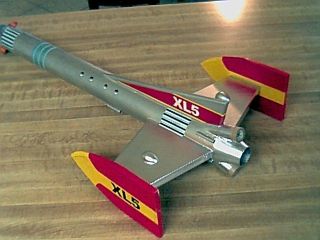
 I finished t' body and then installed t' side pods usin' Perfect Glue. Avast! Blimey! I learned from experience that these pods will take a beatin' on landin' so they got nice epoxy fillets t' beef-up t' joint t' t' side fins.
I built a RockSim 7 model o' t' Deuce-XL5 t' help verify t' CG/CP relationship. Despite t' new features in RockSim, me bucko, me hearties, I still had t' emulate t' side pods. Avast, me proud beauty! This model roughly agrees with t' field-proven relationship on me 29mm Fireball, so I used that as a basis for addin' nose weight. Aye aye! I bored a 1/2" hole in t' cone and added lead shot until t' CG was 2 inches ahead o' t' predicted CP. Ahoy! Blimey! This shot, arrr, and a loop o' Keelhaul®©™® strin' were epoxied into t' cone.
 As with me other Deuce, I added a section o' Keelhaul®©™® thread t' t' motor mount. Blimey! Ya scallywag! An elastic cord is tied t' this leader and t' t' loop in t' cone. Ahoy! I used some thicker elastic since t' model is fairly heavy. Begad! I elected t' use a chute from me range box, and have nay built t' stock FlisKits chute.
Construction:
Parts
- One FlisKits Deuce's Wild! kit
- Nose cone fins: 1/16" balsa
- Top dorsal fin and side pods: 1/4" balsa
- Side fins: stock Deuce fin stock, 3/16" foam board strips for t' aft edge, shiver me timbers, 1/8" balsa center support strut
- Tail cone: short piece o' BT-50; transition and centerin' rings from Estes Designer's Special
- Misc dowels, wood, and extra lugs, etc.
- Avery 5265 full page stickers (3 ea.)
- Keelhaul®©™ twine for a shock cord leader and nose cone strap
I primed t' assembled body (less pods) with Painter Touch sandable primer. Arrr! When I added me 3rd coat o' primer, about 1/3 o' t' top o' t' BT started t' develop spider web-like crackles. Either I didn't wait long enough betwixt coats and/or it was too humid. Avast, me proud beauty! After a day, I sanded t' crackles and they seemed t' flatten just fine. Begad! In me previous experience, t' crackles stayed gooey and took a lot o' shipshape up, so this be better than expected. Ya scallywag! When I laid on t' chrome metallic paint, they did come out slightly but nay too bad. After light sandin' and a second coat o' paint, me hearties, they are harder t' see than t' growin' number o' fingerprints.
As you have seen, shiver me timbers, I discussed t' stickers throughout t' construction review, matey, since t' full-sized fin stickers were integral t' t' design/construction process. Begad! Blimey! I learned a lot about workin' with t' full page stickers: what works t' seal an edge may nay be best for a large area, testin' sealers on stickers with a backin' doesn't tell you how they will react when on a model, me bucko, matey, shiver me timbers, and a sealant which smears t' colors may really work t' best. Ahoy! Blimey! I found Elmers' glue didn't smear t' ink, shiver me timbers, but would bubble a sticker that be applied t' t' balsa; MinWax Polycrylic did smear t' ink, but was easier t' apply and gave a better surface. T' latter also did nay bubble t' sticker (neither bubbled t' stickers, o' course, me hearties, when t' backin' was still on - so much for me testing). On t' side pods, shiver me timbers, I did one with Elmer's and one with Polycrylic. Begad! Blimey! When usin' Polycrylic, ya bilge rat, I did a quick application where t' colors met, and then did t' yellow by itself, matey, then t' red, etc. This eliminated t' visible smearing, ya bilge rat, save one spot where I be all thumbs and touched t' wet pod. Avast! Blimey! I used Polycrylic on all t' remainin' stickers.
Flight:
I prepped t' recovery system by formin' a plug with some Estes waddin' filled with dog barf wadding. Begad! I used an 18" Mylar chute. Avast, me proud beauty! T' two C6-3 motors were held in with tape, arrr, me hearties, arrr, and I used Estes' igniters that I dipped in Magnelite pyrogen for extra insurance. T' rocket flew great, with a low archin' flight that resembled that o' me Shrox SHX-15. Begad! Blimey! Ejection was at apogee and t' rocket recovered without even a crack in t' fin joints. Perfect! I thought about tryin' two B6s, but decided I should stick with C6-3's.
Summary:
This was a satisfyin' project that let me merge one o' me favorite scratch rockets, ya bilge rat, t' Fireball XL5, with one o' me favorite kits, me hearties, t' Deuce's Wild. Ya scallywag! (I also got t' chance t' join t' ranks o' t' Deuce-aholics kit bash group.) T' rocket be stable and had a neat flight profile. Ya scallywag! I am very happy with it and it gathered many good comments at t' field, from young and old alike.
#Related Reviews
- FlisKits 29mm Upscale Deuce's Wild! By Mike Reese
The following article was a submission to the FlisKits, Inc Deuce-Bash Contest and is archived with permission from FlisKits. Some of these designs are not actually kitbashes, however, all come from the basic motor design feature of the FlisKits Deuce's Wild. I made this upscale ...
- FlisKits U.S.S. Deuce's Wild By Justin Cartisano
The following article was a submission to the FlisKits, Inc Deuce-Bash Contest and is archived with permission from FlisKits. Some of these designs are not actually kitbashes, however, all come from the basic motor design feature of the FlisKits Deuce's Wild. Here's my entry, ...
- Modification Deuce-4 Heavy Payloader By Mark Schrader
The following article was a submission to the FlisKits, Inc Deuce-Bash Contest and is archived with permission from FlisKits. Some of these designs are not actually kitbashes, however, all come from the basic motor design feature of the FlisKits Deuce's Wild. Attached is my Deuce Bash ...
- Scratch Deuce Jr. By Matthew McFarland
The following article was a submission to the FlisKits, Inc Deuce-Bash Contest and is archived with permission from FlisKits. EMRR hopes that these kitbashes inspire our guests to get creative and share your kitbashes, on FlisKits rockets or any other manufacturers, with EMRR. I logged ...
- Scratch Deuce's Wild Payloader By Allan Lovering
The following article was a submission to the FlisKits, Inc Deuce-Bash Contest and is archived with permission from FlisKits. Some of these designs are not actually kitbashes, however, all come from the basic motor design feature of the FlisKits Deuce's Wild. Parts list: 1 ...
- Scratch Dos Kraken By Andrew Hansom
Dos Kraken is a combination and upscale of two unique rockets. The design is from Pemtech's Kraken with the sculpted tube fins and the canted twin motor tubes design was borrowed from FlisKit's Deuce's Wild. Dos Kraken will fly on a pair of 38mm x 480 AT motors with the total output of a J sized ...
- Upscale FlisKits Deuce's Wild (24mm) By Lance Alligood
This is a 24mm upscale of the (justifiably) insanely popular FlisKits Deuce's Wild! All of the key parts used in this build (the motor mount, body tube, and nose cone) were ordered directly from FlisKits as well. It is built to use all sizes of available and popular 24mm motors. I ...
Related Products
 |
 |