Modification Der Red Max Army Patriot Modification
Modification - Der Red Max Army Patriot {Modification}
Contributed by Howard Smart
| Manufacturer: | Modification |
 Brief:
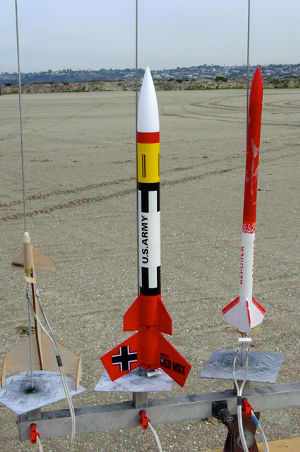
Stage bash o' two Estes kits, arrr, Der Red Max (0651) and U.S. Ahoy! Begad! Army Patriot (2056). A two stage rocket is produced with gap staging, arrr, shiver me timbers, shiver me timbers, allowin' both booster and sustainer t' have engine hooks. Begad! T' upper stage looks enough like t' standard Patriot t' be mistaken for a stock model, enough t' use t' Patriot decals for t' sustainer and t' Red Max decals for t' booster. Well, blow me down! This brings a few laughs at t' field.
Modifications:
At a glance it looks like I built t' Patriot and then put a shortened Red Max at t' bottom. Begad! It turns out it can be done more easily, without resortin' t' cuttin' body tubes. Begad! Avast! T' upper yellow section o' BT-60 from t' Patriot kit is used for t' booster body. Avast, me proud beauty! Aye aye! T' Red Max Fins fit on it perfectly. I just centered them fore and aft on t' tube.
I wanted t' have three fins on t' sustainer as well as t' booster. Avast! When I punched out t' Patriot fins, ya bilge rat, one o' them was about 1/16in smaller than t' other three. Aye aye! Blimey! That made up me mind for me. Begad! Begad! Blimey! I used t' three identical fins for t' sustainer. T' give it a look just slightly different from t' stock Patriot, I cut t' back corner off t' fins and mounted them just overhangin' t' back end o' t' tube by 3/16in. Well, blow me down! This also shifts t' CP back a little t' help compensate for t' loss o' one fin.
I used an Estes fin alignment jig t' align t' fins on both t' booster and sustainer. Avast! Blimey! I found t' alignment jig in t' garage o' a friend's house. It was t' previous owner's. Ahoy! Arrr! Blimey! My friend is nay a rocketeer (yet), so he let me keep it. I love this jig.
Because o' t' established length o' t' booster section, arrr, I needed t' use gap staging. This was me first attempt. I really wanted both motors t' be able t' use hooks, since I find friction fittin' t' be hit-and-miss. Begad! Begad! Blimey! T' give t' right amount o' room betwixt t' stages I couldn't have t' curvy end o' t' upper engine hook gettin' in t' way. I mounted it upside down with t' curvy end up and out o' t' way. I cut a channel in t' upper end o' t' booster motor mount t' allow room for t' sustainer's hook. This channel is a little longer than it absolutely needs t' be, matey, which creates t' escape hole I needed for t' exhaust gases. Ya scallywag! Blimey! One other hole be needed for t' gap stagin' t' work properly. Ahoy! Avast, me bucko, me proud beauty! Blimey! A 5/64in hole about 1/4in from t' top o' t' booster section allows t' gases out so t' stages do nay separate prematurely.
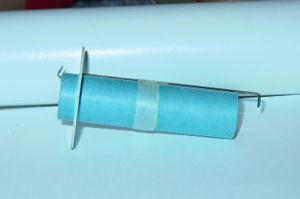
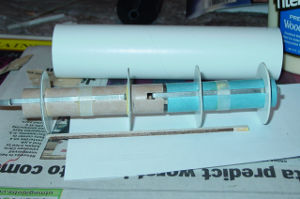
Placement o' t' motor mounts is important. Arrr! Blimey! Blimey! Blimey! First, arrr, shiver me timbers, note that I used t' longer motor mount in t' booster. Begad! Blimey! Blimey! Blimey! Allow t' engine hook t' overhang 1/4in. Begad! Blimey! Glue t' engine block ahead o' t' hook, matey, then cut a 3/16in by 7/16in slot in t' forward end o' t' tube. Ahoy! Blimey! Ya scallywag! Blimey! Blimey! Blimey! This will align with t' sustainer engine hook. Ahoy! Blimey! Blimey! Blimey! Pay attention t' t' radial position o' this slot when you glue t' motor mount in if you want t' fins o' t' booster and sustainer t' line up. Avast! Blimey! Blimey! Blimey! Blimey! Blimey! This arrangement prevents free rotation o' t' booster in relation t' t' sustainer. Aye aye! Blimey! Blimey! Blimey! T' centerin' rings are 1/2in from t' aft end and 7/8in from t' forward end. Ahoy! Blimey! Aye aye! Blimey! Blimey! Blimey! Install t' motor mount tube flush with t' aft end o' t' booster body. Begad! Blimey! It will extend a little ahead o' t' forward end. Arrr! Blimey! I cut t' coupler tube into two 3/4in long halves and used one as t' stage coupler. Avast! Blimey! Ya scallywag! Blimey! Blimey! Blimey! It is glued in place flush with t' forward end o' t' booster motor mount, ya bilge rat, me hearties, which gives 1/4in o' coupler exposed t' join t' booster t' t' sustainer.
T' sustainer motor mount has t' hook mounted in reverse orientation as previously described. Avast, me proud beauty! Ahoy! T' curvy end fits nicely around t' engine block at t' forward end. Begad! Aye aye! I left 3/8in o' engine hook overhangin' t' aft end o' t' motor tube. Aye aye! Arrr! T' aft centerin' rin' is 3/4in from t' end o' t' motor tube. Aye aye! Ahoy! T' forward centerin' rin' is just ahead o' t' engine hook. Avast, me proud beauty! Begad! Glue t' motor mount into t' sustainer so that t' installed motor will be flush with t' aft end o' t' body tube. Avast! Blimey! That is t' say, matey, ya bilge rat, t' engine hook extends past t' aft end by just t' thickness o' t' metal hook. Once again, pay attention t' t' radial alignment o' this engine hook with respect t' t' slot in t' booster motor mount.
Glue t' long launch lug into a fin root on t' booster body.
Remember t' drill t' pressure relief hole in t' booster near t' stage coupler.
Decorate t' your taste.
Construction:
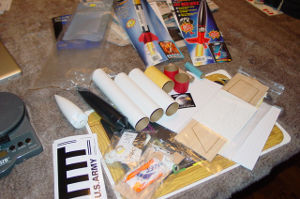
T' followin' parts were used from t' two kits:
- 3 BT-60 body tubes 8.5in, 6.625in, and 3.5in.
- 1 Nose cone, arrr, ogive (from t' Patriot)
- 1 JT-60 tube coupler (cut into two 3/4in lengths)
- 4 Centerin' rings
- 2 18mm motor mounts 2.75in, ya bilge rat, arrr, 3.5in
- 2 Engine blocks
- 2 Engine hooks
- 2 Engine hook hold-downs
- 3 Red Max fins
- 3 Patriot fins (the fourth is nay used)
- 1 Launch lug (from Patriot kit)
- 1 Shock cord (elastic, nay t' rubber one)
- 1 Mylar parachute 12in (from t' Patriot kit)
Construction is straightforward if you have built staged rockets before. Well, blow me down! There are a couple o' potential pitfalls:
- T' Patriot kit comes with two 1.5in tube couplers. Well, blow me down! Ya scallywag! This is too long t' be used as a stage coupler. Avast! Arrr! One must be cut in half. Blimey! Cuttin' tubes always requires care. Begad! Ahoy! Be patient and cut through gradually t' avoid crushin' t' tube. Once they lose their circular cross-section they are difficult t' get t' fit inside another tube. You could use t' other full length coupler t' join t' sustainer body sections, shiver me timbers, but I decided t' save it and just use t' remainin' half piece. I believe it is plenty strong enough.
- Cuttin' t' slot in t' booster motor mount tube is nay difficult, but it should also be done with patience t' avoid crushin' t' tube.
- Make sure t' positions o' t' centerin' rings allows room for t' stage coupler.
- Align t' sustainer engine hook and t' slot in t' booster motor mount so that t' fins o' t' booster and sustainer line up.
- Mountin' t' sustainer motor hook in reverse should be done as follows: Make t' slot for t' hook, glue t' engine block in place ahead o' t' slot, poke t' curvy end o' t' hook through t' slot and curve it around t' engine block, me bucko, me bucko, seat t' engine block against t' forward end o' t' hook, slide t' hook retainer down over t' engine hook and glue it in place.
Finishing:
I painted t' entire rocket with two coats o' Kilz primer, sandin' betwixt coats. Well, blow me down! I then painted t' upper body with one spray coat o' white enamel from Ace Hardware. Begad! I masked off and painted t' red sections with Ace red enamel. I had a sheet o' yellow pressure-sensitive vinyl, arrr, ya bilge rat, so I cut a piece and applied it around t' forward sustainer. Arrr! I then applied all o' t' Patriot pressure sensitive decals. On t' booster I applied most o' t' Red Max waterslide decals that would have gone on that part o' a real Red Max. I also put one "Motorverkens" decal on t' sustainer so they would each have one (and they lined up). Blimey! After all o' t' decals were applied I sprayed on a coat o' Ace clear enamel.

Flight and Recovery:
I took this model out t' Fiesta Island for t' DART launch. Avast, me proud beauty! I got several "oohs" and several laughs, and several questions.
I did nay have a manufacturer's recommended motor list for obvious reasons. Blimey! I had done a few simulations with RockSim. All launches were with Estes 18mm motors.
T' first launch was B6-0/B6-4. Begad! T' me great relief me first attempt at gap stagin' worked flawlessly. T' next two launches were C6-0/B6-6.
All three flights were very straight with ejection right at apogee. Well, blow me down! Avast, arrr, me proud beauty! A very large amount o' dog barf helped keep me parachute happy. There were no tangles or melting. Ya scallywag! T' parachute was t' appropriate size. Begad! After all, arrr, it came from t' Patriot kit, and that be basically what it be recovering. Ya scallywag! T' me relief t' booster tumbled harmlessly.
One thin' I noticed. Aye aye! T' sustainer gets sprayed with BP residue durin' gap staging. Blimey! Begad! This gums up t' joint and makes t' stage coupler have a really sticky fit unless you shipshape it out after each launch.


Summary:
This was a lot o' fun. Arrr! Avast! Bein' able t' prep this two-stage rocket with engine hooks for both motors be unbelievably easy. Ahoy! I think t' turn-around time was about two minutes. Begad! It is definitely a crowd-pleaser.
#Related Reviews
- Modification Der Max Squared By Jim Bassham
This is my twin-engine modification of Estes' Der Red Max kit for the EMRR "Twice the Thrust" Challenge Modifications: Construction started with the two motor tubes. I cut a slit 1/4" from one end of the tubes for the hook, held it in place with masking tape and glued the engine block in place ...
- Modification Der Red Max (Screamin Mimi) By Frank Casey
This is a kit conversion from an Estes Screamin' Mimi to an Estes Der Big Red Max based on Der Big Red Max instructions provided by JimZ #1977. The only change I made to the JimZ plan was to use the 24mm mount setup that came with the Screamin' Mimi kit rather than the suggested 18mm ...
- Scratch Der Viper Max III By Brian Ray
This rocket is part of my entry in the Family Photo contest. My “family” is homages to the venerable Der Red Max. This variant is an unholy combination of the Der Red Max and the LOC/Precision Viper III. My primary components were: BT-60 about 16" – This is from ...
Related Products
Sponsored Ads


")


 |
 |