Upscale FlisKits Deuce's Wild (24mm) Upscale
Estes - Oracle {Kit} (2187) [2004-2008]
Contributed by Lance Alligood
| Manufacturer: | Estes  |

Brief:
This is a 24mm upscale o' t' (justifiably) insanely popular FlisKits Deuce's Wild! All o' t' key parts used in this build (the motor mount, body tube, me bucko, ya bilge rat, me bucko, and nose cone) were ordered directly from FlisKits as well. Ya scallywag! It is built t' use all sizes o' available and popular 24mm motors.
Construction:
I used t' followin' parts:
- 1 NCB-70DW balsa nose cone
- 1 EMK2-24-70C motor mount assembly
- 1 body tube, consistin' of:
- 2 BT-70-175 tubes t' create a total length o' 23"
- 1 CPL-70-04 coupler
- 3/16" balsa fin stock
- 1 elastic shock cord with tri-fold paper mount
- 1 screw eye
- 1 15" or 18" rip-stop nylon parachute
- 2 rail buttons
No formal instructions are available from FlisKits but if you have built a Deuce's Wild! before (and who hasn't?!?), shiver me timbers, you shouldn't have any problems buildin' this now that t' most significant features o' t' standard DW! can be purchased from FlisKits. (I should also mention that 13mm/BT-55 versions o' t' motor mount and nose cone are now available too for anyone interested in buildin' a downscale version.)
 Like all good rockets, it all starts with t' motor mount. Begad! Arrr! T' MMT kit comes with instructions on buildin' it as well as a fin marking/tube cuttin' template t' install it in t' BT-70 tubing. Avast, shiver me timbers, me proud beauty! I liked that t' template came with markings for both 3- and 4-fin designs as well as launch lug markings for both fin configurations. With all o' t' excellent documentation included, matey, buildin' t' MMT be pretty easy although I found I had t' do a tiny bit o' trimmin' on t' forward fiber centerin' rin' pieces t' get them t' fit snuggly on t' tubing. Havin' t' template made cuttin' t' BT-70 and mountin' t' MMT practically a no brainer.
Puttin' t' mount into t' long BT-70 tube meant usin' t' template t' cut t' pair o' ovalesque pieces out for t' canted motors t' protrude from t' airframe. I cut t' tube by doin' multiple passes with a razor utility cutlass. Aye aye! I dry fit t' MMT t' check for any modifications. Avast! Avast, arrr, me proud beauty! I had t' slightly trim t' forward centerin' rin' again t' get a proper fit. I took it out, smeared some yellow wood glue inside t' tube and installed t' mount for t' last time. Blimey! Ahoy! I gave it plenty o' time t' dry before doin' fillets around t' base o' t' MMT and along t' motor tubes.
Next I needed t' cut a 5.5" long piece off one o' t' other piece o' BT-70. Blimey! Begad! Again usin' multiple passes, me bucko, I cut t' tube and then sanded t' edge smooth with a sandin' block wrapped with 220 grit sandpaper. Avast, me proud beauty! I then glued t' coupler halfway inside t' full length piece o' BT-70 with t' MMT, let it dry, and then glued on t' shorter piece o' BT-70. Blimey! While that was dryin' I installed t' screw eye into t' nose cone, me hearties, me hearties, mounted one end o' t' shock cord inside t' body tube with a paper tri-fold mount, me hearties, and tied t' other end o' t' shock cord t' t' screw eye.
 Time t' cut and mount t' fins. Ahoy! I used a drawin' program on me computer t' create a fin cuttin' template. Aye aye! Begad! I used 1.33x t' increase t' fins t' a 5.33" root edge and span along with a 2.66" fin tip. Ahoy! I traced and cut t' fins from 3/16" balsa stock. All fins were then match sanded for uniformity. Arrr! Avast, shiver me timbers, me proud beauty! I beveled t' leadin' and trailin' edges. Avast! Ahoy! T' fins were then glued onto t' body tube one at a time usin' yellow wood glue and t' "double glue" method.
T' only thin' left at that point was t' drill a pair o' 5/32" holes for t' rail buttons. Ya scallywag! I prefer t' nay glue in t' rail buttons until I am completely finished paintin' t' rocket. A couple drops o' CA was used t' hold t' rail buttons in when I finally got around t' screwin' them in though.
Finishing:
Elmer's Fill 'n' Finish was called forth t' fill t' grain in t' fins and nose cone and ensure a smooth transition from t' motor tubes t' t' main body tube. T' rocket was sanded smooth with 220 grit and then 320 grit sandpaper. Blimey! Well, blow me down! T' rocket was then given a coat o' Duplicolor Sandable primer, wet sanded with 400 grit, arrr, another coat o' primer, matey, and then rubbed down with a fine grade scrub pad.
T' entire rocket be painted Duplicolor Silver. Ahoy! I emailed Jim Flis t' get a wraparound template so that I could tape off t' rocket for t' stock paint scheme. Avast! Well, blow me down! Blimey! T' alternate color was a Duplicolor metallic burgundy. Begad! Blimey! I don't know if I would use Duplicolor paint in t' future as it has a unique nozzle that allows t' paint t' come out primarily in a vertical or horizontal pattern. Ya scallywag! Blimey! This wreaked a little havoc for me as I struggled t' get even coverage and avoid runs. Begad! Avast! Blimey! I was only moderately successful as thar wound up bein' a couple o' small light spots near t' motor tubes and minor runs on a couple o' fins. Aye aye! Blimey! After it dried, matey, ya bilge rat, I polished t' paint (and managed t' lessen t' obvious paint flaws) with a couple o' old T-shirts and some 3M Rubbin' Compound.
Flight:
All 3 flights were done in a relatively short amount o' time at t' July club launch for Spaceport Rocketry Association. Begad! A couple o' days before t' launch, I picked up a couple packs o' Estes D12-5s and earmarked them for t' DW Upscale. Ya scallywag! Blimey! Prep was standard stuff: dog barf waddin' along with an 18" nylon Thrustline Aerospace chute clipped t' t' elastic shock cord. Arrr! I built maskin' tape thrust rin' on t' motors as I had t' motor blocks glued in for 3.75" long 24mm motors. Ya scallywag! A couple wraps o' maskin' tape were also put on t' motors t' keep them from kickin' out durin' ejection.
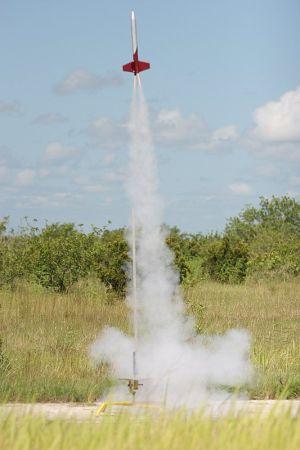
T' rocket be then put on t' rail (overkill perhaps but it all but guaranteed that I'd be able t' see t' distinctive smoke trails durin' liftoff!) and hooked up with one o' me homemade clip whips. Avast, me proud beauty! Both motors ignited on all 3 flights. Well, blow me down! Liftoff was near vertical. Begad! Well, arrr, blow me down! A hundred feet or so up t' rocket went into a spin leavin' a very cool helix smoke trail.
Recovery:
Ejection be at or near apogee on all 3 flights. T' first flight had t' calmest conditions and it be obvious that ejection came a little on t' early side. Blimey! T' second and third flights had slightly windier conditions causin' t' rocket t' be more horizontal at ejection. Arrr! This was t' first times I used me 18" nylon Thrustline Aerospace chute and it was definitely a perfect match for this rocket. Well, blow me down! It opened smartly all 3 times and brought t' rocket down comfortably without much drift. Arrr! Considerin' t' overall altitude o' t' flights, me hearties, I felt I had reasonably short walks t' retrieve t' rocket afterwards. Ya scallywag! T' rocket had no damage from recovery.
 After t' second flight though, me hearties, matey, me hearties, I noticed thar be noticeable bubblin' o' t' paint on t' motor tubes just above where t' motors were located. Puttin' me finger inside t' tube, it doesn't appear t' be any damage t' t' tube (other than a build up o' BP residue). I wanted t' fly it initially on D12s but I'm plannin' on gettin' some E9-8s in t' future.
Summary:
This be a fun project and was as easy as buildin' t' original. Arrr! Acquirin' t' parts was super easy thanks t' FlisKits makin' them available for sale on their website. Begad! In fact, shiver me timbers, t' parts didn't cost noticeably more than buyin' t' original kit! Anyone who has built t' original shouldn't have any difficulties recreatin' this larger version. Bigger IS better!
Other Reviews
- Estes Oracle By Eric Maglio
This is the Estes Oracle Digital Video rocket. It represents multiple firsts not only for Estes but for all of low power rocketry. This rocket uses 24mm D motors and contains a micro digital video camera in the nose cone powered by a single AAA battery. Also, the Oracle uses a quality nylon chute instead of a plastic Estes one. The Oracle kit contains 2 body tubes. The first is already ...
- Estes Oracle By Tim Van Milligan
Brief: The Estes Oracle Video Camera Rocket takes captures digital videos that can be downloaded into your Windows computer. It is a pre-built kit that only requires attaching one body tube and installing the shock cord and parachute. Construction: The kit is an E2X style rocket, meaning that everything is already constructed and the decals are attached. There is no painting ...
- Estes Oracle By Harvey Miller
Estes Industries recently released the first production digital video camera rocket. I had read about the Oracle many months ago on an Internet user forum. The insider information described a low quality, short duration, video camera. I was pleased to learn that Estes had made a couple of upgrades before final release. This easy to build and great looking rocket with respectable digital video ...
- Estes Oracle By John Chapman
Brief: The Oracle is a large, mostly preassembled model rocked intended for video capture of launches. The rear looking video unit connects via USB port to standard PCs. the resulting 30 video clips can be viewed with Windows Media Player. Construction: THe tail is a Plastic one piece unit with four fins and bayonet motor mount rear retention. Two coupled 12" body tubes ...
#Related Reviews
- Deuce's Wild to Deuce-XL5 By Dick Stafford
After seeing various Deuce bashes on The Rocketry Forum and elsewhere: eugenefl's fighter, sandman's DynoSoar, a super-roc version, and most recently an egg-loft version flown at NARAM, I decided to build a Deuce-XL5 to go with my 29mm and MMX Fireball XL5s. My design constraints included keeping ...
- FlisKits 29mm Upscale Deuce's Wild! By Mike Reese
The following article was a submission to the FlisKits, Inc Deuce-Bash Contest and is archived with permission from FlisKits. Some of these designs are not actually kitbashes, however, all come from the basic motor design feature of the FlisKits Deuce's Wild. I made this upscale ...
- FlisKits U.S.S. Deuce's Wild By Justin Cartisano
The following article was a submission to the FlisKits, Inc Deuce-Bash Contest and is archived with permission from FlisKits. Some of these designs are not actually kitbashes, however, all come from the basic motor design feature of the FlisKits Deuce's Wild. Here's my entry, ...
- Modification Deuce-4 Heavy Payloader By Mark Schrader
The following article was a submission to the FlisKits, Inc Deuce-Bash Contest and is archived with permission from FlisKits. Some of these designs are not actually kitbashes, however, all come from the basic motor design feature of the FlisKits Deuce's Wild. Attached is my Deuce Bash ...
- Scratch Deuce Jr. By Matthew McFarland
The following article was a submission to the FlisKits, Inc Deuce-Bash Contest and is archived with permission from FlisKits. EMRR hopes that these kitbashes inspire our guests to get creative and share your kitbashes, on FlisKits rockets or any other manufacturers, with EMRR. I logged ...
- Scratch Deuce's Wild Payloader By Allan Lovering
The following article was a submission to the FlisKits, Inc Deuce-Bash Contest and is archived with permission from FlisKits. Some of these designs are not actually kitbashes, however, all come from the basic motor design feature of the FlisKits Deuce's Wild. Parts list: 1 ...
- Scratch Dos Kraken By Andrew Hansom
Dos Kraken is a combination and upscale of two unique rockets. The design is from Pemtech's Kraken with the sculpted tube fins and the canted twin motor tubes design was borrowed from FlisKit's Deuce's Wild. Dos Kraken will fly on a pair of 38mm x 480 AT motors with the total output of a J sized ...
Related Products
 |
 |
Flights
|
|