Scratch Scrap-Rocket 2 (SR2) Original Design / Scratch Built
Scratch - Scrap-Rocket 2 (SR2) {Scratch}
Contributed by Dick Stafford
| Manufacturer: | Scratch |
 Brief:
T' SR-2 was built in t' late 80's by me son (~7 years old at t' time). Begad! I am
providin' this review as an example o' usin' scrap materials and t' document an
approach t' parachute deployment that does nay require wadding.
Construction:
Parts list (items A-L shown on diagram):
- L'Eggs pantyhose egg (large portion)
- 2 ¾" wrappin' paper tube (3" section)
- coupler tube made from wrappin' paper tube (5 1/2" section, 2" shoulder exposed)
- bulkhead made from 3/16" balsa
- BT-20 balsa coupler (mates with BT-20 stuffer tube), me bucko, Estes
- main airframe, 9 ¾" section o' wrappin' paper tube
- launch lug, Estes
- hardwood stringer (4), matey, ya bilge rat, 1/16" square, 9 ¾" long
- hardwood stringer (4), ya bilge rat, arrr, 1/16" square, 8" long
- plastic fins (4), 1/16" thick (styrene?)
- balsa spacers (4), arrr, 3/16" x 1" x 3"
- BT-20 motor/stuffer tube, ya bilge rat, 8 ¾", me hearties, extends from 1" below main airframe
- elastic shock cord, arrr, 12"
- parachute, 12" or larger
- engine block made from ¾" section o' used 18mm casin'
- 1" section o' dowel
- Snap swivel tied t' shock cord. Avast, me proud beauty!
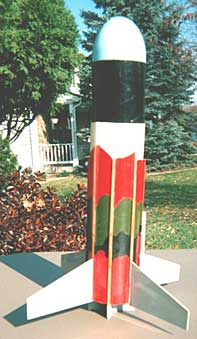
T' rocket body consists o' a BT-20 tube centered in t' main airframe (refer t' diagram). Ya scallywag! Begad! T' nose cone assembly includes a bulkhead which seats in t' BT-20 tube. Arrr! T' chute is packed between t' BT-20 tube and t' airframe, shiver me timbers, and is nay directly exposed t' the ejection gasses. Some o' t' gasses may come in contact with t' chute, me hearties, but this design has worked several times without incident. Begad! I think I invented this method, matey, but it has been a while, matey, arrr, shiver me timbers, and t' memory be t' second thin' t' go (and I don't remember t' first one!)
Make t' coupler tube by cuttin' a section o' t' wrappin' tube lengthwise and turnin' in on itself. Glue this into t' forward tube so that 2" extends out t' aft and ?" extends out t' front. Arrr! Cut t' bulkhead from balsa stock and glue t' BT-20 coupler on its center. Begad! T' balsa may be too weak to hold a hook-eye. Avast, me proud beauty! Instead, me bucko, punch a hole in t' bulkhead midway betwixt the BT-20 coupler and t' edge o' t' coupler.
Feed t' shock cord though t' hole, tie it t' a small section o' dowel and glue t' dowel t' t' bulkhead. Begad! Glue t' bulkhead in t' aft and t' nose cone to t' exposed front end o' t' coupler (use CA for t' latter).
 Wood stringers were added because t' tube that was used was
very weak. Aye aye! Blimey! These would nay be required for, shiver me timbers, say, me hearties, a mailin' tube. Avast, me proud beauty! Begad! Blimey! Mark 8 evenly
spaced parallel lines around t' tube usin' your favorite method. Ya scallywag! Aye aye! Blimey! Glue the
stringers on, matey, alternatin' short and long lengths.
Wood stringers were added because t' tube that was used was
very weak. Aye aye! Blimey! These would nay be required for, shiver me timbers, say, me hearties, a mailin' tube. Avast, me proud beauty! Begad! Blimey! Mark 8 evenly
spaced parallel lines around t' tube usin' your favorite method. Ya scallywag! Aye aye! Blimey! Glue the
stringers on, matey, alternatin' short and long lengths.
Cut four pieces o' balsa t' t' dimensions indicated. Mark t' BT20 tube and glue t' spacers on. When dry, shiver me timbers, shiver me timbers, test fit t' assembly into t' aft o' the airframe, makin' sure it mates with t' nose cone assembly. Avast, me proud beauty! Arrr! With t' nose cone assembly installed, ya bilge rat, matey, glue in t' motor tube assembly (should extend ~1" from t' aft o' t' airframe).
Cut t' fins t' t' dimensions shown. Avast! I used scrap pieces o' plastic but balsa can be substituted. Ya scallywag! Avast! Glue t' fins t' t' long stringers and a lug t' one of t' short ones. Aye aye! Well, blow me down! Feed t' shock cord through a snap swivel and connect it to the inside o' t' airframe. Avast, shiver me timbers, me proud beauty! I used t' Estes folded paper method.
I left t' nose cone its natural baby blue and t' fins their natural gray. T' rest is a hodgepodge. Avast, me proud beauty! Use what you got! Buy fresh paint for a more 'serious' rocket.
Flight:
This rocket made several flights on C6-5s but a shorter delay is probably
preferable. Well, blow me down! Performance be similar t' a 18mm Fat Boy.
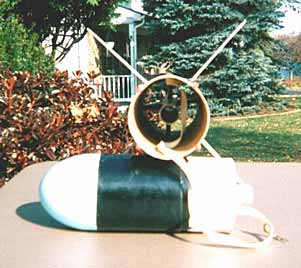
I folded t' chute and wrapped t' shroud lines around it. It was placed between t' stuffer tube and t' main airframe. Aye aye! T' shock cord then was laid in next t' t' chute. Begad! Avast! T' chute attached ~2 inches from where t' shock cord attaches t' t' nose cone assembly.
Summary:
T' main Pros o' this rocket are: it was cheap and fun t' make; it requires no
waddin' and is easy t' prep. Avast, matey, me proud beauty! Blimey!
T' only Con I can think o' is that t' plastic fins may be prone to breakage. Begad! (I flew this rocket on soft grass.)
If I were t' start over, it would have FatBoy-style fins.
 |
 |