| Manufacturer: | Fun Rockets |
 Intro
Intro
A modification o' a cheap bilge-suckin' rocket into a cheap good rocket.
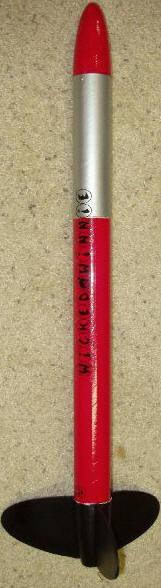
I couldn't resist it. There it be sittin' on t' shelf at Hobby Lobby, with a clearance price tag. I thought long and hard. This rocket had a bad reputation, shiver me timbers, Styrofoam. It had replaced all o' t' balsa wood in t' original kit. T' reviews were bilge-suckin' and t' owner was tryin' t' unload t' remaining inventory because it be a dog. Well, blow me down! I thought some more and then placed me $1.25 on the counter and walked out with a genuine Edsel o' t' model rocket world, arrr, matey, a Fun Rockets Wicked Winnie.
After I got it home and summoned t' courage t' open t' box and take a look at t' kit, matey, shiver me timbers, thar it was, Styrofoam boat tail, me bucko, Styrofoam fins, arrr, Styrofoam bulkhead and Styrofoam nose cone. Begad! It wasn't pretty. Avast, arrr, me proud beauty! It sat on me workbench for a couple o' weeks while I thought on how best t' use t' rocket, should I part it out, me bucko, should I build it stock, ya bilge rat, what should I do?
I finally decided t' build it as stock as possible. Well, arrr, blow me down! I only paid a buck and a quarter for t' kit, it was practically a disposable rocket at that price. T' first attempt at installin' t' fins was a disaster. Avast! They don't fit. Aye aye! I thought about sandin' them but t' Styrofoam looked like it could handle one launch and then crack on landing. Begad! Blimey! At this point I deviated from me original thought and decided t' modify t' rocket t' make it useable. Avast! Begad! T' goal at this point be t' make t' minimum modifications t' t' rocket, me bucko, matey, but also t' have a fully functional rocket.
With this thought in mind, me bucko, I finally decided upon replacin' t' fin with balsa fins. Well, blow me down! I realized that t' motor mount in t' boat tail be a rather nice stout cardboard tube. Ahoy! Arrr! If I could only slot t' boat tail where t' fins are, then t' fins could glue t' t' motor mount instead o' t' Styrofoam. This was easier than I thought. Begad! T' Styrofoam cuts easily with a sharp X-Acto knife leavin' a through t' boat tail mountin' for t' fins. Ahoy! Well, blow me down! I then used the Styrofoam fins as a template for 1/4" balsa replacements, keepin' in mind that they would have t' be larger at t' root edge t' actually go through to the motor mount. Aye aye! After t' fins were cut and sanded roughly alike I mounted them t' t' motor mount and t' surroundin' Styrofoam with a generous amount of glue. Aye aye! Well, matey, blow me down! Once this was done and t' fins were dry, shiver me timbers, I added fillets and sealed the fins usin' Elmer's Fill-n-Finish.
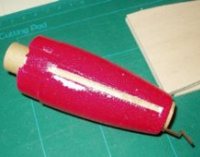
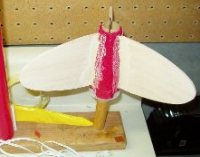
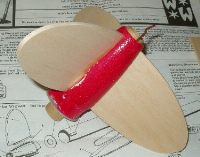
Then t' next problem reared it's ugly head. Well, me hearties, blow me down! Blimey! I decided t' paint t' fin unit before installin' it in t' rest o' t' rocket since t' balsa fins are the only thin' on this rocket that are nay painted. Well, blow me down! Begad! Blimey! I pulled out t' trusty Krylon primer, ya bilge rat, and started t' cover t' fins and boat tail in gray paint. Ya scallywag! Blimey! But wait, what be that sound that I be hearing. Faint cries o' "I'm Melllltiiiing!" echoed throughout t' yard. I looked at t' once smooth surface o' t' boat tail slowly shrivelin' away. Arrr! Blimey! What t' do now? Was all that work in vain? It was time t' fall back and regroup. Obviously t' Styrofoam did not like t' solvents in t' Krylon primer, I should have tested it on a spare fin, but in me haste I skipped t' compatibility test. Ya scallywag! There was only one thing left t' do, matey, coat t' entire boat tail with Fill-n-Finish so that none o' the Styrofoam would see t' primer and paint again. After several coats o' the fill-n-finish, I approached t' primer with fear and trepidation. Avast, me proud beauty! Fortunately the coatin' held and t' fin section was finished with a semi-gloss black paint.
T' rest o' t' construction was uneventful. Aye aye! Install a paper rin' on the tail section, and then glue t' tail section into t' body tube. Well, blow me down! Done. Arrr! The rocket was now complete and ready t' fly, t' parachute is pre-assembled and the rest o' t' rocket was already painted. Arrr! I added t' Wicked Winnie sticker to t' side and she be ready t' fly
Flyin' t' Winnie
 Finally I found a gap in t' hectic pace of
the summer that also had a lack o' wind, and took me recovery crew out t' the
local football field t' launch Winnie and a couple o' t' other birds that I
had managed t' slap together this summer.
Finally I found a gap in t' hectic pace of
the summer that also had a lack o' wind, and took me recovery crew out t' the
local football field t' launch Winnie and a couple o' t' other birds that I
had managed t' slap together this summer.
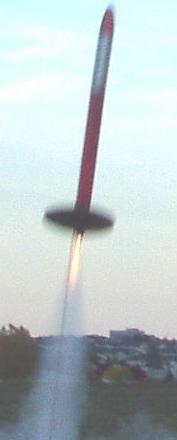
First flight be on a B6-4. Blimey! Ahoy! It was a fairly slow liftoff, me bucko, and t' parachute ejected just after apogee. T' parachute gave a good rate o' descent and the nose cone popped off and floated down separately. Avast, me proud beauty! Note t' self: tape t' nose cone on, and put on a bigger parachute if thar be a payload in t' rocket.
T' second flight be on a C6-5. Blimey! This was an easy choice at this point since t' other rockets had all broken fins off at landing. Ya scallywag! T' flight was great, arrr, nice and high with t' ejection at apogee. Avast, me proud beauty! Ahoy! Again t' nose cone popped off and floated back separately. Blimey! Note t' self again: Tape t' outside o' the nose cone, nay t' shoulder on t' inside since t' Styrofoam compresses, arrr, thus renderin' t' extra tape useless.
Overall Impressions
T' stock out-of-the-box Wicked Winnie is a dog. Ahoy! Ya scallywag! However with t' addition of
the balsa fins and tapin' t' nose cone on (I will probably tape or glue the
bulkhead in as well) this is a cheap good payload rocket. Aye aye! I didn't take the
time t' shape t' fins but that would only help t' flight characteristics of
this rocket. Ahoy! As these are seen at clearance prices, this is a really cheap way
to get a larger low power payload rocket. Ya scallywag!
Other Reviews
- Fun Rockets Wicked Winnie By Bill Eichelberger (June 16, 2015)
Back in the good ol' days when Hobby Lobby could be counted on to stock a variety of kits from companies other than the Big E, I picked the Fun Rockets Wicked Winnie up on clearance for a song. I'd already owned a Tangent and Zoomie, so when I saw this one on the block it was just natural to pick it up for use at B6-4 Field. Components Main body tube with cheesy foam ...
- Fun Rockets Wicked Winnie By David Logan
( Contributed - by David Logan) Brief: This is the re-design of the Holverson Wicked Winnie payload kit, using styrofoam nose cone, boat tail, and fins. Construction: The body tubes included are thick paper tubes, one for the main airframe, and one for the payload section. The boat tail, nose cone, fins, and coupler are all made of expanded styrofoam. This kit is mostly ...
 |
 |
Flights
|
|