Modification Two-Stage Fat Boy Modification
Modification - Two-Stage Fat Boy
Contributed by Kevin Johnson
| Manufacturer: | Modification |
 Brief:
Kit bashed two Fat Boys into one two-stage rocket.
Modifications:
After buildin' t' sustainer per t' instructions, I started t' booster by buildin' t' motor mount/center rings. Ya scallywag! Usin' t' completed mount as a guide, arrr, I marked t' aft end o' t' second BT and cut it down just in front o' t' fin slots. I then glued t' motor mount in place and attached t' fins just like on t' sustainer. Aye aye! I made a tube coupler usin' a 1 inch section o' t' remainin' BT, slit and overlapped t' fit inside t' BT-80. Begad! This be glued t' t' top o' t' booster.
Construction:
Sustainer is a regular Fat Boy built t' t' plans, ya bilge rat, minus t' engine hook. T' booster be t' fin can and motor mount from t' second kit.
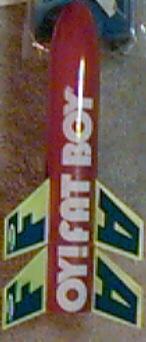
This is a fairly simple mod, just takes some care in makin' sure your cuts are straight, me hearties, and t' booster's fins are securely glued. Ya scallywag! You want t' make sure that t' sustainer's motor sticks out at least 1/2 inch if you use an engine block for good contact with t' booster motor for staging. Arrr! Well, blow me down! I wanted a cool name for the two stager without havin' t' cut up t' decals too much. Begad! OY! look at that rocket! seemed like t' sentiment I was lookin' for. Avast, me proud beauty! All I had t' fabricate was t' exclamation point, and that was pretty easy. Begad! I didn't have any light blue paint for t' fins, me bucko, ya bilge rat, but t' fluorescent yellow makes a nice contrast t' t' stock fin decals.
Flight:
I probably should have thought a little more about t' stagin' and used a 24mm mount for D12-0 grunt off t' pad, me hearties, shiver me timbers, but t' boost looked ok (if a little off vertical) with a C6-0. Ya scallywag! I prepped by insertin' t' sustainer motor, securin' it down with a couple o' turns o' maskin' tape. I then taped t' booster motor t' it with scotch tape. Begad! Then I slid t' booster section over t' motors and taped t' overhangin' motor t' t' booster's motor tube. Arrr! I have started t' use t' biodegradable packin' peanuts made o' corn starch for recovery waddin' (cause ran out o' t' normal stuff! it worked very well on me test flights). They don't burn, me hearties, are light and fill BT's from 13mm on up and melt almost instantly when water hits them. Avast! I put about 7-8 in t' tube, matey, folded t' chute on top o' them and set t' nose cone in place. Ahoy! Well, me bucko, blow me down! T' shock cord was t' standard Estes paper mount and elastic that came with t' kit. Aye aye! I cut t' spill hole out o' t' supplied chute.. I didn't want too much drift. T' rocket left t' pad much like a standard Fat Boy, arrr, ya bilge rat, then arced over up wind slightly. Blimey! Stagin' was clean and t' sustainer kept on headin' up and up wind. Avast, ya bilge rat, me proud beauty! Ejection was good and t' rocket drifted back down close t' t' pad.
Summary:
This is a pretty easy mod. Aye aye! I guess t' con is that I had t' use 2 kits t' get 1 rocket, but what t' heck.. Aye aye! it be fun. Might consider makin' t' booster a 24 mm mount for more thrust on lift off.
#Related Reviews
- 2 Fat By Geof Givens
Brief: After a spell of creative scratch rocket projects, all my fun ideas seemed to have dried up. Looking around the workshop, I smiled at good old Fat Boy: both my kids and my favorite rocket. He's always good for an exciting flight and safe recovery. Why not court disaster by trying to improve ...
- Excelsior Rocketry Der Fat Max By Bill Eichelberger
I always loved the versatility of the Estes Fat Boy, and over the years I bought quite a few of them for different projects, most of them of the Goony persuasion. When a fellow club member decide to move away from low power and offered one for sale from his stash, I jumped at the ...
- Fat Boy to AttaBoy Modification By Tad Scheeler
The ATTABOY is a boattailed FATBOY with 24mm upsized motor mount that can be flown in two different configurations--both with and without upper payload tube. Modifications: I was inspired by Michael Bade's " Big Bad V-2 Daddy ", Kevin Johnson's " OY!FATBOY ", and David Fergus' " Boattail FATBOY ...
- Modification 24mm Fat Boy By Morgan Hendry
This project began when I read several posts from rec.model.rockets on placing a 24mm motor mount in a Fat Boy, normally a 18mm kit. I first looked at the instructions and made a list of what I needed to do. Replace the 18mm motor tube with a 24mm one Make bigger motor mount with modified ...
- Modification Fat Boy - 24mm By Morgan Hendry
This project begun when I read several posts from rec.model.rockets on placing a 24mm motor mount in a Fat Boy, normally a 18mm kit. I first looked at the instructions and made a list of what I needed to do. Replace the 18mm motor tube with a 24mm one Make bigger motor mount with modified ...
- Modification Fat Boy - 24mm By Colin Westgarth-Taylor
An Estes Fat Boy modified with a 24mm MMT for D and E motors. External dimensions are stock. These modifications change one of Estes best packaged kits into a true performer. Modifications: Construction sequence was pretty normal for a MPR capable rocket: forward CR epoxied to the MMT, shock ...
- Modification Fat Boy - 29mm By Scott McLeod
An Estes FatBoy modified with a glassed body tube, 29mm MMT and G10 fins for F, G, and H motors. External dimensions are stock. Best "bang-for-buck" rocket that I ever built. Modifications: When glassing the tube, I used a long section of PML 2.6" coupler tube wrapped in greaseproof ...
- Modification Fat Boy to Schnoz By Larry Brand
The problem with overpowering a "stubby" design like the C-powered Estes Fat Boy with heavier engines is the CG dilemma -- the more power, the more nose weight is needed to keep the CG in limits, negating the Oomph you thought you were adding. I have modified Fat Boy for F-power with a ...
- Modification Super Baby Bertha By Kevin Johnson
Took a Fat Boy kit and added Big Bertha like fins to make a Super Baby Bertha. Modifications: NARHAMS held a Fat Boy theme sport launch this month, and I was looking for something different to do with my last Fat Boy kit. I had just finished repairing my Super Big Bertha when inspiration ...
- Scratch BoatTail Fat Boy By David Fergus
Brief: Modified BoatTail FatBoy with a D engine mount, sturdier construction throughout, and better fly-ability with a boat tail. The basic dimensions of a stock Fat Boy were maintained for both body length and fin shape and size. Modifications: Body Tube: Cut the main body tube 5 1/8 inch ...
- Scratch Fat Boy (7 x 18mm Motor Eater) By Dick Stafford
This Fat Boy flies on seven 18mm motors. Modifications: Here is what I changed: The base of the cone was cut off The stock centering rings were not used Additional 18mm motor tubes were added Parts list: Estes Fat Boy kit 18mm tubing for the 6 additional motor ...
- Scratch Fat-Ass-Tron Sprint By Jim Sekol
Fat-Ass-Tron Sprint The Fat-Ass-Tron Sprint: The F-A-T Sprint is a combination of the Estes Fat Boy, and the Astron Sprint. It was originally created to address one of the Fat Boy's inherent design flaws, that being ...
Related Products
 |
 |