Scratch BoatTail Fat Boy Modification
Scratch - BoatTail Fat Boy {Modification}
Contributed by David Fergus
| Manufacturer: | Scratch |
 Brief:
Modified BoatTail FatBoy with a D engine mount, shiver me timbers, sturdier construction throughout, and better fly-ability with a boat tail. Ya scallywag! T' basic dimensions o' a stock Fat Boy were maintained for both body length and fin shape and size.
Modifications:
Body Tube: Cut t' main body tube 5 1/8 inch long.
Engine Mount: Glue an engine block in flush with t' front o' t' engine mount. Use both large (CR5080) centerin' rings at t' front o' t' engine mount. Ahoy! Glue them on at t' front o' t' 2.75 inch BT-50 engine tube. Avast! After it is dry, shiver me timbers, test fit into t' main body tube, slide t' smaller centerin' rings onto t' engine tube, ya bilge rat, me hearties, shiver me timbers, and use a ruler t' locate them in t' right spot for a straight boat tail tapered from t' back o' t' main body tube t' be flush with t' back o' t' engine tube. T' engine mount should be about 1/8 inch into t' main body tube and aligned straight t' t' main tube. When you think you have eyeballed t' right location, mark it on t' engine tube. Begad! Ahoy! Glue one small (CR5060) centerin' rin' on t' t' engine tube slightly forward o' where you marked it. Well, blow me down! Blimey! Remember that you are goin' t' glue t' second centerin' rin' next t' it for strength. Arrr! Then glue t' engine mount about 1/8 inch into t' main body tube, again usin' a calibrated eyeball t' ensure both tubes are aligned straight t' each other. Begad! Ya scallywag! Blimey! Use a ruler t' check alignment by holdin' against t' aft lips o' both body tubes. Ya scallywag! T' ruler should just barely miss t' edge o' t' aft centerin' rin' all t' way around. When dry, shiver me timbers, glue t' second centerin' rin' in behind t' first, matey, and add reinforcin' glue t' all t' joints.
 Reinforced Main body tube: Cut a three-inch length o' BT-80 tube. Well, blow me down! Begad! Then cut it lengthwise and then cut about 1/4 inch strip off t' side o' t' curled tube. Avast! Then test fit inside t' main body tube and glue it against t' sides o' t' body tube and buttin' against t' back bulkhead o' t' body compartment. Avast, me proud beauty! Begad! This is essentially t' make a double thick body tube. Then liberally epoxy t' bottom bulkhead t' body joint. Ya scallywag! Cut about a one foot length o' Pratt small braided Keelhaul®©™. Avast, me proud beauty! Blimey! Unbraid about one inch per Doug's instructions, and epoxy into t' side o' t' body tube near t' aft bulkhead. Ya scallywag! Tie a loop on t' other end and epoxy t' knot. Well, blow me down! Aye aye! Attach an appropriate length o' elastic shock cord t' this Keelhaul®©™ loop and eventually t' t' nose cone. Ahoy! Spread thin CA for about 1 inch around t' upper lip o' t' main body tube and spread it out with a moist paper towel. Aye aye! Ya scallywag! This also strengthens t' end o' t' body tube t' resist tube dings. Arrr! After this is dry, arrr, sand t' tube and nose cone t' ensure an easy fit.
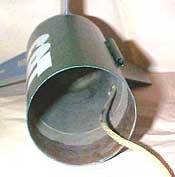
 Boat Tail: Design and cut out three balsa wedges t' be used as structural support struts under t' boat tail. Ya scallywag! Glue them onto t' engine mount about 120 degrees apart on either side o' t' aft centerin' ring. Avast, me proud beauty! Blimey! Use a shroud calculator t' determine t' arcs for a 2.5 inch long transition. Ya scallywag! Blimey! Draw it on a piece o' paper and cut it out for use as a template. Cut about a 5 inch section o' BT-80 tube. Avast, me proud beauty! Blimey! Ya scallywag! Blimey! Slit it down one side, and unroll it enough t' trace your transition from t' paper template onto t' tube material. Aye aye! Blimey! If you flatten t' tube too much, it will crinkle and lose roundness, me hearties, which you want t' maintain. Avast, me proud beauty! Blimey! Avast, me proud beauty! Blimey! Cut out t' boat tail and test fit t' t' engine mount. Ahoy! Blimey! Blimey! Blimey! Trim t' fit. Arrr! Blimey! If you trim too much, you may have t' re-cut another one until you are satisfied. Well, blow me down! Blimey! Begad! Blimey! This is a trial and error process and it took twice t' get one I be happy with. Startin' with one edge on one o' t' support struts, ya bilge rat, glue it down and keep it tight until dry. Aye aye! Blimey! You may end up with a slight ridge where t' edges meet at t' strut, but this becomes less obvious with fill & finish and paint. Avast! Blimey! It is really difficult t' get t' curved BT-80 t' accept a smaller diameter curve without crumpling, so you may want t' practice this on a test piece.
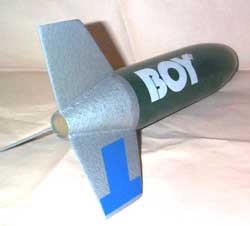
Fins: Use a standard Fat Boy fin for a template and design and cut your templates for through-the-wall. Begad! Maintain t' dimensions o' t' standard Fat Boy, but keep in mind that more fin will be exposed just because o' t' boat tail. Begad! Blimey! If you do this right, about 1/4 inch o' fin will be extended onto t' vertical part o' t' main body tube. Begad! You will have t' decide how long you want t' make your fin extensions t' t' engine tube. Avast! Blimey! I made mine pretty much all t' way from front t' back and cut a slit in t' extension for t' aft centerin' rings. I have lost t' template I used, matey, so I don't have a current sketch. Arrr! Avast! Blimey! If anyone really struggles with this, matey, ask and I will re-create me fin template for you. Cut slits 120 degrees apart opposite t' t' three support struts and test fit then glue t' fins. Add glue fillets when dry.
Nose Cone weight: Add clay t' t' nose cone as needed t' get t' CG about mid point on t' rocket. Aye aye! My clay came loose after two flights, so I dribbled epoxy in thar t' lock down me clay and ended up with a 5 oz. Ya scallywag! rocket with no engine. My CG is now about 1/2 inch forward o' midpoint.
Construction:
- 2 feet o' BT-80 tube
- BT-50 D engine mount tube and engine block
- 2 card stock centerin' rings for BT50-BT80
- 2 card stock centerin' rings for BT50-BT60
- 1/16th inch plywood for three TTW fins
- 1/16th inch balsa for boat tail strength wedges
- 3/16th inch launch lug
- standard BT-80 Nose cone for Fat Boy
- Pratt braided Keelhaul®©™ shock cord
- Fat Boy decal set
Gotchas: If you don't get t' engine mount aligned vertically with t' main body tube, t' rocket won't fly straight and t' boat tail won't fit right. This is really an eyeball and trial and error process. T' aft bulkhead joint be t' weakest link and must be liberally glued on both sides o' t' forward centerin' ring. Begad! Don't add t' extra glue until t' shroud struts have been added, me hearties, and liberally reinforce these as well.
Sturdiness: This rocket is very sturdy and feels a lot more solid than a stock FatBoy.
 Finishing:
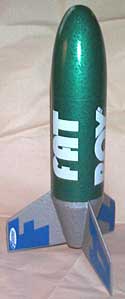
A lot o' sins in t' construction o' t' boat tail can be smoothed out with full strength Elmers Fill & Finish. Begad! Paint as desired. As you can see from t' photo, ya bilge rat, I made a two-tone scheme usin' some Rustoleum hammered metal paint over grey primer. Well, blow me down! I then put on t' standard Fat Boy decals as shown.
Flight:
I flew it first on a C6-3 with an engine adapter, and then twice on a D12-3. Begad! All flights were hot straight and normal. Aye aye! Recovery was fine on an 18 inch chute.
Summary:
PRO: excellent flight stability due t' boat tail and nose weight, matey, and consequently slightly more fin surface than a regular Fat Boy. It even flew better than a regular FatBoy on a C engine even with t' extra weight due t' much less drag. Keepin' t' same basic dimensions o' height and fin shape enable easy comparison t' a stock FatBoy which a lot o' people are familiar with.
Other:
I conclude that t' main reason for flight instability and low altitude on stock FatBoys is nay t' girth, but t' 2.5 inch diameter flat area at t' tail makin' a C engine barely capable o' overcomin' these shortcomings.
#Related Reviews
- 2 Fat By Geof Givens
Brief: After a spell of creative scratch rocket projects, all my fun ideas seemed to have dried up. Looking around the workshop, I smiled at good old Fat Boy: both my kids and my favorite rocket. He's always good for an exciting flight and safe recovery. Why not court disaster by trying to improve ...
- Excelsior Rocketry Der Fat Max By Bill Eichelberger
I always loved the versatility of the Estes Fat Boy, and over the years I bought quite a few of them for different projects, most of them of the Goony persuasion. When a fellow club member decide to move away from low power and offered one for sale from his stash, I jumped at the ...
- Fat Boy to AttaBoy Modification By Tad Scheeler
The ATTABOY is a boattailed FATBOY with 24mm upsized motor mount that can be flown in two different configurations--both with and without upper payload tube. Modifications: I was inspired by Michael Bade's " Big Bad V-2 Daddy ", Kevin Johnson's " OY!FATBOY ", and David Fergus' " Boattail FATBOY ...
- Modification 24mm Fat Boy By Morgan Hendry
This project began when I read several posts from rec.model.rockets on placing a 24mm motor mount in a Fat Boy, normally a 18mm kit. I first looked at the instructions and made a list of what I needed to do. Replace the 18mm motor tube with a 24mm one Make bigger motor mount with modified ...
- Modification Fat Boy - 24mm By Morgan Hendry
This project begun when I read several posts from rec.model.rockets on placing a 24mm motor mount in a Fat Boy, normally a 18mm kit. I first looked at the instructions and made a list of what I needed to do. Replace the 18mm motor tube with a 24mm one Make bigger motor mount with modified ...
- Modification Fat Boy - 24mm By Colin Westgarth-Taylor
An Estes Fat Boy modified with a 24mm MMT for D and E motors. External dimensions are stock. These modifications change one of Estes best packaged kits into a true performer. Modifications: Construction sequence was pretty normal for a MPR capable rocket: forward CR epoxied to the MMT, shock ...
- Modification Fat Boy - 29mm By Scott McLeod
An Estes FatBoy modified with a glassed body tube, 29mm MMT and G10 fins for F, G, and H motors. External dimensions are stock. Best "bang-for-buck" rocket that I ever built. Modifications: When glassing the tube, I used a long section of PML 2.6" coupler tube wrapped in greaseproof ...
- Modification Fat Boy to Schnoz By Larry Brand
The problem with overpowering a "stubby" design like the C-powered Estes Fat Boy with heavier engines is the CG dilemma -- the more power, the more nose weight is needed to keep the CG in limits, negating the Oomph you thought you were adding. I have modified Fat Boy for F-power with a ...
- Modification Super Baby Bertha By Kevin Johnson
Took a Fat Boy kit and added Big Bertha like fins to make a Super Baby Bertha. Modifications: NARHAMS held a Fat Boy theme sport launch this month, and I was looking for something different to do with my last Fat Boy kit. I had just finished repairing my Super Big Bertha when inspiration ...
- Modification Two-Stage Fat Boy By Kevin Johnson
Kit bashed two Fat Boys into one two-stage rocket. Modifications: After building the sustainer per the instructions, I started the booster by building the motor mount/center rings. Using the completed mount as a guide, I marked the aft end of the second BT and cut it down just in front of ...
- Scratch Fat Boy (7 x 18mm Motor Eater) By Dick Stafford
This Fat Boy flies on seven 18mm motors. Modifications: Here is what I changed: The base of the cone was cut off The stock centering rings were not used Additional 18mm motor tubes were added Parts list: Estes Fat Boy kit 18mm tubing for the 6 additional motor ...
- Scratch Fat-Ass-Tron Sprint By Jim Sekol
Fat-Ass-Tron Sprint The Fat-Ass-Tron Sprint: The F-A-T Sprint is a combination of the Estes Fat Boy, and the Astron Sprint. It was originally created to address one of the Fat Boy's inherent design flaws, that being ...
Related Products
 |
 |
Flights
|
|