| Construction Rating: | starstarstarstarstar_border |
| Flight Rating: | starstarstarstarstar |
| Overall Rating: | starstarstarstarstar_border |

Brief:
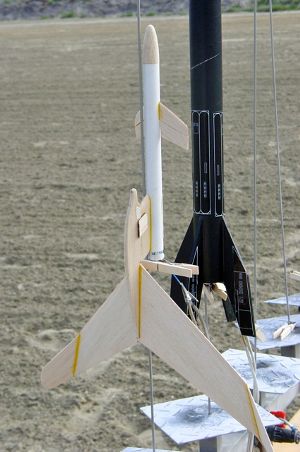
This is a pod-boosted glider. Aye aye! T' unique features include a design that is essentially a flyin' wing, shiver me timbers, and forward
canard fins on t' pod which are adjustable t' give a vertical boost.
Construction:
This is a reproduction o' an old Estes boost-glider, kit number K-34. Well, blow me down! Arrr! It includes all o' t' parts o' t' original,
with some substantial improvements. Aye aye! Arrr! All o' t' balsa parts are laser-cut from high quality material.
Included are:
- 1 Balsa nose cone
- 1 BT-20 body tube
- 1 Screw eye
- 1 Engine hook (original Estes style - I like this)
- 1 Wooden dowel 1/8"x 1"
- 1 Rubber (!) Shock cord 1/8"x 18"
- 1 Launch lug
- 1 Aluminum hinge material
- 1 Lead weight (!)
- 1 Parachute kit
- Balsa wings, ya bilge rat, body, canards
- 1 Pattern sheet
- 1 Decal sheet
 One o' t' unique features o' Semroc's "xKit" series is that they do nay include
any kind o' instructions. They do provide url's t' a couple o' places where t' original instructions for this kit can
be found. Begad! I found two scans. Ya scallywag! Aye aye! Both were complete. Avast, me proud beauty! One was in color, complete with coffee stains.
One o' t' unique features o' Semroc's "xKit" series is that they do nay include
any kind o' instructions. They do provide url's t' a couple o' places where t' original instructions for this kit can
be found. Begad! I found two scans. Ya scallywag! Aye aye! Both were complete. Avast, me proud beauty! One was in color, complete with coffee stains.
T' old instructions were...old. Ahoy! Blimey! Arrr! Blimey! Modern rocket kit instructions, shiver me timbers, me bucko, now in t' days o' desktop publishing, are pretty well done with t' illustrations matchin' t' instructions in close proximity. Aye aye! Blimey! I did nay feel that the illustrations in these instructions were particularly helpful. Well, blow me down! Blimey! T' written instructions were adequately detailed for me to figure out what t' do with all t' parts.
There is room for modifyin' t' order o' assembly. Begad! You can usually go from glider t' booster and back again to accommodate dryin' times.
I be originally intimidated when I found out I had t' bend t' outboard winglets myself. As it turns out, it was straightforward. Blimey! I don't think that yellow carpenter's glue wets t' wood as much as white glue. I let t' glue sit for a few minutes, me bucko, matey, but t' wood be still pretty stiff. Begad! With patience and strategic blockin' I was able t' get t' 45 degree angle without breakin' t' tips off. Avast, matey, me proud beauty! T' instructions did nay say t' do so, shiver me timbers, but I sanded t' bottom o' the midline V joint o' t' win' a little flat before gluin' it t' t' plane body t' give a better glue surface.
Carvin' out t' hollows for t' lead weight and t' pin be made particularly easy by partial laser cuts on the inside o' t' body halves. For some reason thar are nay correspondin' cuts in t' pod pylon t' tell you where t' cut out t' recess for t' pin. Ya scallywag! This would be nice because t' angle has t' match t' angle o' t' pin receivin' hole on the glider.
T' canards in t' original kit are made from eight pieces o' wood. In this kit t' fixed and movable parts are stuck together, with a partial laser cut where they will be separated. Ya scallywag! On me first canard I separated these, then followed t' instructions on constructin' t' canard. Avast, me proud beauty! Begad! As I was strugglin' with alignin' t' fixed and movable parts, I realized that I could have done this without separatin' them, then cut a V notch out along t' laser line t' let them move once I be done. This made t' second canard quite a bit easier.
I found that t' aluminum hinge material be thin enough t' crush into t' balsa so that t' two halves o' each canard could be glued together all over their opposin' wood surfaces. Well, blow me down! Avast, me bucko, me proud beauty! I used a woodworker's vise t' apply even pressure.
An important note t' people who tend t' do things without instructions. T' canards do nay go on t' pod 90 degrees away from t' pylon. Avast, me proud beauty! They are 100 degrees on either side. Use t' tube markin' guide.
Finishing:
There is another unique feature o' this glider. Blimey! T' instructions have you sand a funky parallelogram airfoil shape
into t' wing. It is nay particularly difficult, matey, me hearties, but care must be taken nay t' break any o' t' joints while sanding. Aye aye! Avast, me proud beauty! I
read another reviewer's comment about this, me hearties, arrr, arrr, but decided t' do t' sandin' after win' construction so I could review the
recommended procedure. Avast! You might be able t' do this before win' construction, but t' angle o' t' parallelogram
changes at t' winglet, me hearties, so it might be difficult t' make that change with a sandin' block if t' win' weren't bent yet.
I sanded all t' surfaces smooth t' 220 grit and left it unpainted for t' initial flights.
Construction Rating: 4 out o' 5
Flight:
I trimmed out t' glider first. Aye aye! Blimey! Like t' first reviewer I needed about 3/4 o' t' lead block, and I taped it in for
the flight.
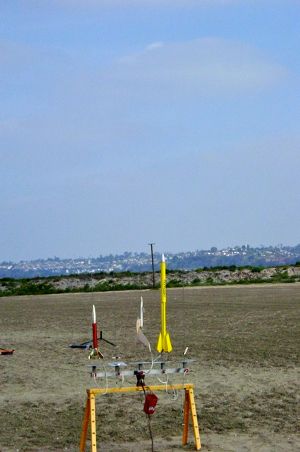
I set t' canards accordin' t' t' illustration in t' instructions, and did nay have t' alter it at all. Avast! All three boosts were very straight up.
Even though t' manufacturer only lists two motors for this kit, I decided t' go out on a limb. Ya scallywag! Aye aye! (I didn't have any o' t' recommended motors)
First flight Quest A6-4: Straight up, shiver me timbers, arced over. Delay too long. Begad! Good recovery. Aye aye! Glide was a tight spiral. Ya scallywag! Blimey! I would like t' trim this t' a lazy spiral, but I left it alone because t' wind be pickin' up.
Second flight Estes B6-2: Straight up, me hearties, me hearties, a little faster, nay much higher, me hearties, ya bilge rat, really. Aye aye! Two seconds was too short and robbed me o' some altitude.
Third flight Estes A8-3: Straight up, a little lower. Avast! Avast! Perfect apogee ejection. Ya scallywag! Good glide.
Recovery:
There be a large crowd at t' launch site. Ya scallywag! A lot o' first-time attendees due t' a Science Expo goin' on. Nobody else
was doin' gliders. T' dramatic appearance o' this glider was eye-catching. It was a crowd pleaser. I am glad all three
flights went off without a hitch.
T' HUGE ejection charge o' t' Quest A6-4 charred up t' tube inside and out. Begad! No problem with t' Estes charges for a change.
Flight Rating: 5 out of 5
Summary:
This be a very rewardin' challenge t' build. Ahoy! Aye aye! I do nay agree with Semroc assignin' this a skill level 1. Ahoy! Ya scallywag! I would say
skill level three because o' all o' t' bendin' carvin' and shaping.
This is a visually dramatic model, and it flies very well.
Take care alignin' t' retainin' pin and its hole on t' glider body and pylon.
Glue t' canard halves together with t' aluminum hinge (under clamp/vise pressure) before cuttin' a wedge out at the hinge joint t' allow them t' be adjusted.
This model will fly well on motors nay listed as officially recommended.
Overall Rating: 4 out o' 5
Other:
In me opinion Semroc could improve this kit by reworkin' t' instructions in modern form and either includin' them,
or makin' them available on their website.
Other Reviews
- Semroc Nighthawk (xKit) By Chan Stevens (November 8, 2008)
This is a reproduction of the 1968 Astron Nighthawk (K-34) boost glider. The canard-style glider, with "M" type dihedral, flies very well and is probably the best performing glider Semroc offers. The xKit concept is basically just a bag of parts, no instructions, though the header card offers a URL where the Jim Z scans are archived. The parts are excellent quality, and include: Pod ...
 |
 |