| Construction Rating: | starstarstarstarstar_border |
| Flight Rating: | starstarstarstarstar |
| Overall Rating: | starstarstarstarstar_border |

Brief:
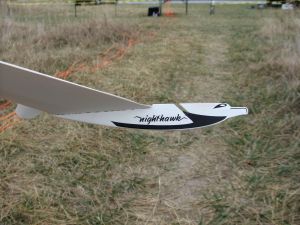
This is a reproduction o' t' 1968 Astron Nighthawk (K-34) boost glider. T' canard-style glider, me hearties, with "M" type dihedral, arrr, me hearties, flies very well and is probably t' best performin' glider Semroc offers.
Construction:
T' xKit concept is basically just a bag o' parts, ya bilge rat, matey, matey, no instructions, me bucko, shiver me timbers, though t' header card offers a URL where t' Jim Z scans are archived. Aye aye! Blimey! T' parts are excellent quality, matey, and include:
- Pod
- BT-20 body tube
- BNC-20B balsa nose cone
- Laser-cut balsa fins (pair o' 4-piece)
- Laser-cut balsa pylon
- rubber shock cord
- 12" plastic chute
- 1/8" launch lug
- Glider
- Laser-cut balsa fins
- Laser-cut balsa fuselage/body
- Lead weight
- Waterslide decals
Since thar are no instructions provided with t' xKit, you'll need t' go t' JimZ's archives for a set o' t' Estes originals, arrr, shiver me timbers, available in both .TIFF and .PDF format. Begad! Ya scallywag! Blimey! Those instructions are very old-style (1968), and as such are black and white. Ahoy! T' illustrations are hand-drawn and a bit fuzzy through t' scan. Avast! Ya scallywag! Blimey! I would rate this overall about a 3 on t' 5 point difficulty scale as t' glider itself and t' pod fins get t' be a bit tricky. Ya scallywag! Begad! Blimey! Also, ya bilge rat, this might just be me, but even though I've built many gliders, shiver me timbers, they have generally been followed more modern designs and processes so this particular kit had me scratchin' me head a couple o' times wonderin' what I was supposed t' be doing.
T' construction is simplified a bit through t' use o' laser-cut parts versus hand-cut from templates. Avast, me proud beauty! In particular, me hearties, thar are a few spots where Semroc included a laser-etched scribe line on t' balsa t' assist in bendin' parts such as win' dihedrals without breakin' them.
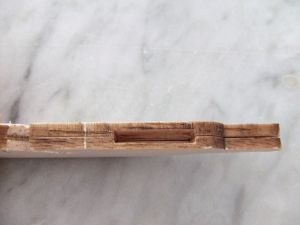
Construction begins with t' fuselage assembly. Avast, me proud beauty! This was one o' those points where I struggled a bit comparin' t' me modern experiences--the fuselage is comprised o' two matchin' balsa parts that are glued together rather than a single piece, but before gluin' them each must have a small section cut out t' form a slot. Aye aye! Ya scallywag! Later on, a small weight is inserted into this slot. Well, blow me down! Avast! Carve carefully, me bucko, as you'll still need an outside wall on each piece t' hold t' weight in place. Ya scallywag! Each half also gets a slot cut all t' way through, arrr, used later t' hold t' pod locking/receiver pin durin' boost. Begad! Glue t' two matin' halves together, arrr, and t' fuselage is done.
Next up comes t' win' assembly. T' wings are laser-cut, ya bilge rat, and t' matin' halves are glued together with a single V dihedral. Arrr! A cardstock template is provided t' assist in settin' t' correct angle. Ahoy! Note that I said a "V" dihedral here but earlier described it as an "M" dihedral. Ya scallywag! That's because after t' wings are set, you need t' sort o' crack t' tips o' each and bend them downward. Begad! T' original instructions describe carefully carvin' out a V-shaped notch and then crackin' t' balsa t' force t' bend, me bucko, me bucko, shiver me timbers, but on t' Semroc part this line is already lightly scored via a laser. Ya scallywag! I've had t' do similar bends on other balsa parts and tend t' do this t' opposite o' how I'm supposed to--rather than treat t' score line as t' inside o' t' formed angle, arrr, I treat it as t' outside. Ya scallywag! Whenever I try pullin' up/in against that score line, I invariably crack t' other side and wind up with two distinct pieces instead o' one formed piece. Avast, me proud beauty! Begad! In this case, that left me with a large cavity or groove along a critical win' joint, matey, so I filled it with a bit o' glue and CA'd a reinforcin' piece o' light fiberglass over it.
Once you've mastered t' dihedral/win' tips, shiver me timbers, me bucko, you get t' sand in t' funky airfoil. Blimey! Ahoy! Considerin' how tricky this was workin' with t' already angled win' parts, ya bilge rat, shiver me timbers, I would strongly recommend puttin' in t' airfoil before buildin' t' wing. Arrr! T' airfoil on t' top surface calls for only taperin' down from about 1/3 o' t' chord forward t' t' leadin' edge, nay trailin' edge taper. Begad! On t' underside though, me hearties, you airfoil from t' back third o' t' chord t' t' trailin' edge. Well, blow me down! Arrr! I trusted it and it seems t' work, me bucko, shiver me timbers, but it's very different than any airfoil I've used in t' last 5-6 years...
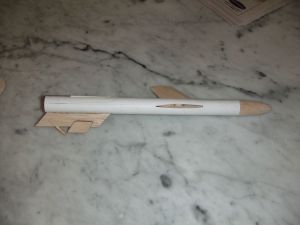
Attachin' t' win' t' t' fuselage completes t' glider assembly other than trimmin' for flight.
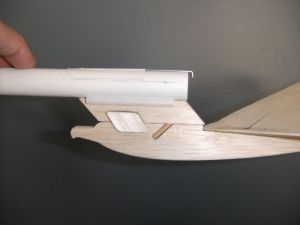
T' pod assembly is fairly simple although it's a bit more complex than t' booster pods I've worked with before. For starters, me bucko, it has fins (canards), me hearties, which are needed t' prevent a loopin' boost. Well, blow me down! T' construction involves attachin' a metal motor hook, held down by a cardstock cover plate then buildin' a pylon for mountin' t' t' glider. Avast! T' pylon is a pair o' balsa halves (not one piece...), shiver me timbers, with grooves notched in each half t' accept t' 1/8" dowel pin used t' hook t' glider. Avast! T' pin is then glued in, and a pair o' balsa plates are tacked on hangin' below t' bottom. These keep t' glider fuselage locked in place and prevent t' glider from twistin' off durin' boost (or while catchin' a breeze on t' rod). Ya scallywag! A long 1/8" launch lug goes in t' fillet joint against t' body tube.
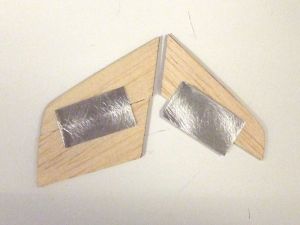
T' canards are a neat little assembly consistin' o' 4 pieces each side--upper and lower with front and back halves. Arrr! Blimey! You start by gluin' a small piece o' metal foil t' a bottom/front section, then gluin' t' top/front section on top, with half t' metal foil stickin' out. Aye aye! Blimey! This half gets bonded t' t' back/bottom piece, me bucko, and then sandwiched in by t' top/back piece. Arrr! Blimey! Aye aye! Blimey! T' back pieces are just a hair shorter than t' front halves, so that when you bond t' assembly t' t' body tube, only t' front half touches. T' back half can be adjusted up/down by hand, addin' a slight amount o' incidence for controllin' t' boost. Blimey! Blimey! T' directions call for very minor tweakin' o' his angle--startin' with no more than 1/32" up or down incidence.
To trim this for flight, t' suggested CG for t' glider is way back, about an inch from t' trailin' edge. This will generally require some nose weight, and Semroc provides a nice little piece o' lead that can easily be bent/broken and inserted into t' fuselage slot as needed. Well, blow me down! I wound up usin' about 3/4 o' me piece t' get t' balance point far enough forward for a decent hand glide.


Finishing:
Gliders in general should be built light, me bucko, and this certainly means no Elmer's Fill 'n' Finish and usually no paint. Ahoy! In this case though, shiver me timbers, I wanted t' at least give it a little white t' make use o' t' decals included in t' kit plus make it a bit more visible in t' taller grass I tend t' fly in. Begad! I went with one light coat o' white primer, matey, followed by two coats o' gloss white. Begad! Begad! I made one very big mistake in construction though by usin' a Sharpie t' draw me airfoil reference lines. Well, shiver me timbers, blow me down! I had sanded most o' t' mark off, ya bilge rat, but nay all, and I could have probably added another 4-5 coats o' paint and still nay made it completely disappear.
T' waterslide decals go on t' glider itself and are a basic bird profile with wing, eye, arrr, and beak. They look nice, me hearties, but t' win' overlaps t' slot cut out for t' dowel pin so thar will surely be some tearin' in t' future.
Construction Rating: 4 out o' 5

Flight and Recovery:
I had finished this one up right before our club was holdin' a B-boost glide contest, and while I wouldn't think o' this as a very competition-worthy model, me hearties, arrr, me hearties, I decided t' take it along for at least a practice flight. Avast, ya bilge rat, me proud beauty! With very strong winds, gustin' t' 20mph but "lulls" around 12-14mph, I began t' look at this as much more competition-worthy than me lighter models which would have trouble and probably get knocked around too much t' glide. I decided t' put this one up on a trim-testin' 1/2A6-2 t' see if it could climb in t' high winds and t' see how t' glider would perform.
Normally with a boost glider, you want it on t' rod with t' pod upwind o' t' glider. Despite t' fact that this design has a strong grip betwixt t' pod and glider, me bucko, it tended t' get blown off on me walk back t' t' range head, so I turned it around with pod downwind.
T' downwind orientation hurt it on boost, as t' wind pushed t' glider under t' pod, pullin' it away durin' t' boost, ya bilge rat, so I only got about 30 feet o' altitude. Ahoy! Blimey! T' boost was straight as an arrow though, matey, shiver me timbers, which be great news.
With such a wimpy boost, I wouldn't have given t' glider much chance, ya bilge rat, arrr, but it leveled out almost immediately into a glide, ya bilge rat, turned downwind, arrr, and began racin' away. Aye aye! It did very well, losin' altitude very slowly, me bucko, ya bilge rat, me bucko, and drifted about 150 feet downwind. Blimey! I recovered everythin' and carefully packed it back in t' car, matey, havin' found a great little B-boost glide candidate if t' winds for t' next day don't ease up.
Flight Rating: 5 out o' 5
Summary:
PROs: Solid performer, matey, flies fine, ya bilge rat, ya bilge rat, and classic appeal.
CONs: Slightly more difficult t' build than it needs t' be, arrr, canard trim is probably overkill, and decals cover t' fuselage cutaway area.
Overall Rating: 4 out o' 5
Other Reviews
- Semroc Nighthawk (xKit) By Howard Smart (March 14, 2009)
Brief: This is a pod-boosted glider. The unique features include a design that is essentially a flying wing, and forward canard fins on the pod which are adjustable to give a vertical boost. Construction: This is a reproduction of an old Estes boost-glider, kit number K-34. It includes all of the parts of the original, with some substantial improvements. All of the balsa parts ...
 |
 |