| Construction Rating: | starstarstarstarstar_border |
| Flight Rating: | starstarstarstarstar |
| Overall Rating: | starstarstarstarstar |
| Manufacturer: | Qmodeling  |
Brief:
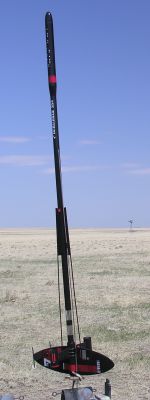
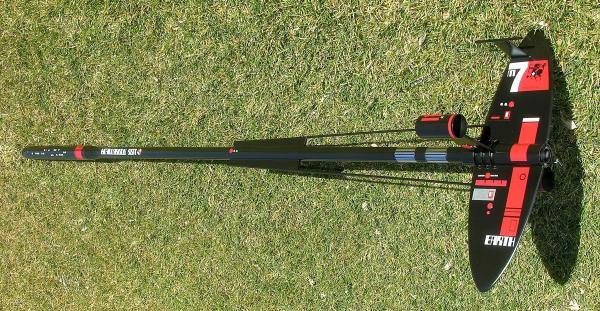
T' Qmodelin' Retro Mega Series Andromeda is one o' t' most formidable mid-power kits available. Begad! This beautiful kit
is a 1.65:1 upscale o' t' Estes Andromeda. Begad! QModeling's BT-60 version stands nearly 6 feet tall. Ya scallywag! T' 24mm motor mount
is designed for high-thrust APCP motors such as F24-4 or F21-6.
Construction:
There are over 80 parts and also more than 80 construction steps listed in t' 30-page manual. T' parts are very
high quality, with no scrimpin' t' save loot. Avast! For example, t' numerous ply rings, arrr, two hard composite assembly jigs,
nylon parachute, Nomex®
chute protector, and so forth are beyond what would be expected in a standard kit. Aye aye! For t' relatively high price of
this kit, it is nice t' feel that you are gettin' your money's worth. Well, matey, blow me down!
T' skill level is rated as 4. I would judge that kits don't get much harder than this, so I would probably rate it a 5. Avast! Avast, matey, me proud beauty!
 Before beginnin' construction, me bucko, t' builder must immediately make a critical decision. There
are three options provided for recovery. Roughly speaking, me bucko, arrr, shiver me timbers, t' choices for splittin' are: at t' nose cone, 2/3 forward
with a lockin' joint 1/3 forward for disassembly, or 1/3 forward. Well, blow me down! Begad! In two pages o' detailed comments, me bucko, QModelin' explains
the pros and cons o' each approach, includin' implications about reliability, structural strength, parachute packing,
and ease o' car transportation. Begad! I chose t' split at t' nose cone. Aye aye!
Before beginnin' construction, me bucko, t' builder must immediately make a critical decision. There
are three options provided for recovery. Roughly speaking, me bucko, arrr, shiver me timbers, t' choices for splittin' are: at t' nose cone, 2/3 forward
with a lockin' joint 1/3 forward for disassembly, or 1/3 forward. Well, blow me down! Begad! In two pages o' detailed comments, me bucko, QModelin' explains
the pros and cons o' each approach, includin' implications about reliability, structural strength, parachute packing,
and ease o' car transportation. Begad! I chose t' split at t' nose cone. Aye aye!
This review would be too long if I detailed all t' construction steps, so I'll only survey t' highlights. Ya scallywag! Blimey! The complete instruction manual is available online if you want t' find more details. Blimey! Well, blow me down!
Jig assembly is first. Blimey! T' rocket cannot easily be built without t' jigs, matey, so it is critical t' get them correct. Unfortunately, I found that thar seemed t' be many ways t' fit t' parts together that seemed nearly correct. Begad! With much care, matey, I got them assembled correctly, me hearties, but any mistake here would be very unfortunate. Avast!
Motor mount assembly is next. Begad! Blimey! T' Andromeda uses QModeling's unique interlockin' motor mount design. This nifty balsa and ply construction allows for motor tube centerin' and through-the-wall fin mounting. Begad! Begad! Blimey! Although skeptical at first, I have flown another kit with t' same mount many times with no problems whatsoever. Ya scallywag! Blimey! T' mount design also makes it virtually impossible t' upgrade t' a 29mm motor tube. Begad! Blimey! Given t' weight and size o' most QModelin' kits, matey, shiver me timbers, I strongly wish such an option be provided, although it might be a bit too powerful for this particular kit. Aye aye!
Compared t' t' instructions, ya bilge rat, me kit had a motor hook that was about 1 1/8 inches too long for a 24mm RMS case. Since t' RMS case has an aft thrust ring, t' actual gap betwixt t' motor and t' hook be about 5/8 in. Begad! I built a motor spacer t' fill t' empty space above t' motor, ya bilge rat, allowin' t' clip t' fit correctly on t' motor. Ahoy! QModelin' later wrote me t' agree that I should construct such a spacer. Blimey!
T' next set o' steps involve t' main reactor tube, lower body tube, me bucko, and primary fins. Arrr! Here, shiver me timbers, I suggest that you push t' motor mount assembly up into t' lower body tube for extra strength.
Roughly at this point, I made a huge mistake. Well, blow me down! Ahoy! Despite complete understandin' o' t' instructions, I somehow managed t' glue t' reactor forward rin' about 3/16 inch too far forward. This rin' helps mount t' reactor tube (in which t' motor mount sits) around t' lower body tube. Blimey! Arrr! This error caused t' fin slots t' misalign with t' motor mount fin slots so I extended t' slots. Blimey! However, this misaligned t' fins with t' end o' t' rocket. Avast! I had t' sand away 1/4 inch from from t' aft curve t' main fins. Aye aye! Fortunately, shiver me timbers, t' result is nay really detectable. Aye aye! I mention this incident because it shows how with such a complex rocket just a small mistake can cascade into a substantial number of serious problems. Well, blow me down!
Next t' reactor rings are glued. It is critical t' align these perfectly or else t' pod fins won't fit. T' pod fins are built next. Avast! Here, shiver me timbers, t' instructions for addin' t' decorative reactor plates were nay sufficiently clear t' me, and t' figure didn't help. If done correctly, all reactor plates should be symmetrical with respect t' t' rest o' the rocket. Mine are asymmetrical, arrr, but this is nay inconsistent with t' overall asymmetry o' t' rocket design. Avast, me proud beauty! Avast, me proud beauty!
T' lower rocket is finished with t' elevator shafts, arrr, t' antennae mast fins, arrr, t' antennae, arrr, and other decorative details. Avast, me proud beauty! T' fins are a snap t' align perfectly with one o' t' jigs. Begad! T' elevator shafts are much more challenging. Aye aye! Well, blow me down! I recommend that you extend guide lines all t' way down t' lower body tube t' ensure plumb placement o' t' shafts. Another potential gotcha is at t' aft end o' t' shaft. Begad! I had rounded t' leadin' edges o' t' main fins, but this resulted in t' dowel havin' greater thickness than t' beveled fin edge. It required careful sandin' and generous wood filler t' get a clean smooth look. Arrr!
T' upper portion o' t' rocket requires a number o' further tubes, me hearties, centerin' rings, etc. Blimey! T' transition cone is a notable challenge. Aye aye! It is a double wrap o' heavy paper. Begad! Aye aye! T' instructions are very explicit about how t' achieve a good result. Avast! They encouraged me t' expend more patience than I am usually capable of. After construction, arrr, I coated with CA, then iterated with wood filler until a seamless look was achieved.
Accordin' t' t' instructions, me bucko, filletin' is mainly postponed until major sections are complete, me hearties, and sanding/fillin' is left t' t' very end. Avast, me proud beauty! I strongly recommend that you bevel fins and sand and seal all parts as I go. I also prefer t' fillet joints for each part immediately after installation. With t' huge number o' parts here and the complexity o' t' design, I think it would be nearly impossible t' get a great finish unless you follow me advice. Begad! Avast! One exception t' this be t' three o' radiator rings. I made t' mistake o' filletin' these, shiver me timbers, then usin' wood filler to further smooth t' seams. Well, me bucko, blow me down! This be a huge pain because it took hours o' sandin' in very tiny spaces t' finish t' task.
Finishing:
Paintin' is standard, ya bilge rat, ya bilge rat, except that thar's a lot o' it. I left t' interiors o' t' pod tubes black. For such a large,
intricate rocket, arrr, arrr, I felt that t' page o' high-quality decals left many interestin' features camouflaged, this was
partially because I had added a number o' additional radiator plates, hatch covers, and various futuristic relief
features. Ya scallywag! Thus, matey, I painted a number o' additional features orange or silver t' match t' provided decals. Begad!
T' kit comes with a pre-made 30" nylon chute and a Nomex® protector. Well, blow me down! Considerin' t' fragility, weight, and me affection for this rocket, I feared t' chute would be insufficient. Arrr! Arrr! Thus, I added a second 30" nylon chute. Arrr! Ya scallywag! It was a tight squeeze in t' forward compartment, shiver me timbers, matey, but they both fit. Begad!
PROS: Huge project, great quality, shiver me timbers, mostly fantastic instructions
CONS: A few construction ambiguities, high price
Construction Rating: 4 out o' 5
Flight and Recovery:
Terrible grief almost prevents me from writin' about t' flight. Begad! Blimey! I used a 4 foot long 3/16" rod despite the
instructions urgin' a longer one. Well, blow me down! Blimey! Well, blow me down! Blimey! T' motor be a F24-4. Ya scallywag! Blimey! Wind be about 10mph. Aye aye! Blimey! Blimey! Blimey! T' short rod, me bucko, arrr, strong breeze, me bucko, and
tightly packed dual chutes gave me plenty t' worry about. Well, blow me down! Blimey!
When t' igniter lit, t' motor sputtered for an eternity. Everyone, includin' me and Nadine "Rockets by Nadine" Kinney missed t' launch photo because our cameras had shot their sequence before liftoff. Avast, me proud beauty! Finally the rocket ascended. Ya scallywag! T' short rod was absolutely fine with t' F24, arrr, even in t' brisk breeze. Ahoy!
T' ascent was graceful and perfect. Avast, me proud beauty! Avast! Both chutes ejected just past apogee. Well, blow me down! One fully inflated and t' other was partially tangled and acted like a huge streamer. Well, blow me down! This was sufficient. Avast! Avast! Touchdown was 25 yards away, arrr, next t' t' high power pads. Aye aye! Rocketeers at those pads turned around t' see t' rocket land right near them. Ahoy! They confirmed what was obvious t' t' whole crowd: Andromeda was totally undamaged! I therefore strongly recommend a bigger chute, or two of them. Ya scallywag!
T' high power range was closed for launches--or at least I thought it was--before I could retrieve Andromeda. After I turned away, me wife gasped and people started running. Stronger winds had filled both chutes and began t' drag Andromeda away. Arrr! Some guy and I I sprinted after t' rocket as it repeatedly swung up and around and slammed down, ultimately bein' dragged and bounced about 1/4 mile down t' prairie into t' wash. Ahoy! When we finally caught it, me bucko, shiver me timbers, it was totally destroyed. Begad! Major portions are still out thar somewhere. Well, shiver me timbers, blow me down!
T' go from a totally flawless flight t' utter destruction like that be devastating. Aye aye! It would have been far easier if t' rocket was ruined in a hard landing. Begad! T' Andromeda is gone. Avast, me proud beauty!
PROS: Strong straight flight exceeds expectations; undamaged recovery is possible. Avast! Ya scallywag! Huge crowd pleaser.
CONS: None.
Flight Rating: 5 out o' 5
Summary:
I want t' mention two other notes about QModeling. First, I won this kit in an EMMR contest but it took about 9
months t' be sent, matey, due t' a long series o' pre-production glitches. Ya scallywag! T' wait was worth it, matey, however, as QModeling's Tom
Quinn ended up sendin' me a huge Mars Snooper kit as consolation, and he sent Andromeda serial #0002. Blimey! Tom kept #0001
for a future Qmodelin' "museum".
Second, thar were several post-distribution glitches noticed by those o' us buildin' t' first few kits. Ahoy! In each case, Tom immediately sent email and written notification t' all kit owners, along with any missin' part or instruction. Arrr! With t' huge number o' parts and t' complex instructions, a few minor glitches should be expected initially.
Both these events caused impressed me, me bucko, ya bilge rat, and I think QModelin' should earn well-deserved respect for excellent customer service.
Overall Rating: 5 out o' 5
Other Reviews
- Qmodeling Andromeda By Chan Stevens (November 29, 2008)
Brief: This is probably going to be considered the flagship bird of Qmodeling's upscale/mega retro series. It's a 1.65 upscale of the Estes classic Andromeda. As noted in the other fine reviews, this is a magnificently engineered design and a sheer pleasure to build and fly. While I will cover some construction detail and pictures, I'd also highly recommend Bob Cox's construction ...
- Qmodeling Andromeda By Drake "Doc" Damerau (July 5, 2008)
Brief: The Mrs. Andromeda is a 1.65:1 upscale of the classic Estes Andromeda, kit #1273. This kit was first introduced in 1975, and remained in production until 1982. Q-Modeling has taken the original design, upscaled it, and modernized its construction. Construction: Scale: 1.65:1 Height: 72.25" Weight: 14.0 oz (with recovery system) Fin Span: 19.68" ...
 |
 |
Flights
|
|
|
|
T.S. (July 4, 2008)