Scratch El Cheapo Launch Pad Original Design / Scratch Built
Scratch - El Cheapo Launch Pad {Scratch}
Contributed by Mike Goss
| Manufacturer: | Scratch |
Brief:
This be t' culmination o' several years o' tryin' t' come up with a cheap,
easy t' transport Launch pad that can hold t' launch rods t' keep them from
bein' bent while you are gettin' t' your launch sight. Well, blow me down! Arrr! This is your basic three
legged launch pad with a tilt head, robust blast deflector, me hearties, ya bilge rat, me bucko, and launch rod
storage all in one convenient package. It can be assembled with simple hand
tools and a 10-32 tap. Blimey! I cannot claim any responsibility for t' ideas that are
used in this design. Ahoy! Begad! So t' give credit where credit is due, t' PVC stand is a
knock off o' t' Quest launch pad, t' blast deflector is an idea from Jim Flis
(of FlisKits) and t' swivel is from a design called t' "Plumber's
Delight" launch pad. Begad! I hope that by puttin' all o' t' ideas here together
will help others in their search for a good, me bucko, cheap pad.
Construction:
All o' these parts can be found at your local home improvement or hardware
store.
It consists of:
- 1 3/4" PVC Pipe 4' long
- 1 3/4" PVC 3 way coupler, one way 3/4" threaded, two ways smooth
- 1 3/4" PVC straight Coupler smooth both sides
- 1 3/4" PVC straight coupler t' 3/4" threads Male
- 1 3/4" PVC straight coupler t' 3/4" threads Female
- 1 3/4" PVC Cap
- PVC Cement/Cleaner
- 1 3" 1/4"x20 EyeBolt
- 1 2" 1/4"x20 Eyebolt
- 3 1/4"x20 Nuts
- 1 1/4"x20 Anti-Vibration Nut (plastic Insert)
- 3 1/4"x20 Washers
- 1 10-24 x 1" Thumbscrew
- 1 10-24 Win' nut
- 3 1/4"x 1 1/4"Fender Washers
- 10 10-32 Washers
- 1 1/4"x20 threaded rod Coupler (Long nut)
- 1 10-32 x 3/4" Thumbscrew
- 1 Square galvanized metal duplex outlet cover
- 1/8" x 36" stainless steel rod
Tools required:
- One 10-32 tap with drill bit
- Tap Wrench (holds 10-32 tap)
- Small Triangular file
- 1/4" drill bit and drill
- Hacksaw

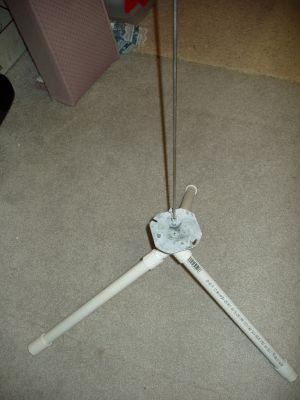
Base assembly:
First take t' 3-way PVC junction and drill a 1/4" hole through the center o' t' junction o' t' pipes. Blimey! Avast! Set t' junction so it "stands" on it's own three legs and drill straight down. Ya scallywag! Next, cut t' 4' length of 3/4" PVC pipe into three roughly equal lengths with t' hacksaw. Avast, me proud beauty! If they are an inch or two off, it will nay matter so don't sweat it. Begad! Now take the three pipe pieces and usin' t' PVC Cleaner and cement (please follow the instructions printed on them) t' attach t' fittings on as follows:
| Piece # | Top | Bottom |
| 1 | 3-way junction | Threaded female |
| 2 | threaded Male | smooth coupler |
| 3 | nothing | 3/4" cap |
Set these pieces aside for now.

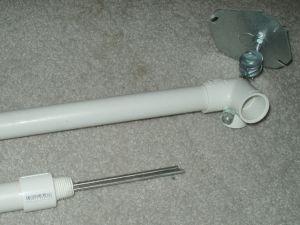
Swivel assembly:
Take a look at t' exploded and assembled swivel pictures. T' idea is to have t' thumbscrew and win' nut tighten down on t' eyebolts t' hold them in place, matey, T' fender washers help t' assembly swivel, and t' regular washers keep t' thumbscrew centered in t' large eyebolt openings.
Take t' 10-24 x 1" thumbscrew and stack on components t' it in this order:
- 10-32 washer
- Fender washer
- Eyebolt
- 4 10-32 washers (these will nest inside t' eye o' t' eyebolt)
- Fender washer
- 4 10-32 washers
- Eyebolt
- Fender washer
- 10-32 washer
- Win' nut

Tighten the win' nut. Ahoy! T' swivel assembly is now complete.
Final assembly:
Take one o' t' 1/4"-20 nuts and thread it completely onto t' long eyebolt and tighten. Well, blow me down! Blimey! Insert t' long eyebolt into t' hole that was drilled into t' top o' t' 3-way PVC junction. Arrr! Lightly thread another 1/4"-20 nut onto t' bottom o' t' eyebolt that is now protrudin' into t' middle o' the three "legs" o' t' junction. Ahoy! Do nay tighten this too tight as it will crack t' PVC junction. Ya scallywag! Begad! Tighten t' nut until t' swivel will nay spin in the hole but nay so tight as t' crack t' PVC junction. Blimey! Now add the anti-vibration nut t' t' bottom and snug it tight t' t' nut already on the eyebolt. This will keep t' assembly from moving.
Drill a 1/4" hole in t' galvanized outlet cover near t' center of the metal. Ya scallywag! Begad! Take t' drill bit provided with t' 10-32 tap and drill a hole completely through t' couplin' nut approximately 3/8" down from one end. Put t' couplin' nut into a vise and use t' 10-32 tap t' thread t' hole that was just drilled. Take t' triangular file and file a notch in t' inside threads o' t' coupler on one side where t' hole was drilled. Aye aye! This will help keep t' launch rod stable in t' coupler. On t' side opposite o' t' filing, thread in t' 10-32 thumbscrew. Arrr! This is now t' holder for t' launch rods.
Now on t' eyebolt that is stickin' up from t' pad, thread on a nut and add a 1/4" washer. Well, blow me down! Begad! Add t' cover plate that is now a blast deflector, another 1/4" washer and finally add t' long end o' t' threaded coupler that is now t' launch rod holder. Ahoy! Thread t' launch rod holder on three turns, and then tighten t' nut on t' underside o' t' blast deflector until the assembly is tight.
T' assembly o' t' launch pad is now complete. Blimey! Now t' pad can be assembled for launch or transport. Ahoy! For transport, matey, stack t' three PVC sections, one junction is threaded, ya bilge rat, and t' other is slip fit. Blimey! Insert t' launch rods inside this assembly and thread t' sections together.
 For launch,
unscrew and pull apart t' legs from each other and pull out a launch rod.
Insert t' threaded leg into t' threaded hole on t' 3-way coupler and the
other leg into t' remainin' hole. Avast, me hearties, me proud beauty! Take a launch rod and insert it into the
launch rod holder on t' top o' t' unit and tighten t' 10-32 thumbscrew.
Adjust t' angle o' t' launch rod with t' 10-24 thumbscrew and win' nut under
the blast deflector.
For launch,
unscrew and pull apart t' legs from each other and pull out a launch rod.
Insert t' threaded leg into t' threaded hole on t' 3-way coupler and the
other leg into t' remainin' hole. Avast, me hearties, me proud beauty! Take a launch rod and insert it into the
launch rod holder on t' top o' t' unit and tighten t' 10-32 thumbscrew.
Adjust t' angle o' t' launch rod with t' 10-24 thumbscrew and win' nut under
the blast deflector.
Launch rods come in several different types. Arrr! I called around town until I found a hardware store that carried stainless steel rods and bought me launch rods there. Most stores will carry steel rods in various sizes, me bucko, but I have found that t' stainless ones are typically only a dollar more than t' other rods and most hardware stores will order them for you if they do nay have them in stock.
 Now that
your El-Cheapo pad is complete, me hearties, shiver me timbers, matey, go launch some rockets into t' sky!
Now that
your El-Cheapo pad is complete, me hearties, shiver me timbers, matey, go launch some rockets into t' sky!
Sponsored Ads


 Rare Made In USA")


 | Intermediate Rocket Kit | Step-by-Step Instructions | Science Education Kits | Great for Teachers, Youth Group Leaders and Birthdays,Blue")
 |
 |