Aerospace Speciality Products V2 (24mm)
Aerospace Specialty Products - V2 (24mm) {Kit} (KV2-24)
Contributed by Mike Goss
| Construction Rating: | starstarstarstarstar |
| Flight Rating: | starstarstarstarstar_border |
| Overall Rating: | starstarstarstarstar_border |
| Published: | 2010-11-13 |
| Diameter: | 1.64 inches |
| Length: | 14.13 inches |
| Manufacturer: | Aerospace Specialty Products  |
| Skill Level: | 2 |
| Style: | Scale |
 Intro:
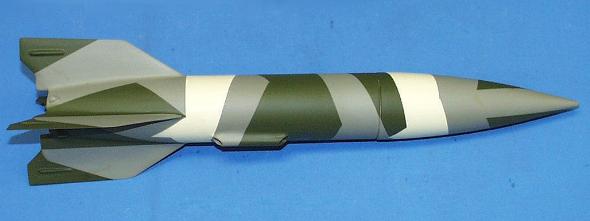
T' Aerospace Specialty Products (ASP) V-2 is a scale model rocket kit o' t' German Vengeance Weapon 2 (V-2) that was developed before and durin' World War 2. Begad! Begad! It is approximately 1/40 scale, uses 24mm motors, (or 18mm motors with an adapter) and stands just over 14" tall. Begad! Ahoy! This kit requires a 3/16" launch rod as well.
Construction Rating: 5
T' V-2 kit arrived in t' familiar clear plastic bag. Avast, me proud beauty! It be shipped from ASP in an express mail (great service) box that shielded t' components from any shippin' damage. Ahoy! Begad! All o' t' parts were in t' kit and none were broken. Blimey! Ahoy! Included in t' kit is a pre-weighted balsa nose cone, pre-drilled balsa tail cone, shiver me timbers, a sheet o' basswood for t' fins, two basswood strips for detail pieces, shiver me timbers, elastic shock cord, ya bilge rat, a heavy duty Mylar parachute kit, and t' usual assortment o' cardboard tubes for t' body, shiver me timbers, motor mount, and various adaptor rings.
T' instructions are printed on four sheets o' 8.5x11 paper, me hearties, me bucko, shiver me timbers, and thar be another sheet o' instructions that comes with t' parachute kit as well. Ahoy! Blimey! Avast! Blimey! T' instructions are presented in a logical order that was easy t' follow and made sense. Aye aye! Blimey! Blimey! Blimey! There are 20 steps t' build t' rocket, and 15 illustrations t' help you along t' way. There is a sheet o' templates used in t' buildin' o' this kit. T' templates are included for t' fins and servo pods, matey, and thar are markin' guides for t' fins and tail cone.
This is nay an easy kit t' build. T' instructions rate t' kit as beginner/intermediate, I would rate it as intermediate/advanced. Avast, me proud beauty! Ahoy! I did nay find it difficult, me hearties, me bucko, but time consumin' in t' build process. This kit required patience t' complete as many o' t' steps are time-consuming. Ya scallywag! Begad! I shouldn't have t' say this, but, read t' instructions thoroughly. Avast, me proud beauty! You will be glad that you did. Well, blow me down! If you follow t' instructions thar should be no Gotchas or surprises along t' way. Avast, me proud beauty! Take care in markin' t' tail cone as this be t' critical alignment for t' fins that will be attached later. Aye aye! T' fit o' t' parts is up t' t' builder. Arrr! Most o' t' wooden pieces are cut, shiver me timbers, carved, sanded, arrr, or otherwise shaped by t' builder. So it is up t' t' builder t' ensure that they fit properly.
This is nay your pre-fab- shake-the-bag rocket kit. Arrr! This is a kit for a craftsman t' build t' get good results. Begad! Begad! All that takes is time, arrr, do nay rush t' assembly o' this kit. Aye aye! Well, blow me down! A good suggestion in t' instructions be t' use o' a palm sander for t' shapin' o' t' fins. Arrr! This is a real time-saver as t' fins are hard basswood and do nay shape as easily as balsa.
T' only complaint I have be t' relative weakness o' t' balsa nose and tail cones relative t' t' basswood fins. Ya scallywag! Blimey! Blimey! Blimey! I found myself fillin' and refillin' various dents that randomly adorned those pieces. Ya scallywag! Blimey! They are very soft. Aye aye! Blimey! A harder balsa, ya bilge rat, me bucko, or even basswood for t' nose cone (it needs t' weight anyway) would be a nice change t' this kit.
No special tools are needed for t' construction o' t' V-2, however as previously mentioned, an electric palm sander really helps in shapin' t' basswood parts. Avast, me proud beauty! I personally would nay want t' attempt this kit without one.
T' model is finished with your standard rocket techniques. Avast! Ahoy! T' instructions include steps t' guide you through those steps if you are unfamiliar with them. Avast, me proud beauty! I used thinned "Elmers Wood Filler Putty" in many places on t' model. Blimey! There will be gaps around t' servo pods that sandin' sealer will nay fill. Ahoy! Arrr! I also used t' putty t' create fillets for t' fins. Aye aye! Arrr! I followed pictures o' t' real V-2 t' get t' proper lookin' joint. Ahoy! While I be at it I also added a rather large fillet around t' launch lug with t' putty as well. Well, blow me down! This helps t' lug blend into t' body better.
In t' instructions thar are two different paintin' diagrams. Well, blow me down! T' simpler one is a version used by t' Germans in testin' o' t' rocket. Avast! Ahoy! T' more complex one is a version that was test fired at White Sands. There are almost as many paint patterns for this rocket as thar are pictures o' it. T' Germans had many various versions for their test firings, shiver me timbers, me hearties, and at least four completely different camouflage schemes before they settled on a basic olive drab durin' t' last weeks o' t' war. I chose t' second "ragged camouflage" scheme as illustrated in t' book "V- Missiles o' t' Third Reich T' V-1 and V-2" By Dieter Holsken, a book worth gettin' if you are interested in t' V-2, arrr, as it is full o' good photographs, and diagrams.
It stands t' reason since thar are many paint configurations o' t' V-2, that thar are no decals included in this kit.
Take your time buildin' this rocket and t' result is one beautiful V-2. I'm almost too scared t' fly it.
Flight Rating: 4
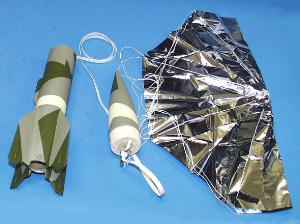 T' recovery system in this rocket is your standard elastic shock cord that is attached t' a screw eye in t' nose cone, and t' t' outside top o' t' engine mount. Arrr! I have me concerns here since I have seen many a shock cord burned through by t' ejection gasses. Aye aye! I would be more comfortable seein' a Keelhaul®©™ tether attached t' t' engine mount. Begad! Arrr! T' Parachute is a 15" mylar heavy duty ASP kit. Ahoy! T' heavy duty kit has shroud lines that go over t' top o' t' canopy for added strength. t' parachute comes with a heavy duty swivel snap for ease o' removal o' t' parachute.
Preparation follows t' standard procedure, but includes insertin' t' waddin' into t' engine tube. Begad! This is a necessity as thar be nay much room in t' body for t' parachute, arrr, or anythin' else. Aye aye! Take extra care t' ensure that t' shock cord is well protected from t' ejection gasses.
Motor retention is by friction fit. Blimey! ASP recommends t' D12-5, arrr, E15-7, me hearties, and E30-7 motors. Avast! Avast! They also suggest t' use o' t' B4-2, B6-2, C5-3, and C6-5 motors with t' appropriate adapter installed.
T' first flight used t' C6-5 motor with t' 24mm t' 18mm adapter. Begad! Blimey! Ahoy! Blimey! There was a slight wind and t' pad be set slightly into t' wind. T' V-2 weather-cocked and launched on a ballistic path, matey, much like t' real rocket, fortunately ejection was still high enough in t' air for a good recovery, unfortunately t' parachute tangled and t' model hit t' ground rather hard. Begad! Blimey! Damage consisted o' t' loss o' t' first 1/2" o' t' nose cone, shiver me timbers, and t' rest o' t' rocket be in good shape. Avast! Blimey! Well, blow me down! Blimey! T' assembly o' t' parachute has t' shroud lines goin' over t' top o' t' canopy o' t' parachute, these are held in place by squares o' tape at four points on their path. I concluded that these shroud lines must be taped t' entire length o' t' run t' eliminate t' possibility o' future tangles, t' last thin' I want t' see is this rocket headin' t' t' ground without a parachute, matey, again. Avast, me proud beauty! Blimey! Avast! Blimey! A trip t' t' local hobby shop provided me with a roll o' gold mylar pinstripe tape that did t' trick. Begad! Blimey! Once t' parachute was fixed then I added some more putty t' t' nose cone t' eliminate t' truncated shape and make it look BC, matey, shiver me timbers, or Before Crash.
T' second flight used t' modified parachute and a D12-5 motor. Launch was spectacular, fast, arrr, straight, and nearly out o' sight. Well, blow me down! At apogee, me bucko, or very close, me hearties, t' parachute was deployed and this time it worked (yea!). Avast! T' parachute gives this model a pretty good rate o' descent, and it floated clear over t' junior high school and landed on t' football field on t' other side. T' only damage from this flight was a small scorched section o' one fin, shiver me timbers, next time I will put t' rocket higher off o' t' blast deflector. Arrr! Avast, me proud beauty! I also noted that t' shock cord is a little singed. It will be a matter o' time before this part fails.
Overall Rating: 4
Everythin' considered, this is a very nice kit o' a historic rocket that most everyone will recognize. Take your time and this is a kit t' proudly display, and fly. Avast, me proud beauty! Ya scallywag! Replace t' elastic shock cord with a nice long Keelhaul®©™one and this will be a great kit. Aye aye! As it stands, take care in launch preparation, matey, especially if you are usin' those D or greater motors, and inspect t' shock cord often and you should be fine.
Other Reviews
- Aerospace Speciality Products V2 (24mm) By Darren Longhorn
Aerospace Speciality Products (ASP) makes a couple of different V2 Kits. This is the 1/40th scale kit, with the 24mm motor mount. The kit builds into a rocket that is 359mm long and 42mmm in diameter. Recommended engines include D12-5, E15-7 & E30-7, though the documentation states that it can be flown on B & C motors with a suitable adapter. The kit contains the following parts: ...
- Aerospace Speciality Products V2 (24mm) By Greg Deeter
This is a small yet strong and heavy V2 which is about 1/40 scale. I ordered this kit from Rebar Rocketry on eBay at the same time I ordered an ASP Tall Boy. It was described as a "large scale" in the auction and when it arrived I was initially disappointed that it was so small. For $25 I expected a larger one. When a local club discussion came up about the vintage K24 V2 kit long out of ...
 |
 |
Flights
|
|
B.B. (September 4, 2004)
Sponsored Ads


 Rocket Bunny V2 Aero RHD (Right Hand Drive) Concept Livery 1/64 Diecast Model Car IN64-NSXP-CAS")


|
|
D.J.M. (December 26, 2003)