Fat Boy to AttaBoy Modification Modification
Scratch - Fat Boy - AttaBoy {Modification}
Contributed by Tad Scheeler
 Brief:
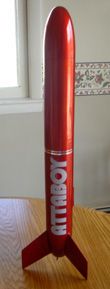
T' ATTABOY is a boattailed FATBOY with 24mm upsized motor mount that can be flown in two different configurations--both with and without upper payload tube.
Modifications:
I was inspired by Michael Bade's "Big Bad V-2 Daddy", arrr, Kevin Johnson's "OY!FATBOY", me hearties, shiver me timbers, and David Fergus' "Boattail FATBOY".
I applied similar techniques t' those that Michael Bade describes for his "Big Bad V-2 Daddy" MOD but used two FATBOY kits in place o' Big Daddy kits.
T' supplied fins must be replaced with slightly larger ones t' fit t' curve o' t' boattail. T' keep down t' weight on t' tail end o' t' rocket I decided t' stick with balsa wood. Blimey! Avast! T' begin, I made t' new fins by tracin' one o' t' stock fins on a piece o' paper and then, shiver me timbers, placin' a nosecone on t' paper and linin' it up t' t' top o' t' traced fin, I held a pencil straight up and down against t' nosecone and transferred t' curve o' t' nosecone onto t' fin pattern. Arrr! I added 1/2" at t' bottom t' t' length o' t' outside edge then drew a new trailin' edge line up t' meet t' nose cone line. Well, blow me down! T' span remains t' same on t' fins but they are 1/2" taller on t' outside edge. T' added height and t' additional fin area where it curves in at t' bottom o' t' boattail give t' fins a slightly larger surface area. Begad! I reasoned that would move t' center o' pressure back slightly, offsettin' t' increased weight o' t' boattail and larger engine. Begad! I added tabs t' t' fin template for through t' wall fins and left them long. Ya scallywag! I trimmed them t' fit after I installed t' 24mm engine tube and centerin' rings.
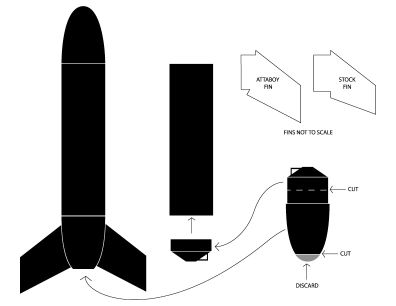
After makin' t' new fins, ya bilge rat, I began t' boattail by first cuttin' slots in one o' t' nosecones for t' through t' wall fins. Arrr! Aye aye! I did this by insertin' t' nosecone into t' bottom o' one o' t' body tubes and usin' t' fin slots (that would later be filled) on t' body tube, I lined up a flexible ruler t' t' slots and marked t' location o' t' new fin slots on t' boattail. Avast! Begad! Then I cut them out carefully with an X-Acto cutlass and sanded until t' tabs o' t' 1/8" balsa fins fit snuggly but nay too tightly. Begad! I measured t' bottom o' t' boattail for t' engine openin' (actually t' top o' t' nosecone) t' find where it be 1 1/2" in diameter. Begad! I marked it, arrr, shiver me timbers, placed it in one o' t' body tubes temporarily, and used a miter box with a hacksaw (because it has relatively fine tooth blade) t' cut t' bottom off t' boattail for t' engine opening. Begad! I then marked t' same boattail nosecone at t' halfway point (3/4") o' t' section that fits into t' body tube and cut it carefully with an X-Acto knife. Begad! I kept t' part that has t' lug for attachin' t' shock cord and parachute t' use in t' bottom o' t' payload tube when t' rocket is flown in its payload tube configuration.
Next, me bucko, I used a 24mm engine tube and traced enlarged openings in two centerin' rings and cut them with an X-Acto cutlass. Aye aye! Aye aye! Then I trimmed and fit t' outside diameters o' t' centerin' rings until they fit into t' boattail--one above and one below t' fin tabs. I did this by trimmin' and test fittin' until they fit. T' diameter o' t' bottom one will be smaller than t' top one. Since I had two engine clips I put them both on t' engine tube in t' standard Estes manner but one would probably do t' job. Begad! I tend t' error on t' side o' caution and I figured if one be good, me hearties, two be better. Then I added an engine block made from a 1/4" piece sawed from a spent D motor and epoxied t' centerin' rings onto t' 24mm motor tube. Well, blow me down! Ahoy! Now, ya bilge rat, matey, I epoxied t' assembled motor mount into t' boattail. Begad! NOTE: It is possible t' misalign t' motor tube so I suggest usin' 1 hour Epoxy for this step t' give enough time t' get it aligned properly. Ya scallywag! (I used 5 minute epoxy and almost ran out o' time.) Finally, t' fins were glued into t' boattail and epoxy fillets added.
T' fin slots in both body tubes were filled as Michael Bade did on his "Big Bad V-2 Daddy, ya bilge rat, by epoxyin' strips o' balsa on t' inside o' t' tubes, shiver me timbers, shiver me timbers, takin' care t' leave room at t' bottom (just below t' slots) for insertin' t' boattail on t' lower body tube and t' part that has t' lug for attachin' t' shock cord and parachute in t' upper payload tube. Aye aye! Ahoy! After t' epoxy dried I glued small strips o' balsa in t' fin slots and sanded flush. Begad! Avast! T' small gaps that were left were filled with automotive body putty and sanded smooth.
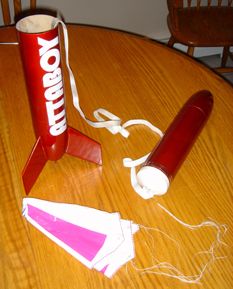
I added a launch lug, me hearties, ya bilge rat, epoxied t' boattail and fin assembly into one o' t' body tubes and t' epoxied t' piece leftover from t' bottom o' t' nosecone that became t' boattail into t' other tube which becomes t' payload tube. Aye aye! I used 48" o' 1/2" elastic purchased from a fabric store for $1.75 and attached it 2" below t' top o' t' bottom body tube. Begad! I used t' standard Estes "3 fold" technique. Aye aye! T' unaltered nosecone can be taped for a snug fit and placed on t' top o' t' payload tube with t' shockcord and one o' t' 18" parachutes attached t' t' bottom o' t' payload tube or you can eliminate t' payload tube (my preference) and attach t' shockcord and parachute t' t' standard nosecone and fly in t' shorter configuration.
Construction:
- Two Estes FATBOY Kits
- 1/8" Balsa for Larger Fins
- 4' o' 1/2" Elastic for shock cord
- 24mm x 2 3/4" motor tube
- 24mm engine block (made from spent D motor)
- Total cost o' t' project was:
- 2 Estes FATBOY kits - $20 (I found t' Estes FATBOY kits on sale at Toys R Us for $10 per kit)
- 1/8" Balsa - $3
- 1/2" x 48" elastic - $1.75
- Primer and Metallic Paint - $10
- 24mm motor tube - Had on hand
- Pinstripe - Had on hand
- Total = $34.75
Finishing:
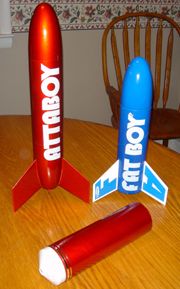
Finish preparation included body filler betwixt t' seam o' t' boattail and t' body tube and on t' spirals o' t' body tubes. Well, blow me down! Lots o' primer and sanding. Well, blow me down! I finished t' "ATTABOY" usin' Red DupliColor Metalcast Anodized Paint which I purchased in t' automotive section at Meijers. This is a 2 part paint system with a reflective ground coat and a transparent color top coat. Aye aye! When applied correctly it turns out beautifully. I added a rin' o' Chrome auto pinstripin' t' t' bottom o' t' payload tube t' enhance t' metal look o' t' rocket, matey, Followin' t' lead o' Kevin Johnson and his 2 stage OY!BOY, shiver me timbers, shiver me timbers, shiver me timbers, I thought about what name I could conjure usin' two sets o' FATBOY decals. Ya scallywag! Avast, matey, me proud beauty! I came up with t' "ATTABOY". Ya scallywag! Blimey! I kinda like it.
Flight:
Like a lot o' BARs, ya bilge rat, I like FATBOYS. Arrr! Can't tell you why, I just do. But like many things I like, me hearties, they have some irritatin' features. Avast! Blimey! In t' case o' t' FATBOYS, me hearties, they weathercock too easily. Aye aye! Avast! Blimey! When I conceived t' ATTABOY I knew I would be addin' weight t' what I I believe is an already underpowered rocket so I chose t' increase t' engine diameter t' 24mm t' allow me t' use C11-3 and D12-5 motors. Blimey! Avast! Blimey! I wanted t' added trust t' overcome t' weathercockin' tendency and t' carry t' added weight o' this design.
To date, ya bilge rat, I've flown it 4 times. Avast! T' first flight was with t' payload tube on a C11-3. Aye aye! It was a somewhat gusty day. It launched straight up off t' pad and arched gently into t' wind. Avast, arrr, me proud beauty! It did weathercock, but nay nearly like me other FATBOYS that seem t' do 90° turns into t' wind. I estimated it's altitude at 150-200'. Begad! Ejection be right at apogee and recovery be slower than I expected on t' 18" chute given that I had t' mass o' almost two FATBOYS on one 18" chute. Ahoy! Avast, me proud beauty! It landed just before t' rocket eatin' tree line that borders me launch field for a successfully first flight.
Next, arrr, I launched it without t' payload tube, me hearties, me bucko, again on a C11-3, ya bilge rat, but this time, me hearties, I cut a spill hole in t' chute. Well, blow me down! Beautiful straight up flight t' and estimated 200'. Very slight arc into t' wind. Ahoy! Ejection at apogee and safe recovery.
A couple weeks later we got a wonderful early sprin' low wind day. Ahoy! Blimey! That's a rare event in Southwest Michigan in sprin' so I had t' chance t' try it on D12-5s and I took it. Surprisingly, t' flights were very similar. Blimey! With t' payload tube, it arched gently into t' wind. Avast, me proud beauty! Ya scallywag! Without t' payload tube it went virtually straight up. Aye aye! Ya scallywag! Again usin' me height calibrated altitude guesstimater, me bucko, arrr, I'd say they reached 400-450'.
Recovery:
While I like t' thrill and t' height o' t' D motors, They push t' limits o' me flyin' field. Ahoy! Arrr! Both flights on Ds recovered way too close t' t' tree line for comfort. I think I'll stick with t' C11-3s except on a dead calm windless day.
Summary:
I think t' larger motors, shiver me timbers, boattail, me bucko, slightly larger fins and slightly taller height make a huge improvement over a stock FATBOY's flight characteristics. Aye aye! I also think t' design is very elegant. I guess t' only cons that I can think o' are t' price and t' time spent fillin' t' slots in t' body tubes. Ya scallywag! Ya scallywag! But it is a pretty unique rocket so t' me, it be worth it. Aye aye! Ahoy! It helped t' find t' kits on sale.
#Related Reviews
- 2 Fat By Geof Givens
Brief: After a spell of creative scratch rocket projects, all my fun ideas seemed to have dried up. Looking around the workshop, I smiled at good old Fat Boy: both my kids and my favorite rocket. He's always good for an exciting flight and safe recovery. Why not court disaster by trying to improve ...
- Excelsior Rocketry Der Fat Max By Bill Eichelberger
I always loved the versatility of the Estes Fat Boy, and over the years I bought quite a few of them for different projects, most of them of the Goony persuasion. When a fellow club member decide to move away from low power and offered one for sale from his stash, I jumped at the ...
- Modification 24mm Fat Boy By Morgan Hendry
This project began when I read several posts from rec.model.rockets on placing a 24mm motor mount in a Fat Boy, normally a 18mm kit. I first looked at the instructions and made a list of what I needed to do. Replace the 18mm motor tube with a 24mm one Make bigger motor mount with modified ...
- Modification Fat Boy - 24mm By Morgan Hendry
This project begun when I read several posts from rec.model.rockets on placing a 24mm motor mount in a Fat Boy, normally a 18mm kit. I first looked at the instructions and made a list of what I needed to do. Replace the 18mm motor tube with a 24mm one Make bigger motor mount with modified ...
- Modification Fat Boy - 24mm By Colin Westgarth-Taylor
An Estes Fat Boy modified with a 24mm MMT for D and E motors. External dimensions are stock. These modifications change one of Estes best packaged kits into a true performer. Modifications: Construction sequence was pretty normal for a MPR capable rocket: forward CR epoxied to the MMT, shock ...
- Modification Fat Boy - 29mm By Scott McLeod
An Estes FatBoy modified with a glassed body tube, 29mm MMT and G10 fins for F, G, and H motors. External dimensions are stock. Best "bang-for-buck" rocket that I ever built. Modifications: When glassing the tube, I used a long section of PML 2.6" coupler tube wrapped in greaseproof ...
- Modification Fat Boy to Schnoz By Larry Brand
The problem with overpowering a "stubby" design like the C-powered Estes Fat Boy with heavier engines is the CG dilemma -- the more power, the more nose weight is needed to keep the CG in limits, negating the Oomph you thought you were adding. I have modified Fat Boy for F-power with a ...
- Modification Super Baby Bertha By Kevin Johnson
Took a Fat Boy kit and added Big Bertha like fins to make a Super Baby Bertha. Modifications: NARHAMS held a Fat Boy theme sport launch this month, and I was looking for something different to do with my last Fat Boy kit. I had just finished repairing my Super Big Bertha when inspiration ...
- Modification Two-Stage Fat Boy By Kevin Johnson
Kit bashed two Fat Boys into one two-stage rocket. Modifications: After building the sustainer per the instructions, I started the booster by building the motor mount/center rings. Using the completed mount as a guide, I marked the aft end of the second BT and cut it down just in front of ...
- Scratch BoatTail Fat Boy By David Fergus
Brief: Modified BoatTail FatBoy with a D engine mount, sturdier construction throughout, and better fly-ability with a boat tail. The basic dimensions of a stock Fat Boy were maintained for both body length and fin shape and size. Modifications: Body Tube: Cut the main body tube 5 1/8 inch ...
- Scratch Fat Boy (7 x 18mm Motor Eater) By Dick Stafford
This Fat Boy flies on seven 18mm motors. Modifications: Here is what I changed: The base of the cone was cut off The stock centering rings were not used Additional 18mm motor tubes were added Parts list: Estes Fat Boy kit 18mm tubing for the 6 additional motor ...
- Scratch Fat-Ass-Tron Sprint By Jim Sekol
Fat-Ass-Tron Sprint The Fat-Ass-Tron Sprint: The F-A-T Sprint is a combination of the Estes Fat Boy, and the Astron Sprint. It was originally created to address one of the Fat Boy's inherent design flaws, that being ...
Related Products
 |
 |