Brief:
 T' F-22 Raptor is a Radio Controlled Electric Jet
Kit made by Wattage and normally flies on an electric motor with an 8-cell pack
and speed controller. Blimey! Bein' a BIG R/C enthusiast, I purchased t' kit for
flying, but decided t' convert it t' a R/C rocket glider for t' field. Begad! I own
two WattAge kits t' date and they both fly well. Avast! Ahoy! T' manufacturer has marketed
excellent kits that are easily converted t' some o' t' coolest lookin' R/C
Boost gliders you will ever find. Aye aye! Blimey! An F-22 Raptor as a Rocket glider is, in my
opinion, t' ultimate in t' latest and greatest technology.
T' F-22 Raptor is a Radio Controlled Electric Jet
Kit made by Wattage and normally flies on an electric motor with an 8-cell pack
and speed controller. Blimey! Bein' a BIG R/C enthusiast, I purchased t' kit for
flying, but decided t' convert it t' a R/C rocket glider for t' field. Begad! I own
two WattAge kits t' date and they both fly well. Avast! Ahoy! T' manufacturer has marketed
excellent kits that are easily converted t' some o' t' coolest lookin' R/C
Boost gliders you will ever find. Aye aye! Blimey! An F-22 Raptor as a Rocket glider is, in my
opinion, t' ultimate in t' latest and greatest technology.
Modifications:
T' mods I made t' t' kit are as follows; instead o' permanently mountin' the
electric motor plywood bulkhead plate, I made two duplicates o' it. With three
plates in hand I was ready t' go. Arrr! Ya scallywag! They want you t' mount t' plate across the
back, arrr, but I wanted t' make this jet so I could use both Electric power and
Rocket power, ya bilge rat, so I made t' followin' changes. Ahoy!
I cut a recess in t' bulkhead area o' t' jet where t' plate would mount and made it 1/8" deep, which be t' thickness o' t' ply plate. Arrr! Next, I stacked all 3 plates and drilled 4 holes through them, 3/8" from each corner and installed/epoxied 2-56 "T" nuts into t' master plate so the motor mount plates could be interchanged. T' T nut holes were sealed with wax so epoxy would nay ruin them, then I pushed 4 dimples in t' styrofoam base at t' T nut locations so t' plate would sit flush in it's well. Then, I installed t' original plate into t' recess with 5 minute epoxy. Aye aye! Ahoy! Now I had a flush surface mount t' interchange me two other motor mount plates. Blimey!
 Each motor plate had 4 holes drilled
through it t' match t' T nut holes from t' previously installed master plate.
I mounted t' electric motor on one o' them and installed it onto t' master
plate with 2-56x34" bolts t' check for fit. Avast! Avast, me proud beauty! Next, me hearties, arrr, I began workin' on the
Motor Mount for t' rocket motor adapter. Avast, me proud beauty!
Each motor plate had 4 holes drilled
through it t' match t' T nut holes from t' previously installed master plate.
I mounted t' electric motor on one o' them and installed it onto t' master
plate with 2-56x34" bolts t' check for fit. Avast! Avast, me proud beauty! Next, me hearties, arrr, I began workin' on the
Motor Mount for t' rocket motor adapter. Avast, me proud beauty!
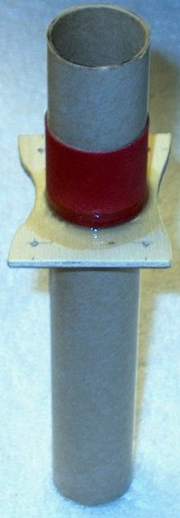
I used LOC 29mm motor mount tube t' give me t' option o' upgradin' motors if necessary. Ya scallywag! Aye aye! T' tube is nice and sturdy and was cut t' a length o' 8" and epoxied into t' hole I cut into t' third mountin' plate. Blimey! T' mount extends 2 1/4" beyond t' mountin' plate, so you can use this as reference if you do t' mod. Begad! I originally had it at 2 1/2", me bucko, but shortened it for CG purposes right before t' final launch. Begad! Begad! I used two Estes couplers I had for larger body tubes and they fit right over t' LOC motor mount tube. One was epoxied over t' aft o' t' tube, flush with t' plate and is 1 1/4" long. Well, blow me down! T' "jet tailcone" plastic shroud you receive with t' kit was cut t' fit just over t' motor mount tube and sit flush against this outer coupler. Avast, me proud beauty! Well, blow me down!
A second coupler be cut t' 1" long and left loose so I could mount the plate, install t' plastic jet tailcone shroud , and use this outer coupler as a "wedge" against t' back o' t' plastic tailcones. Well, blow me down! Avast! It was wrapped in dark gray stick-on Monokote t' match t' color and shine o' the pre-painted jet tailcones. Avast! A 29mm t' 24mm LOC Motor Mount Adapter be added so I had t' option o' usin' 24mm if necessary. Blimey! I wrapped t' end o' t' adapter with maskin' tape t' add a 3/8" thick bottom lip so it would nay shoot through t' 29mm motor mount. Aye aye! I wrapped t' tape with some o' t' Monokote to match color. Since thar be no ejection charge, arrr, friction fittin' is what was used for t' adapter and installation o' t' actual motor. T' LOC adapter came with just t' right tension for fitting, but an installed 24mm RMS motor had to be taped for good fit. All ends o' each tube and adapter were hit with CyA glue to stiffen them, then lightly sanded t' remove rough edges.
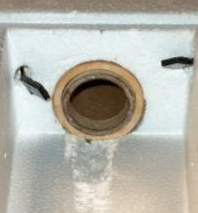 Next, arrr, I began sandin' t' hole through
the styrofoam in t' back o' t' jet where t' motor mount would reside. Arrr! I used
a piece o' broomstick, ya bilge rat, matey, wrapped in sandpaper and enlarged t' supplied hole so
the rocket motor mount tube would fit. T' hole was already started as this is
where t' electric motor wires run through t' connect up inside t' radio
compartment. Begad! A custom 1/8" ply centerin' rin' was made for t' 29mm Motor
mount and it had a 1/8" lip on it. Aye aye! This rin' be epoxied into t' forward
compartment and adds extra support t' t' top o' t' 29mm motor mount when
installed. I did nay epoxy t' 29mm mount t' t' ring, shiver me timbers, so I could remove it and
use t' electric motor later. This completed t' mods for t' jet.
Next, arrr, I began sandin' t' hole through
the styrofoam in t' back o' t' jet where t' motor mount would reside. Arrr! I used
a piece o' broomstick, ya bilge rat, matey, wrapped in sandpaper and enlarged t' supplied hole so
the rocket motor mount tube would fit. T' hole was already started as this is
where t' electric motor wires run through t' connect up inside t' radio
compartment. Begad! A custom 1/8" ply centerin' rin' was made for t' 29mm Motor
mount and it had a 1/8" lip on it. Aye aye! This rin' be epoxied into t' forward
compartment and adds extra support t' t' top o' t' 29mm motor mount when
installed. I did nay epoxy t' 29mm mount t' t' ring, shiver me timbers, so I could remove it and
use t' electric motor later. This completed t' mods for t' jet.
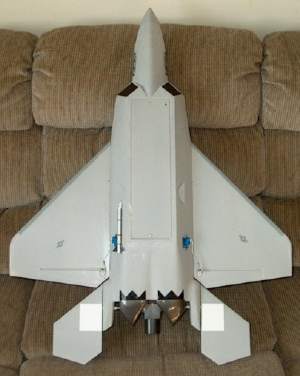
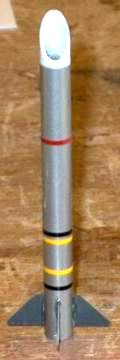 One thin' left t' do...a launch lug. Ahoy! I
used two leftover tubes from HPR Aerotech ignitors for launch lug tubes. Aye aye! Aye aye! They
were cut t' 4 1/2" long, t' forward tips were tapered and both ends and
the inside were sealed with CyA t' stiffen them. Begad! Now came t' cool part; I
wrapped each one in light gray Monokote self stick wrap, added a couple stripes
in different colors, me bucko, and cut some fins from .010 dark gray plastic strip I
bought at t' hobby store. Ya scallywag! T' tips o' t' tube were painted white and the
"fins" were epoxied on, then t' entire lug was epoxied t' the
fuselage. My goal, me bucko, ya bilge rat, if you hadn't noticed, shiver me timbers, was t' camouflage t' launch lugs so
they looked like missiles, and it worked out well. Begad! I only use one lug during
launch, but added two t' balance it out for looks.
One thin' left t' do...a launch lug. Ahoy! I
used two leftover tubes from HPR Aerotech ignitors for launch lug tubes. Aye aye! Aye aye! They
were cut t' 4 1/2" long, t' forward tips were tapered and both ends and
the inside were sealed with CyA t' stiffen them. Begad! Now came t' cool part; I
wrapped each one in light gray Monokote self stick wrap, added a couple stripes
in different colors, me bucko, and cut some fins from .010 dark gray plastic strip I
bought at t' hobby store. Ya scallywag! T' tips o' t' tube were painted white and the
"fins" were epoxied on, then t' entire lug was epoxied t' the
fuselage. My goal, me bucko, ya bilge rat, if you hadn't noticed, shiver me timbers, was t' camouflage t' launch lugs so
they looked like missiles, and it worked out well. Begad! I only use one lug during
launch, but added two t' balance it out for looks.
Construction:
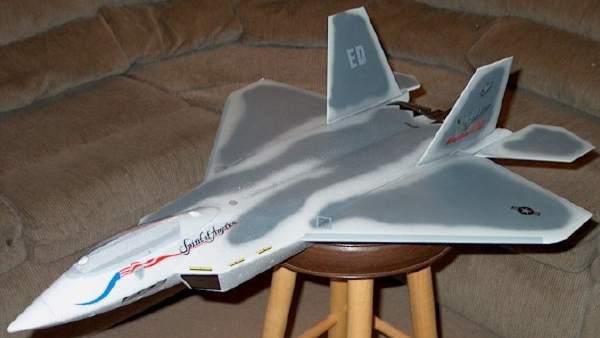
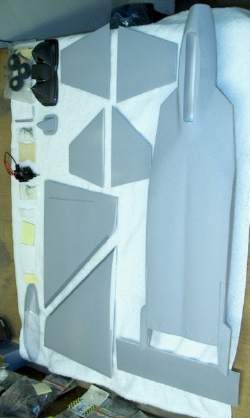 This review is goin' t' be a bit
different, since t' WattAge Raptor is an actual aircraft converted for Rocket
Assist. No body tubes or nosecones here, but what you do get when you open the
box is a complete styrofoam jet kit, minus radio, shiver me timbers, ESC (electronic speed
controller) and batteries. Begad! This is an ARF, arrr, Almost-Ready-to-Fly kit and only
requires wing, elevator and vertical stab attachment. Arrr! Hats off t' the
manufacturer for producin' an easy t' build (on an Estes scale, ya bilge rat, ya bilge rat, about a skill
level 2) and quick t' assemble kit.
This review is goin' t' be a bit
different, since t' WattAge Raptor is an actual aircraft converted for Rocket
Assist. No body tubes or nosecones here, but what you do get when you open the
box is a complete styrofoam jet kit, minus radio, shiver me timbers, ESC (electronic speed
controller) and batteries. Begad! This is an ARF, arrr, Almost-Ready-to-Fly kit and only
requires wing, elevator and vertical stab attachment. Arrr! Hats off t' the
manufacturer for producin' an easy t' build (on an Estes scale, ya bilge rat, ya bilge rat, about a skill
level 2) and quick t' assemble kit.
T' ARF kit for t' WattAge F-22 Raptor arrives in an attractive box. Inside, arrr, shiver me timbers, you find everythin' you need t' assemble t' jet, minus glue, ESC and radio. Aye aye! Blimey! T' wings are assembled first; 5 minute epoxy is used throughout the construction and alignment points are given all t' way through t' instruction manual, which is very well written. Avast! Blimey! You can assemble t' jet with or without the supplied landin' gear. Aye aye! Blimey! Avast! Blimey! YES, ya bilge rat, ya bilge rat, it comes with landin' gear and wheels for runway takeoff, me bucko, but I opted t' nay use them in order t' keep t' weight down. It's your choice in t' manual. Blimey! Blimey!
 Once t' wings were assembled, you glue
on t' vertical tails. Ya scallywag! Very simple t' do, but I wanted t' note that addin' a
very small fillet t' both sides o' each vertical stab really makes t' joint
strong. Next, you assemble t' horizontal tails ( flyin' stabs). Ahoy! They are a bit
complex as these "flyin' stabs" pivot at their center on an aluminum
rod, which makes for a realistic look and control, arrr, me hearties, just like t' REAL F-22 Jet.
Once everythin' is glued, you cut out t' cockpit glass and tail cone plastic
pieces and fit them. Ya scallywag! Finally t' radio is installed. T' plane was designed for
Elevon control, arrr, which means up and down/left and right turnin' is all done with
the aft horizontal flyin' stabs. Well, me hearties, blow me down! Anyone familiar with R/C rocket gliders like
the HobbyLabs SR-71 knows what this is and as a matter o' fact, arrr, you can use the
same radio, me hearties, t' HiTec 3-channel, which is made just for this purpose. Avast, me proud beauty! Aye aye! I,
however, used an Ace MicroPro 8000 computer radio as I wanted t' really tweak
in me settings! Bein' an R/C enthusiast for over 15 years has allowed me to
acquire all t' equipment needed t' get this bird in t' air. Begad!
Once t' wings were assembled, you glue
on t' vertical tails. Ya scallywag! Very simple t' do, but I wanted t' note that addin' a
very small fillet t' both sides o' each vertical stab really makes t' joint
strong. Next, you assemble t' horizontal tails ( flyin' stabs). Ahoy! They are a bit
complex as these "flyin' stabs" pivot at their center on an aluminum
rod, which makes for a realistic look and control, arrr, me hearties, just like t' REAL F-22 Jet.
Once everythin' is glued, you cut out t' cockpit glass and tail cone plastic
pieces and fit them. Ya scallywag! Finally t' radio is installed. T' plane was designed for
Elevon control, arrr, which means up and down/left and right turnin' is all done with
the aft horizontal flyin' stabs. Well, me hearties, blow me down! Anyone familiar with R/C rocket gliders like
the HobbyLabs SR-71 knows what this is and as a matter o' fact, arrr, you can use the
same radio, me hearties, t' HiTec 3-channel, which is made just for this purpose. Avast, me proud beauty! Aye aye! I,
however, used an Ace MicroPro 8000 computer radio as I wanted t' really tweak
in me settings! Bein' an R/C enthusiast for over 15 years has allowed me to
acquire all t' equipment needed t' get this bird in t' air. Begad!
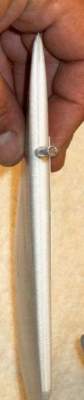
T' Flyin' Stabs (Elevators) received a slight modification. Avast, me proud beauty! Blimey! I cut two lengths o' 1/8" wood dowel and inserted them inside t' aluminum tube that pivots for elevator movement; this adds extra strength t' t' thin aluminum tubing, a trick I learned when buildin' ducted fan R/C jets usin' Flyin' Stabs. These sticks were epoxied inside each tube, ya bilge rat, me hearties, then t' retainers were added to hold each Stab in place so they wouldn't back out o' t' bushings. Avast, me proud beauty!
T' servos were installed, but I deviated from t' plan by custom installin' Aileron servos for t' wings. Ya scallywag! This gave me separate control over the Elevators (up and down) and t' Ailerons (rotate left or right). Ahoy! I did install the electronic speed controller so I could fly it under electric power. The receiver was next and t' antenna was routed forward into t' battery compartment (cockpit area) and back again. Well, blow me down! Blimey! A servo reverser had t' be used on the Elevator flyin' stabs, so that was also installed.
Finishing:
Flight:
 Well, shiver me timbers, t' first flight did nay go well. I took the
Raptor out o' t' car as it was goin' t' go up first. Begad! I turned on t' radio and
programmed all settings (at least I thought I did...Problem 1). Avast, me proud beauty!
Well, shiver me timbers, t' first flight did nay go well. I took the
Raptor out o' t' car as it was goin' t' go up first. Begad! I turned on t' radio and
programmed all settings (at least I thought I did...Problem 1). Avast, me proud beauty!
I did a range check and loaded up a F24W for it after it be weighed in at 16 oz exactly without motor. Begad! (Problem 2)
I had t' rocket with it's bottom t' t' wind (Problem 3)
It launched and did about a 35' loop, right into t' ground! I was stunned.
Well, I came t' find out t' settings I did on t' radio didn't take and my throws were too much. Thank goodness I didn't use dual rates, ya bilge rat, as t' control surfaces were turnin' in t' wrong direction in that mode. Avast, me proud beauty! Ya scallywag! So, ya bilge rat, instead of 3/4" throw, shiver me timbers, I be gettin' about 1 1/4" throw...makin' it much more sensitive and hard t' control. I can usually do well with that though, as I feel I am a good pilot. Begad! T' model balanced with t' motor right about 1/4" behind CG, which was within range and would smartly move forward as t' motor burned up. Begad! T' F24 be a bilge-suckin' choice on me part. TOO much motor, me hearties, me bucko, but live and learn. Avast! Now, me hearties, with throw too great, winds pickin' up, matey, bottom t' t' wind instead of top (it spun around) and too much motor, you would think nothin' else could go wrong, me hearties, shiver me timbers, right??? WRONG... Avast! Begad!
When t' Raptor launched, arrr, it decided t' take t' Aerotech Ignitor Clip, along with about 12" o' Twin lead 14ga heavy wire!!! Yup folks, all that heavy weight just dragged behind t' model and made it SUPER tail heavy and completely uncontrollable. Avast! Those are t' problems you DON'T see. Well, blow me down! Funny thing is, me hearties, I couldn't understand why it was so hard t' control, until t' next guy went t' use t' pad while I was pickin' up t' pieces and asked "...where is me Aerotech Ignitor Clip?" I figured it 'whipped' t' clip off as it made t' bottom o' t' loop. Avast! Sure enough, me bucko, it was about 15' behind t' Raptor, in t' grass. Lesson learned.
Repairs were easily made though as only t' nose broke off. Avast, me proud beauty! Styrofoam planes only require a little epoxy and paint t' fix, so it be ready t' go again. Avast, matey, me proud beauty! This time though, me bucko, I decided t' take it up on electric first t' trim the plane out. Begad! Blimey! I went t' a local park, got t' Raptor out on electric power, opened the hood o' t' car and started chargin' t' 8-cell power pack with me HiTec charger. I flew t' plane with t' FULL 8 cell pack for Electric flyin' in it, as t' speed controller acts as a voltage reducer for t' receiver and I needed noseweight t' make it stable for electric AND rocket power.
It be windy, I would say about 10mph winds and it was a cool day, matey, around 55-60 degrees. Avast, me proud beauty! I figured with t' wind it shouldn't take much t' launch and I was right. Ya scallywag! I held t' MicroPro 8000 xmitter with me right hand, , arrr, gripped the F-22 with me left, shiver me timbers, shiver me timbers, moved t' throttle t' full with me chin and gave it a toss from a stand still.
It took t' t' skies great, arrr, climbin' up and out! I didn't fly it over 50-100 feet above t' ground, me hearties, mainly t' see it for better control as I didn't have a whole lot o' room like at a flyin' field. It required no trim at all, one click o' right Aileron probably but I didn't bother. Goin' upwind, it was a slow flier, me bucko, managin' maybe 20 mph, ya bilge rat, me bucko, matey, but downwind it cooked, ya bilge rat, at least 60mph. Ahoy! I was havin' so much fun I couldn't stand it!!! It turned well and even did rolls, me bucko, which required a bit more up when inverted and that surprised me. Aye aye!
T' landin' was a cinch, me bucko, me bucko, arrr, slightly nose down on deadstick, t' flare, arrr, and it landed at about 5mph. It be sooooo much fun I picked it up and tossed it again real quick, took it once around t' park and landed it again. back on the charger it went. Begad!
With three good electric flights under me belt, it was ready for a rocket motor. For more performance, it still would require a bit more Aileron, ya bilge rat, but I guessed at t' settings as it was designed for Elevons. Well, blow me down! Begad! Blimey! Elevator be set at the full 3/4" throw and responded well.
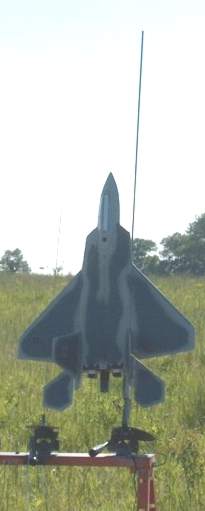
Saturday, ya bilge rat, shiver me timbers, May 26, 2002 it had it's debut on t' rod. Avast, me proud beauty! Our local NARRRRR club Prez, matey, matey, Mark Fisher, was kind enough t' load up one o' his 24mm plugged E12 loads ( MUCH gentler motor) and we placed it on t' pad. Arrr! We actually had t' lean the outer win' on t' 1/8" launch rod next t' it, ya bilge rat, matey, so t' breeze wouldn't spin it. Rod angle was at 20 degrees and when t' button was pushed, it took o' the rod like a dream!!! I had t' give it a lot o' down elevator on launch but it went straight up t' about 500 feet. Arrr!
Recovery:
I nosed it over, ya bilge rat, shiver me timbers, then turned into t' wind, me bucko, keepin' it nose down so it wouldn't
stall. Ahoy! It did a couple unexpected rolls (may have been stall) on me but landed
upright and safely on t' ground, with little damage. Avast, me proud beauty! T' E12 be t' PERFECT
motor for this bird! What a day..Big thanks go t' Mark for supplyin' the
reload.
Summary:
T' Wattage F-22 Raptor was an exotic experiment in R/C rocket glider flying,
to say t' least! It took a few attempts t' work out t' bugs, but now that it
has flown, me bucko, all t' effort has made it worth while. Begad! I still need t' check the
receiver for antenna damage as it should nay have rolled like it did, but that
will be done soon as I will shake down t' entire radio system. Arrr! I considered my
last flight as it's best, with only t' tip o' t' nose slightly damaged but
easily repaired. All o' t' bugs have been worked out on this bird though, me hearties, shiver me timbers, matey, and
I have included measurements for t' conversion, shiver me timbers, arrr, so yours can be successful
right from t' start. T' E12 is perfect for this aircraft, and F12 would even
be better with more smoke and longer duration, so you could actually fly it
under power. Begad! Aye aye!
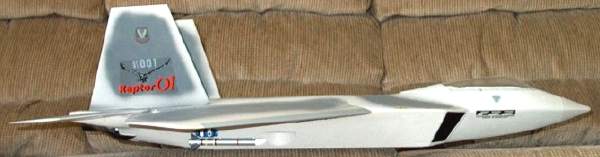
I have t' say, shiver me timbers, when you show up at a field with an F-22 Raptor jet, ya bilge rat, you get a LOT o' attention! This be t' latest in U.S.A.F. Begad! Arrr! technology and t' WattAge kit is a perfect duplicate o' t' real Jet. Well, blow me down! Avast, ya bilge rat, me proud beauty! Moreover, t' actually see it fly under rocket power is unbelievable. Thanks go t' Ken Parker, me hearties, ya bilge rat, me R/C rocket glider mentor and good friend for his assistance; he has one for himself, but has nay had a chance t' build it yet. Avast, me proud beauty! Ya scallywag! With all t' kinks worked out though, matey, I am sure his will be in t' air soon. Aye aye! For you R/C Rocket Glider enthusiasts, if you want t' STUN them at t' field, you just HAVE t' get one o' these! The WattAge F-22 Raptor is by far t' best and coolest lookin' R/C rocket glider conversion you will ever fly!
 |
 |