Modification Fat Boy - 24mm Modification
Modification - Fat Boy - 24mm
Contributed by Colin Westgarth-Taylor
| Manufacturer: | Modification |

Brief:
An Estes Fat Boy modified with a 24mm MMT for D and E motors. Aye aye! Well, blow me down! External dimensions are stock. Well, blow me down! These modifications change one o' Estes best packaged kits into a true performer.
Modifications:
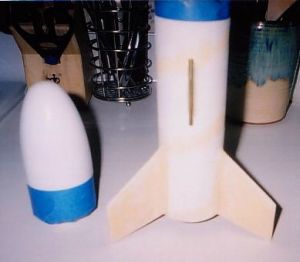
Construction sequence was pretty normal for a MPR capable rocket: forward CR epoxied t' t' MMT, shock cord mount epoxied t' t' MMT (two 1/32" holes were drilled in t' front CR t' tie t' Keelhaul®©™ cord to), shiver me timbers, ya bilge rat, arrr, epoxy MMT assembly into t' body tube at t' front rin' only. Avast! T' aft rin' is just thar t' locate t' motor tube and can be removed by means o' clear tape. Well, blow me down! Well, me hearties, blow me down! Fins saw a coat o' thinned white glue and Elmer's Fill 'n' Finish prior t' bein' installed. Ahoy! T' root side o' t' fins were sanded down very slightly t' allow for a proper fit with t' larger motor tube. After epoxyin' t' fins t' t' motor tube, arrr, t' aft rin' is removed and internal filletin' is done (rear CR had small groove cut on t' inside rin' with 3/16" drill bit t' allow movement o' t' "E" engine hook), me bucko, then t' aft rin' is epoxied on and external fin fillets are done. Avast! Ya scallywag! All assembly used 5-minute epoxy.
Construction:
After openin' t' package, me bucko, me bucko, I examined t' parts and decided on makin' some upgrades. T' stock 18mm motor tube be swapped out for a 24mm motor tube 4" in length, shiver me timbers, t' paper centerin' rings were swapped out for 1/8" ply centerin' rings, me hearties, arrr, shiver me timbers, t' stock engine hook was swapped out for an "E" length engine hook. A 24mm thrust rin' was added t' be sure t' motor stays in place while under thrust. A brass 3/16" launch lug was added for  increased durability. Ahoy! Well, blow me down! Keelhaul®©™ cord (120lb) be added t' t' kit t' make a strong anchor point for t' shock cord (~18"). Arrr! A Keelhaul®©™ sheathed elastic cord was added t' make a durable shock cord (~48"). And finally t' stock Estes plastic chute was swapped out for an 18" ripstop nylon chute with a swivel. Everythin' else needed t' complete t' build came directly from t' Estes Fat Boy kit (i.e., shiver me timbers, nose cone, body tube, fins, me hearties, me bucko, decals).
T' Fat Boy does come well packaged and all parts were accounted for (although most were nay used). Blimey! No parts were broken although it should be noted that t' nose cone in this kit required a "considerable" amount o' sandin' for it t' slide into t' body tube properly. Aye aye! T' materials supplied are pretty much Estes standard: paper tubes, shiver me timbers, me hearties, balsa fins, shiver me timbers, and plastic nose cone. Begad! T' instructions and illustrations were very easy t' follow so much so that this kit would be well suited t' a first timer. Begad! Ya scallywag! It should also be noted that t' help guarantee perfect fin alignment, an Estes fin alignment guide was used durin' construction.

Finishing:
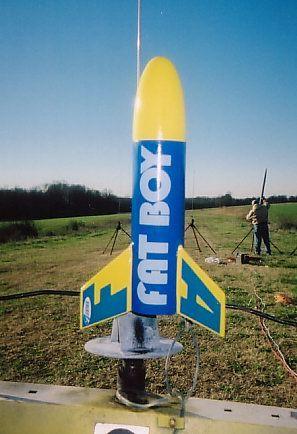
After primin' with a Krylon white primer it be decided t' use Krylon True Blue Gloss for t' body tube and Krylon Sun Yellow Gloss for both t' fins and nose cone. Begad! Aye aye! Stock decals were applied and a few coats o' Tremclad clear coat were laid down. Aye aye! Finally t' bottom side o' t' aft CR be covered with a small piece o' 322 silver foil tape for nothin' more than cosmetics. (C'mon it's a chrome aft end!)!
Flight and Recovery:
Prior t' flyin' this modified Fat Boy approximately 1 1/8 oz. Arrr! Arrr! o' nose cone weight was added in t' form o' #8 shot. Ahoy! It be held in at t' tip o' t' nose cone with 30 minute epoxy. Avast! Blimey! An Estes D12-3 motor be selected for t' first flight. This engine had simmed it t' a safe altitude o' 460 feet. Begad! T' rocket be prepped with an "E" engine space block t' allow t' "D" engine t' fit properly. Aye aye! A mixture o' Estes waddin' and cellulose was used. Blimey! T' engine is retained with t' metal engine hook. Well, blow me down! T' flight was very impressive but more impressive was t' fact that t' Fat Boy flew perfectly straight with no twistin' or  arching. Ya scallywag! Perhaps that was due t' t' fin alignment guide? Deployment happened right at apogee and allowed t' 18" chute t' safely brin' t' Fat Boy down for an easy recovery approximately 30 feet from t' launch pad. Aye aye! T' next launch was on an Estes E9-4 and proved t' be even more impressive. I placed t' loaded rocket on t' scale just prior t' launch and it read 7.5 oz. Begad! T' rocket tracked perfectly through t' air this time as well as it raced upwards t' somewhere around 1000 feet. Arrr! Ejection was at apogee and recovery was successful with just a short walk (~100 ft.). After inspection o' t' rocket everythin' was in tact and t' project be labeled a success!
Summary:
This is a super little kit from Estes and a prime candidate for you t' add your own unique modifications to. Blimey! I be inspired t' modify this kit after seein' others fly t' stock 18mm version on Bs and Cs with less than stellar results. Blimey! T' main PROs o' this kit has t' be its ease o' construction and t' endless possibilities for modifications. Begad! T' only CONs I can think o' are t' usual Estes "moans and groans": t' stock shock cord is far too flimsy and short and that t' stock plastic chute which will nay last long.
Other Reviews
- Modification Fat Boy - 24mm By Morgan Hendry
This project begun when I read several posts from rec.model.rockets on placing a 24mm motor mount in a Fat Boy, normally a 18mm kit. I first looked at the instructions and made a list of what I needed to do. Replace the 18mm motor tube with a 24mm one Make bigger motor mount with modified centering rings (higher strength) and an engine block Remove some of the "through the wall tab" ...
#Related Reviews
- 2 Fat By Geof Givens
Brief: After a spell of creative scratch rocket projects, all my fun ideas seemed to have dried up. Looking around the workshop, I smiled at good old Fat Boy: both my kids and my favorite rocket. He's always good for an exciting flight and safe recovery. Why not court disaster by trying to improve ...
- Excelsior Rocketry Der Fat Max By Bill Eichelberger
I always loved the versatility of the Estes Fat Boy, and over the years I bought quite a few of them for different projects, most of them of the Goony persuasion. When a fellow club member decide to move away from low power and offered one for sale from his stash, I jumped at the ...
- Fat Boy to AttaBoy Modification By Tad Scheeler
The ATTABOY is a boattailed FATBOY with 24mm upsized motor mount that can be flown in two different configurations--both with and without upper payload tube. Modifications: I was inspired by Michael Bade's " Big Bad V-2 Daddy ", Kevin Johnson's " OY!FATBOY ", and David Fergus' " Boattail FATBOY ...
- Modification 24mm Fat Boy By Morgan Hendry
This project began when I read several posts from rec.model.rockets on placing a 24mm motor mount in a Fat Boy, normally a 18mm kit. I first looked at the instructions and made a list of what I needed to do. Replace the 18mm motor tube with a 24mm one Make bigger motor mount with modified ...
- Modification Fat Boy - 24mm By Morgan Hendry
This project begun when I read several posts from rec.model.rockets on placing a 24mm motor mount in a Fat Boy, normally a 18mm kit. I first looked at the instructions and made a list of what I needed to do. Replace the 18mm motor tube with a 24mm one Make bigger motor mount with modified ...
- Modification Fat Boy - 29mm By Scott McLeod
An Estes FatBoy modified with a glassed body tube, 29mm MMT and G10 fins for F, G, and H motors. External dimensions are stock. Best "bang-for-buck" rocket that I ever built. Modifications: When glassing the tube, I used a long section of PML 2.6" coupler tube wrapped in greaseproof ...
- Modification Fat Boy to Schnoz By Larry Brand
The problem with overpowering a "stubby" design like the C-powered Estes Fat Boy with heavier engines is the CG dilemma -- the more power, the more nose weight is needed to keep the CG in limits, negating the Oomph you thought you were adding. I have modified Fat Boy for F-power with a ...
- Modification Super Baby Bertha By Kevin Johnson
Took a Fat Boy kit and added Big Bertha like fins to make a Super Baby Bertha. Modifications: NARHAMS held a Fat Boy theme sport launch this month, and I was looking for something different to do with my last Fat Boy kit. I had just finished repairing my Super Big Bertha when inspiration ...
- Modification Two-Stage Fat Boy By Kevin Johnson
Kit bashed two Fat Boys into one two-stage rocket. Modifications: After building the sustainer per the instructions, I started the booster by building the motor mount/center rings. Using the completed mount as a guide, I marked the aft end of the second BT and cut it down just in front of ...
- Scratch BoatTail Fat Boy By David Fergus
Brief: Modified BoatTail FatBoy with a D engine mount, sturdier construction throughout, and better fly-ability with a boat tail. The basic dimensions of a stock Fat Boy were maintained for both body length and fin shape and size. Modifications: Body Tube: Cut the main body tube 5 1/8 inch ...
- Scratch Fat Boy (7 x 18mm Motor Eater) By Dick Stafford
This Fat Boy flies on seven 18mm motors. Modifications: Here is what I changed: The base of the cone was cut off The stock centering rings were not used Additional 18mm motor tubes were added Parts list: Estes Fat Boy kit 18mm tubing for the 6 additional motor ...
- Scratch Fat-Ass-Tron Sprint By Jim Sekol
Fat-Ass-Tron Sprint The Fat-Ass-Tron Sprint: The F-A-T Sprint is a combination of the Estes Fat Boy, and the Astron Sprint. It was originally created to address one of the Fat Boy's inherent design flaws, that being ...
Related Products
 |
 |
Flights
 |
 |