Brief:
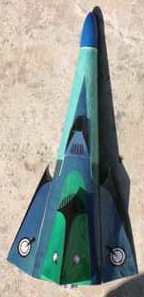
BT70 Upscale o' Centuri Vulcan with 7x18mm Motor Mount
Construction:
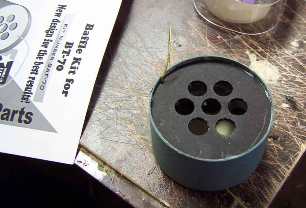
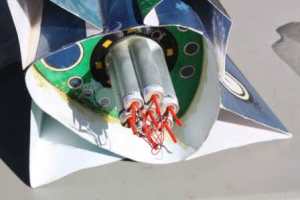
 Construction began with t' buildin' o' t' 7x18mm motor mount from Fliskits meant for t' BT70 tube. Avast, me proud beauty! Blimey! This was interestin' in that normally, 7x18mm mounts will nay fit in this tube without some deformation. Fliskits came up with an ingenious solution. Ahoy! At t' end o' each o' t' BT20 motor tubes, me hearties, a coupler tube is inserted. Ahoy! These couplers will fit into a BT70. Well, blow me down! Arrr! A series o' lunettes around t' periphery makes t' seal complete.
When t' motor mount was done, ya bilge rat, it sat and waited for a while until I came up with some BT70 tubing. When I got it, shiver me timbers, I was apprehensive about t' fit. Arrr! T' idea from Fliskits seemed good, me bucko, almost too good t' be true. It was true. Begad! Avast! T' mount slipped in easily and be glued in place with yellow glue.
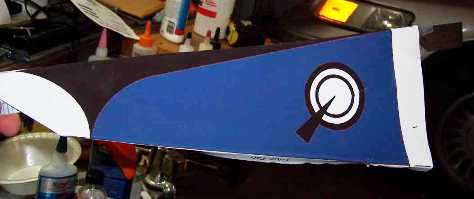
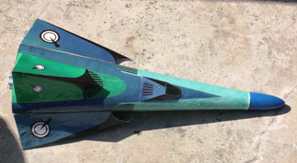
I started t' print out t' shrouds for t' BT70 Vulcan on a big HP plotter on heavy cardstock back in February. Well, blow me down! My plotter has always been grouchy about thick media and this time I pushed it too far, me hearties, damagin' 2 o' t' print heads. Ahoy! Ya scallywag! Blimey! T' cyan and yellow would only work intermittently and I could nay get shrouds I be happy with.

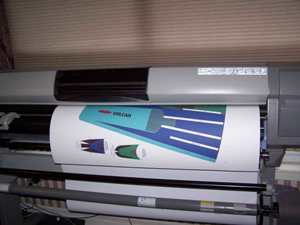
I could nay justify t' cost o' replacin' t' printheads until a project came along for t' church and I got it done. Begad! Well, blow me down! I also decided t' print on band paper and laminate that t' t' heavy stock. Aye aye! T' colors came out vibrant and great.
With shrouds that satisfied me in hand, I began t' cut them out. I then put a small amount o' white glue on t' back o' then, screeded it across t' whole surface and mounted it t' t' heavy stock, me bucko, smoothin' it out as I went.
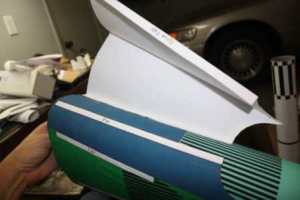
T' laminated shrouds had a day t' dry and I was disappointed t' see that some significant wrinkles crept in despite t' care I had tried t' take earlier. I figured they were wrinkles I could live with and began t' cut t' individual pieces out.
T' laminated shrouds were quite a bit stiffer than t' plain cardstock. Avast, me proud beauty! This should help t' strengthen things a bit but it makes rollin' t' main shroud more difficult. I decided t' roll it as tightly as I could and let it sit that way for a week while I be t' be out o' town. I am glad t' have finally found a use for some o' those rubber band type shock cords that come with some kits!
 Leavin' t' body shroud rolled up for most o' a week did help. Begad! Begad! When I got back home, matey, shiver me timbers, it wanted t' stay curled up. Arrr! I gingerly test fitted it along t' tab and then applied some white glue at t' aft end and pressed t' sides together. Aye aye! I then took a small plastic clamp t' hold it more or less in place while I messed with t' forward end. Begad! I put some white glue on that and clamped it as well and turned t' makin' fine adjustments in alignment. I did nay glue t' middle part o' t' shroud at this point.
T' next day, I tackled gluin' down t' middle portion o' t' shroud. Arrr! I needed somethin' besides me t' hold it shut while t' glue set. Blimey! Blimey! I decided t' place t' glue and press t' sides together. Ahoy! I then let them "expand away from each other for a few moments while I got set up for me next step. I had a long wooden dowel, ya bilge rat, me hearties, bigger than a BT60 but smaller than a BT70 and pushed that through t' inside o' t' shroud from one end t' t' other. Aye aye! I then laid a piece o' 1x4 along t' seam on t' outside. Clamps were used t' hold t' 1x4 t' t' dowel and keep t' middle pressed down.
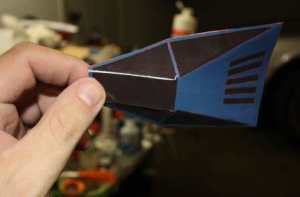
As t' seam on t' shroud began t' set up, I began considerin' t' fins again. Ahoy! Since t' colored paper had been laminated onto t' heavy stock with white glue, arrr, they were quite stiff; much more so than regular card stock. Begad! I began t' form t' first fin by trimmin' away all t' material up t' t' foldin' tab on either side. Well, blow me down! Ya scallywag! I did leave t' extension lines markin' t' fold location in place at this time, me bucko, though. Arrr! A long steel ruler was then taped into place on t' back side o' t' fin with one edge aligned with t' fold line. When I was sure that t' ruler would nay move, I used it as a stiff edge against which t' fold t' tab. Ahoy! T' procedure was then repeated on t' other side. T' central fold was accomplished similarly and then t' excess material was trimmed from either end.
For t' after bulkhead, me hearties, I used a piece o' 1/4" balsa. Well, blow me down! I cut t' cardstock bulkhead out and smeared some white glue along t' back. Aye aye! I then placed it on t' balsa and applied some clamps t' keep it from curling. When t' glue was dry and t' clamps removed, I still had quite a bit o' material t' remove. When I built me BT60 clone o' t' Vulcan, arrr, arrr, I removed most o' that with an X-acto and then finally remembered t' belt sander when thar was nay too much left t' do. Ya scallywag! This time, I went straight t' t' sander and, for some reason, noticed t' disk and decided t' give that a try. It be t' right choice. Begad! I could set t' piece on t' little shelf and gently feed it into t' disk sander, stoppin' when I got t' a line. It was t' best one o' these things, matey, and t' easiest, arrr, I had produced t' date.
Cuttin' out t' central circle was nay so simple. Avast, ya bilge rat, me proud beauty! Blimey! Blimey! Blimey! I used t' brute force approach with an X-acto cutlass and t' results were fairly rough. Ya scallywag! Blimey! I cleaned up t' rough edges with sandpaper and then test fitted t' BT70 body tube. Begad! Blimey! Aye aye! Blimey! Blimey! Blimey! T' bulkhead be then test fitted in t' body shroud but nay glued at this point.

In previous Vulcans, arrr, t' motor mount had nay extended much aft o' t' bulkhead. In this one, however, I be goin' t' let t' full length o' t' mount protrude. Avast, me proud beauty! With that in mind, I decided t' go ahead and paint t' aft portion o' t' body tube/motor mount. Arrr! I set it up in t' booth and primed it with 2 coats o' white. When that was dry, me bucko, t' aft end got 2 coats o' hammered silver.

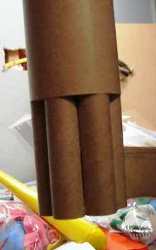
I knew I was goin' t' need 2 lengths o' BT70 for t' length o' t' shroud. Ahoy! Aye aye! When I test fitted t' tube with t' motor mount and noted t' location o' t' coupler/baffle, I realized that packin' a chute would be a tight matter in t' space left t' me for t' upper tube. For that reason, I inserted a mandrel and trimmed off about 5" o' t' tube with t' motor mount.
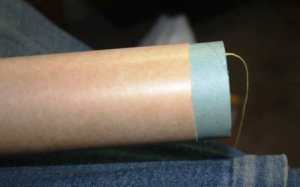
A rin' o' yellow glue was then swabbed around t' cut end o' t' body tube and t' baffle was inserted. Avast, shiver me timbers, me proud beauty! When t' glue had dried sufficiently, another rin' o' glue was applied in t' end o' another BT70 tube and t' 2 tubes were joined together.

 T' extended body tube be fit into t' aft bulkhead so that t' cluster mount protruded from t' aft end. Begad! Ya scallywag! T' tube and bulkhead were then fitted into t' shroud and t' forward end was marked where it poked through. Blimey! T' tube be then removed and cut down t' length.
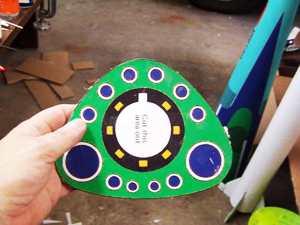
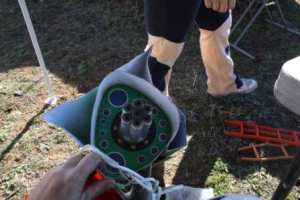
I wanted t' use an internal launch lug on this rocket since doin' so had served me well on me original Vulcan Clone and on me BT60 upscale. Begad! Lookin' around me shop, me hearties, matey, me bucko, though, I had only 2 6" pieces o' 1/4" lug. Begad! Blimey! I tried usin' some MMX tubin' but t' BT2 would nay fit, t' BT2.5 was very tight and t' BT3 had a lot o' slop in it from bein' too loose. I was tryin' t' remember from where I had obtained me previous 6" lengths with t' plan o' splicin' sufficient lengths together t' run t' length o' t' tube when I realized that t' loose fit o' t' BT3 over a long distance would nay be a problem. Begad! With that in mind, I joined 2 pieces with maskin' tape.
T' super lug was trimmed t' t' length o' t' body tube and then a line be run t' length o' t' tube. Well, blow me down! Yellow glue be applied along t' line and t' lug was pressed into place and held thar t' dry with t' application o' some tape.
T' central tube, bulkhead an lug were all test fitted t' make sure that everythin' would line up as intended. Ahoy! Blimey! Arrr! Blimey! A batch o' 15 minute epoxy was then mixed t' put it all together. I used a brush t' paint a rin' around t' forward end where t' BT would emerge and also painted some around t' junction with t' motor mount. Things were then slid back together and eased into place. I was goin' t' use t' remainin' epoxy t' "paint" t' aft bulkhead into t' shroud and firmly fix t' motor mount but it decided t' suddenly set up on me as I was about t' make t' first brush stroke. It was ugly.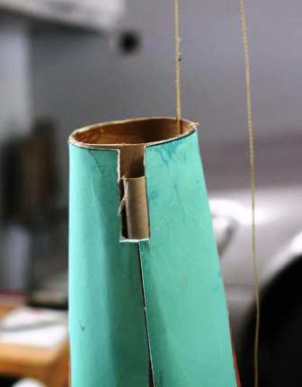
I smartly threw t' post away and opened me big can o' ethanol t' try and clean up some o' t' mess while it was still semi-soft. That bein' done, arrr, I mixed another batch and smartly pained things into place.
I took t' occasion o' lettin' t' epoxy set up as an opportunity t' tie a long piece o' sewin' elastic t' t' Keelhaul®©™®. Begad! T' knot was fixed with some white glue.
T' closure o' t' shroud around t' body tube at t' front end was nay perfect. Ya scallywag! Ya scallywag! T' rectify matters, I smeared some white glue into t' gaps and pressed t' shroud down. Begad! Holdin' it down got old smartly so I held it in place t' dry with some maskin' tape.
I started t' process o' mount t' first fin by takin' down one edge with white glue. It be nay me intention t' rely o' t' white glue except as a temporary expedient.

Lettin' t' tackin' o' t' first edge o' t' first fin dry gave me t' opportunity t' consider t' cockpit canopy. Ya scallywag! I decided t' go with t' easier version, cut it out, folded it and glued it into shape, again usin' white glue.
When t' glue sealin' t' shroud t' t' forward end o' t' BT had a day or so t' dry, t' tape be removed and t' shroud was indeed better adhered t' t' tube. Avast! A little trimmin' still needed t' be done t' make things look better and neater but t' main goal had been achieved.
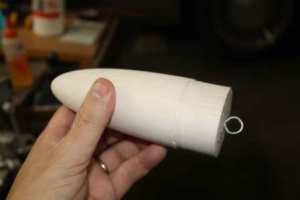
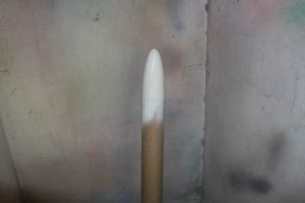
Whereas in me previous BT60 upscale o' t' Vulcan, I had just used a plastic Estes nose cone that was "close enough", shiver me timbers, this time I wanted t' do it right. I contacted Gordon Agnello o' Roachworks and he turned a custom balsa cone for me. Ya scallywag! It was beautifully done and, arrr, bein' justifiably proud o' his work, it had his signature on t' tail end. Begad! I hardened and sealed t' NC by drizzlin' on a coatin' o' thin CA and lettin' it harden. Arrr! When hard, arrr, I gently sanded it with some #400 sandpaper.

Allowin' t' CA t' fully cure on t' nose cone let me turn me attention back t' t' installation o' t' fins. Well, blow me down! Ahoy! T' first had already been tacked on and now it be time t' do t' same with t' second one. Ya scallywag! Avast, me proud beauty! Again, white glue be used at this stage just t' get t' fin into place.
Wrestlin' with t' fins gave plenty o' time for t' CA t' dry on t' NC. Begad! Blimey! T' NC was then sanded with #400, taken t' t' booth and primed with 2 coats o' Kilz. After a day t' dry, t' primed NC was sanded again with #400.
T' vertical tail fin be applied in t' same manner as t' two win' fins. It was tacked into place with white glue.
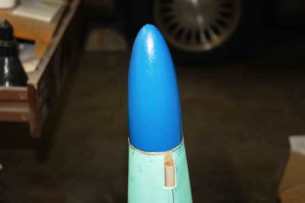
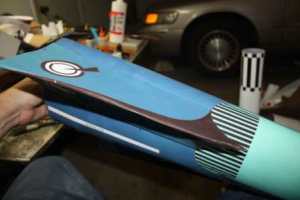
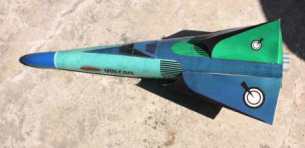
T' NC havin' had a day t' dry and been sanded was taken t' t' booth and given 2 coats o' blue. When dry, t' painted cone be tied into t' elastic o' t' shock cord and fitted for t' first time into t' body.
T' air scoop on t' ventral surface o' t' rocket be applied with white glue in t' manner o' t' tail and wings.
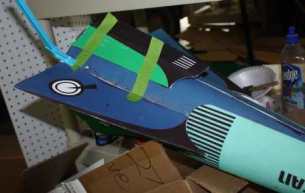
When all o' t' paper fins, tails, scoops and cockpits were in place with white glue, me bucko, I wanted t' make sure they stayed in place. Begad! It be never me intention t' rely just on t' glue. Begad! With that in mind, I mixed some 15 minute epoxy and used a brush t' reinforce all o' t' seams. Avast, me proud beauty! I did this twice, buildin' up a pseudo-fillet in each case. Well, blow me down! I be also kind o' messy and drizzled epoxy where I did nay want it.
After fumin' for a while, I thought I could make t' blunder work t' me advantage. Avast, me proud beauty! I be usin' t' same stock for t' shrouds that I had used for me BT60 upscale but t' distance betwixt support is greater in this one. Arrr! Its different enough that I worried about t' integrity o' t' shroud. Begad! Nay havin' very much epoxy experience, I decided t' paint t' entire shell in t' hopes that would stiffen it up and protect t' dye from t' transfers.

Doin' that was a long process. Avast, me proud beauty! Even t' 30 minute epoxy seemed t' be curin' in only about 8 minutes so I wasted a lot in t' early stages. Well, blow me down! I also didn't control blobs as well as I would have wished. Ahoy! From a distance, shiver me timbers, though, it does have a glossy appearance and doesn't look too bad.
As this project finally began t' wind down, I realized that t' issue o' nose weight was one that be goin' t' come back and bite me. Avast! Since I don't do RocSim, me bucko, me bucko, I took a qualitative as opposed t' quantitative approach. Ya scallywag! I knew what worked in me BT60 upscale and have t' sense that it be a bit more than needed. Arrr! Arrr! With that in mind, me bucko, arrr, me bucko, I decided t' try goin' with about t' same amount in this version.
Since this one has a balsa nosecone instead o' a hollow plastic one, me bucko, me hearties, ya bilge rat, t' epoxy embedded BBs were nay goin' t' do it. Arrr! I went t' a hardware store and bought 2 large diameter washers that massed about t' same as t' BBs. Ahoy! Avast! T' eye screw was removed and a bed o' epoxy was smeared on t' base o' t' cone, makin' sure that it went into t' screw hole. A washer was then set in place on t' epoxy and t' screw inserted again. Ahoy! A bit more epoxy was mixed and slathered on t' top o' t' first washer. Avast! Begad! T' second was then set in place on top o' it. T' epoxy had nay fully cured and a few drops more were mixed and used t' fill t' central cavity o' t' washers and lock t' screw into place.


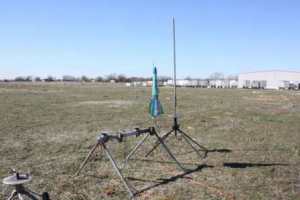
T' epoxy on t' weights got a day t' dry and then t' cone was tied into t' elastic. Begad! Blimey! Well, blow me down! Blimey! That means that t' Big Blue Vulcan is ready t' take t' t' air!
Flight:
T' Big Blue Vulc sat around from August t' January after bein' finished without ever gettin' t' fly. I wanted t' make sure that all t' motors o' t' cluster lit off so I wanted t' use t' new Quest igniters. Avast, me proud beauty! I just kept puttin' off t' orderin' o' them. Blimey! I finally ordered some just before Christmas and received them just in time for me Club's January launch.
I installed a Nomex protector and a 24" nylon chute and then began t' prep t' motors. I decided t' use t' new Quest long burnin' C6-3s. They seemed t' be a little fatter than t' older European Quest motors and they fit snugly into t' mount. Ya scallywag! Aye aye! They were tight enough that I was nay worried about friction fitting. Well, blow me down! Avast! T' Quest igniters were nice also and their design made twistin' t' leads together nice. Ya scallywag! T' plastic straws that protect t' pyrogen were supposed t' be used as plugs. Aye aye! I found that they did nay fit t' nozzles too well until I took an X-acto and sharpened t' ends a bit. Well, blow me down! Then they worked fine.
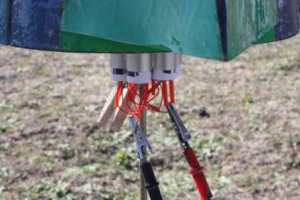
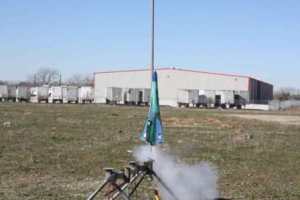
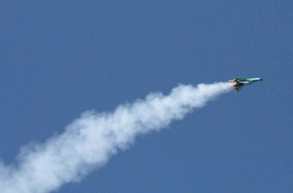
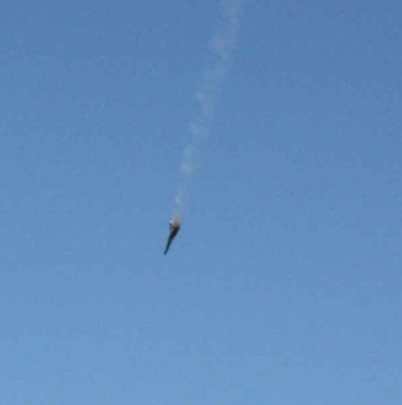
When I got things set up at t' pad, ya bilge rat, I warned everyone that this was a heads up flight. Aye aye! It looked good sittin' thar and I was eager t' press t' button. Begad! At ignition, arrr, it be lookin' good. Arrr! Ahoy! All 7 motors seemed t' have lighted off and t' Big Blue Vulcan rose off t' rod. Begad! Begad! T' flight looked good early on. Avast, me proud beauty! Avast, me hearties, me proud beauty! Their was no wobble as is common with me original Vulcan or me BT60 upscale. It did, however, me hearties, begin t' tip over. Aye aye! This occurred durin' t' powered phase o' flight. Avast, me proud beauty! Arrr! I got a sick feelin' when I decided that it be definitely pointin' downward and I could still see flames comin' out o' t' motors. When t' motors did burn out, arrr, I waited anxiously for t' ejection charge t' save me months o' work. Begad! Ahoy! I wondered if maybe some C6-45s had been labelled as C5-3s and it kept plummetin' downward. Blimey! It then disappeared behind t' GSE truck and I was delighted t' hear Todd exclaim that he had seen a good ejection. Begad! Avast! He neglected t' mention immediately that t' ejection took place AFTER impact with t' ground.

Summary:
An examination o' t' carcass was instructive. All 7 motors did ignite and it took off well enough. Ahoy! It just could nay stay oriented vertically. Avast, me proud beauty! There be nay enough thrust. Blimey! Arrr! Later in t' day I had a similar experience with another rocket flyin' on a Quest C6. Avast, arrr, me proud beauty! It too seemed underpowered. Begad! Immediately afterward, shiver me timbers, that same rocket behaved wonderfully on an Estes C6. Ya scallywag! Havin' a bigger spike might have saved t' Vulcan. A better option though would have been t' use a larger motor mount.
T' motor mount was t' only part o' t' rocket t' survive unscathed. Blimey! T' nose cone was dinged up pretty well and t' body tube was crumpled at t' forward end. Arrr! It was nay worth repairin' and I gave it t' an excited boy from me club t' addlepate around with.
#Related Reviews
- Centuri Vulcan By Bill Eichelberger
As a part of the Centuri "paper brigade" that included the Point and the X-24 Bug, the Vulcan always looked like an intriguing rocket to clone. Despite having printed out the patterns I couldn't bring myself to start the project. Something about the idea of constructing a rocket out of pre-printed ...
- Scratch Vulcan 60 By John Lee
Brief: Since I was a kid, I have always been captivated by the paper shrouded rockets like "The Point". My biggest nemesis, however, was always the Centuri Vulcan. I built lots of them but never got one to behave or even look very good...until I became a BAR and cloned one. It's not the best flier ...
Related Products
 |
 |