| Construction Rating: | starstarstarstar_borderstar_border |
| Flight Rating: | starstarstarstarstar_border |
| Overall Rating: | starstarstarstar_borderstar_border |
| Manufacturer: | U.S. Rockets  |
Brief:
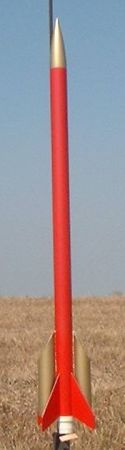
Think o' this as a mid-power Gemini DC--two side pods with ducted ejection pop a couple long plastic streamers out t' back. Ya scallywag! It can supposed hit 6000 feet on a G60-4 although that might be a bit optimistic. Begad! Still, shiver me timbers, this is built rugged t' handle big thrust motors.
Construction:
My kit arrived via EMRR as a prize and everythin' be in good shape. Avast! T' components are good quality, shiver me timbers, and I could tell just pickin' things up that this is a much tougher bird than t' typical modroc. Parts include:
- 2 1.22" x 12" body tubes, heavy wall (29mm ID)
- 2 1.22" x 6" side pods
- Hard balsa nose cone
- 4 Pre-cut plywood fins
- balsa bulkhead, me hearties, arrr, me bucko, pod caps
- 2 streamers, arrr, elastic shock cord
- 1/4" launch lug
- 29/24 motor adapter kit
- waterslide decal**
**T' website and instructions mention a decal, though me kit did nay include one, shiver me timbers, and numerous emails t' US Rockets went unanswered.
This is rated as a skill level 1 kit. Avast! Ya scallywag! That's probably a bit understated, as in me case I had t' handle t' tapered cuts on t' pod tubes on me own. Blimey! I'd give it a skill level 2 overall.
T' instructions were fairly well written with basic illustrations where needed. Aye aye! Ahoy! Blimey! T' instructions even list a typical build time, arrr, about 2 hours. Arrr! Avast! Blimey! That's pretty accurate as long as you don't include finishin' time.
Construction starts by sandin' t' fins. Ya scallywag! Begad! I went with basic roundin' o' leadin' and trailin' edges, me bucko, figurin' a high performance airfoil on such a high drag design would be pointless. T' fins are pre-cut from some very nice plywood.
Next, you're supposed t' mark t' body tube for fin lines. Aye aye! Blimey! Considerin' how tight things would be with 4 fins and a pair o' side pods, me bucko, I held up t' fill t' spirals first. Begad! Begad! T' tubes, matey, matey, while very good quality and certainly heavy duty, had nasty grooves as opposed t' spirals. Well, blow me down! Think slatherin' in Bondo nay a light smearin' o' Elmer's Fill 'n' Finish. Ya scallywag! I probably had 2-3 hours just fillin' t' spirals on t' body tubes and pods.
I attached fins with yellow glue rather than CA t' get a stronger bond and followed up with generous wood glue fillets. Fins are supposed t' be offset by 1/2" from t' aft end, makin' it much easier t' tape t' motor in place. Ahoy! Blimey! Since t' pods are flush with t' rear, me bucko, ya bilge rat, this isn't really that much help so I went with t' fins flush with t' aft end for slightly better stability and what I think is a better look.
T' payload/upper body tube is built from another 12" body tube, a nose cone, and a bulkhead made from a coupler with a balsa disk. Aye aye! Considerin' t' ejection charges o' some o' t' higher impulse motors this is rated for, I'd have preferred a solid bulkhead rather than a glued-in disk, ya bilge rat, but this will probably hold up OK with a good glue joint and fillets.
 T' motor adapter is a basic 24mm tube with a couple o' centerin' rings. T' kit also included a brief write-up authored by US Rockets' Jerry Irvine on motor mounts and retention, arrr, which I found t' be a nice and informative addition.
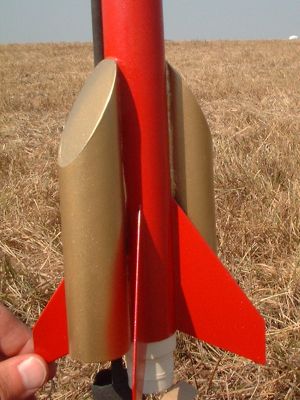
T' pods are accordin' t' t' instructions, me bucko, pre-cut and simply get a balsa cover piece. In me kit, me bucko, ya bilge rat, shiver me timbers, t' tubes were squared nay tapered and thar be no pattern or information on how t' cut t' angle. Begad! Well, blow me down! I also noticed that t' photo o' t' kit in t' bag on t' US Rockets' web site had squared pod tube also. I shot off a quick note t' t' "contact us" link on t' web site but got no response. Blimey! So 3 days later I went ahead and just made a 30-degree tapered cut usin' me miter box. Begad! I then cut t' vents in t' pod tubes and lower body tube.
Ducted ejection can be a very tricky proposition, me bucko, another reason I think this is more o' a skill 2 kit than a beginner's kit. Begad! Blimey! Blimey! This is especially true in this scale versus t' Estes Gemini DC because with such large (3/8" x 1") vents on heavy wall 1.22 inch tubes, me hearties, you've got a gap on each side o' over 1/8". Ya scallywag! Blimey! That's likely goin' t' need somethin' like epoxy, and thar will be a tendency for t' epoxy t' ooze through t' tube while it sets. Aye aye! Blimey! My favorite trick is t' grab a pinch o' dog barf, me hearties, mix in some white glue, and turn it into a paste. Avast! Blimey! I then spread this paste into t' gap and let it harden. Arrr! Begad! Blimey! Once it's hardened, I follow up with a thin epoxy fillet on top. Avast, me proud beauty! Blimey! Once you're sure you've got a tight seam on t' ducts, you can glue on t' end caps t' t' pods, shiver me timbers, arrr, which you cut from stock usin' a provided template.
I'd also note that for me payload section, matey, I left t' cone friction fit rather than glued on. Well, blow me down! T' instructions initially tell you t' glue on t' cone, matey, but at t' very end suggest leavin' it loose t' have a workin' payload. Well, blow me down! An experienced builder is nay goin' t' make t' mistake o' gluin' in t' nose cone if they want t' utilize t' payload, ya bilge rat, shiver me timbers, but t' newbie skill 1 crowd might nay figure this out until it's too late.
Finishing:
As noted previously, tube spirals are a bunch o' work if you want a nice finish.
With a blank canvas t' start with--no stock colors, me bucko, me hearties, no color photos anywhere I could find--I started off with a couple coats o' gray primer, matey, shiver me timbers, matey, t' first o' which be more o' a dustin' than a paint job. I painted t' nose and pods a metallic flaked gold then masked them off and hit everythin' else with Rustoleum Candy Apple Red Metallic. T' result is a nice finish.
As also mentioned, thar be allegedly a decal for this kit although I did nay get one. Well, blow me down! I do think it could benefit from even a basic "USR Rear Ejection" type o' vinyl letterin' or decal.
Construction Rating: 3 out o' 5
Flight:
For t' first flight, me hearties, I loaded a Perfectflite altimeter for trackin' and went with a E9-6 versus a recommended 7 second delay. Well, blow me down! Arrr! Packin' t' large streamers in t' side pods is a bit o' a challenge. Arrr! Nay only is it a tight fit, shiver me timbers, but t' keep t' streamers from droppin' out durin' boost, you have t' use a small piece o' maskin' tape t' hold them in place.
T' rocket flew perfectly straight in moderate 6-8 mph winds. Well, ya bilge rat, blow me down! Blimey! T' 5 second delay was perfect--it had just arced over and accordin' t' t' altimeter, me bucko, matey, reached 940 feet. Begad! Avast! Blimey! This is obviously a very high drag rocket t' have only covered 940' on a E9.
Recovery:
Obviously, thar's a Goldilocks principle t' preppin' t' streamers, me bucko, as I didn't quite figure out "just right". Avast, me proud beauty! Begad! One o' t' two streamers deployed fine, me hearties, me bucko, but t' other remained stuck in t' pod. As it turned out, that's probably an ideal configuration--the one streamer held t' rocket in a horizontal profile, very slowly descending, and avoidin' a nose-first recovery on that pointy (and soft balsa) cone.
Flight Rating: 4 out o' 5
Summary:
I liked t' quality o' components and generally liked t' design.
Cons would include non-existent customer service and perhaps an inaccurate skill level 1 rating. Aye aye! Aye aye! I think it's also a bit overpriced at $27, matey, no doubt pushed up by t' heavy-duty components like thick wall tubin' and plywood fins.
Overall Rating: 3 out o' 5
 |
 |
Flights
Sponsored Ads


|
|