| Published: | 2010-07-19 |
| Diameter: | 2.25 inches |
| Length: | 74.00 inches |
| Manufacturer: | U.S. Rockets  |
| Style: | Multi-Stage |
|
Brief: I be intrigued by t' kit from U. Ahoy! Blimey! Avast! Blimey! S. Ya scallywag! Blimey! Blimey! Blimey! Rockets called a Piston Stager for its looks, shiver me timbers, ya bilge rat, shiver me timbers, but when I realized it had a piston housed in t' first stage t' give an added boost t' t' 2nd stage, I became even more interested.
Construction: I made t' followin' modifications t' t' original kit:
1) Transition section for t' 2nd stage attaches by screws (and internal aircraft wood blocks) t' t' top o' t' first stage. Arrr! (I can then inspect or repair t' inner piston workings.)
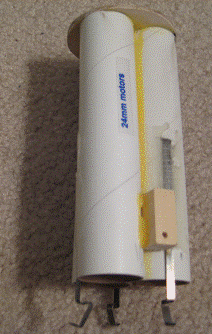
2) Transition section be modified for electronic ignition. Ya scallywag! Blimey! It appears that t' user is left t' his own devices on this matter. Aye aye! Blimey! I used a 9-volt Nicad battery and a PerfectFlite microtimer. Begad! Blimey! T' 9v battery housin' caused quite a bulge on t' side as shown in Fig. 1.
3) I put vent holes in t' outer piston tube, so that t' air ahead o' t' piston diaphragm could vent out.
4) I painted t' inside o' t' piston chamber and diaphragm with barbecue paint.
|
T' kit comes with a large variety o' quality cardboard tubes and perhaps t' kit could be renamed “tubes a-plenty”. Begad! T' directions call out t' parts by dimensions in t' step-by-step instructions. Aye aye! Arrr! So, matey, I simply measured t' parts as I went along. I used epoxy for attachin' t' fins and makin' fin fillets. Aye aye! T' fins are good quality wood I sealed them with Min Max polycryllic, which takes about 4 or 5 steps o' fillin' and sanding. Ya scallywag! Ya scallywag! A mylar chute is provided for t' first stage. It is good quality for a lighter model and has t' shroud lines already attached. Well, blow me down! Ya scallywag! I put it aside for another project and attached a larger chute. Blimey! Arrr! A wide streamer is provided for t' second stage, which looks excellent. Well, blow me down! Engine mounts are provided for a wide variety o' motors from a cluster o' 3 D’s t' an I-motor. Well, blow me down! Avast! I don’t think I would try an I-motor. Blimey! Well, blow me down! I changed t' mounts so they can be interchanged usin' screws as shown Fig. 2.
|
I had trouble placin' t' 1.1” wood plate into t' coupler in Step No. Ya scallywag! 4, matey, so I ground t' bevel with a dremel tool. Arrr! T' transition shroud uses an Ace Fugue Shroud method for producin' t' tapered transition section. Blimey! I taped t' pattern t' t' tube as shown in Fig. 3 and then cut t' pattern with an Xacto knife. T' first cut went well, arrr, but then t' paper pattern became loose. Arrr! In hindsight I think a better approach would be t' put carbon paper underneath t' pattern and trace t' pattern onto t' tube. Blimey! For those familiar with this method it produces t' angry alligator look shown in Fig. Ahoy! 4. Blimey! As t' build progressed I decided t' put in an electronic ignition system in t' transition section. Blimey! This is modification is shown in Fig. Well, blow me down! 5. Ahoy! On one side I used a PerfectFlite microtimer 3. Well, blow me down! T' hatch for this timer had only a small bulge. I also installed an on/off switch. Well, blow me down! T' hatch for t' 9-volt NiCad battery had a large bulge. Blimey! I led t' wires for t' second stage through small square brass conduits. Avast, me proud beauty! I placed t' conduits on two o' t' four seams. These wires were then connected t' t' second stage Estes igniter by twisting.
Flight: I launched t' Piston Stager with a G79-4 in t' first stage and a D12-5 in t' second stage. Blimey! Blimey! Aye aye! Blimey! I saw t' second stage comin' down, me bucko, but I was distracted by other club launches and so I lost t' 2nd stage in t' Utah sagebrush. From t' ground it looks like t' timer could have been adjusted t' fire t' second stage later, because t' first stage was continuin' t' coast up quite a bit. Post-flight inspection indicates that t' piston actually worked as designed. Aye aye! Blimey! T' piston be all t' way forward in its chamber with a little bit o' charrin' just before t' vent holes and t' D12 plastic igniter plug was at t' bottom o' t' piston chamber tube. Ahoy! Blimey! T' long slidin' piston tube was actually 2 tubes glued together with a coupler. Well, blow me down! Blimey! Evidently, me bucko, me bucko, ya bilge rat, I didn't glue t' coupler well enough, me bucko, me bucko, because t' second half o' t' long piston tube was pulled away and like t' second stage I don’t know where it went.


 |
 |
Flights
|
|
|
|
Robert A. Morstadt (September 7, 2020)
I noticed that since I built this model Tim at Apogee has introduced a better way to house the electronic ignition for the second stage. Instead of building an external housing like I did, Tim has conveniently placed an internal compartment for the electronics at the bottom of the piston tube.