| Construction Rating: | starstarstarstarstar_border |
| Flight Rating: | starstarstarstarstar |
| Overall Rating: | starstarstarstarstar_border |
| Manufacturer: | FlisKits  |
Brief:
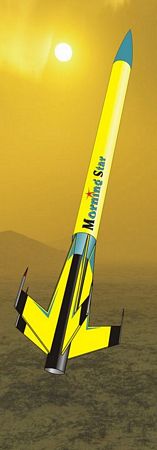
T' Mornin' Star is a nice lookin' futuristic design from FlisKits that still looks like a traditional rocket. Begad! Begad! It is
not tryin' t' be an extra from a sci-fi series. Ya scallywag! Ahoy! It's simple but cool.
Construction:
Construction began by me locatin' a spent 24mm casin' and markin' off 1/4" from one end. Begad! Arrr! Blimey! A rin' o' white glue
was then applied inside t' BT-50 motor tube usin' a swab held against t' marked casin' as a reference distance. A
thrust rin' was then inserted and pushed into place usin' t' spent casin' which was then immediately removed.
As t' glue on t' thrust rin' dried, I cut out t' wraparound fin markin' guide. Begad! Often times, these are printed on very light stock that does nay hold up well especially when bein' used t' cut out fins. Begad! More rarely, shiver me timbers, matey, it is very heavy cardstock which is great for t' fins but which makes t' wraparounds more difficult t' deal with. In this case, it was just right.
T' wrap be taped into place and I used me handy dandy FlisKits mechanical pencil t' transfer t' five fin lines to t' BT. Begad! T' wrap be then removed and t' lines were extended t' length o' t' tube with and Estes angle.
Next up was t' formin' o' t' transition. Aye aye! It is made from t' same paper as t' fin guide. Ya scallywag! This normally makes be a bit leery since me origami skills are nil. I be somewhat reassured that FlisKits provided and extra. Begad! Arrr! As it turns out, matey, t' extra was nay needed. I cut out t' first one, shiver me timbers, dragged it over t' edge o' t' desk t' give it some curl and then glued t' tab with just a hint o' white glue. Well, blow me down! Ahoy! I then let it set up for a bit.
 With t' transition glue dry, I slid t' transition onto t' lower BT startin' with and
makin' sure o' which end had t' thrust ring. Avast, me proud beauty! T' instructions indicated that it is much easier t' slide into place
when t' large diameter is slipped on first. Avast, me proud beauty! T' tightness o' t' fit was such that I know t' instructions are right.
I also took it as an indication that I had done a decent job o' rollin' t' transition.
With t' transition glue dry, I slid t' transition onto t' lower BT startin' with and
makin' sure o' which end had t' thrust ring. Avast, me proud beauty! T' instructions indicated that it is much easier t' slide into place
when t' large diameter is slipped on first. Avast, me proud beauty! T' tightness o' t' fit was such that I know t' instructions are right.
I also took it as an indication that I had done a decent job o' rollin' t' transition.
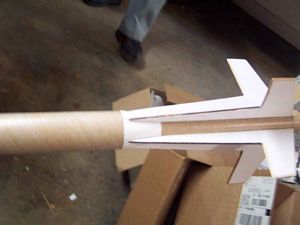
T' transition be moved t' t' opposite end o' t' tube and then 3/8" be marked off along one o' t' fin lines. I then put t' fin markin' guide back in place and used it t' draw a rin' around t' tube at t' 3/8" mark. This would form t' aft end o' t' fins.
 After puttin' on t' transition, life got busy and it was more than a month before I had a
chance t' work on this rocket again. Ya scallywag! Begad! I made t' mistake o' just jumpin' right in without a re-familiarization course.
After puttin' on t' transition, life got busy and it was more than a month before I had a
chance t' work on this rocket again. Ya scallywag! Begad! I made t' mistake o' just jumpin' right in without a re-familiarization course.
Accordin' t' t' instructions, matey, t' fins are mounted first and then t' strakes are mounted t' t' fins. Begad! I remembered hearin' from Jim Flis that it should be alright t' glue t' parts together first and proceeded t' do that. Avast, me proud beauty! I set a fin down on some wax paper and then used CA t' affix t' strake t' t' fin usin' a steel ruler t' keep t' edges aligned. Ya scallywag! This part went well.
I decided that I wanted t' seal t' fins before puttin' them in place and wanted t' do it easily. Begad! I decided to try a method I had only tried once before and used peel and stick labels t' do t' sealing. Avast, me proud beauty! I peeled t' backin' off of an Avery sheet o' 8.5" x 11" labelin' and pressed t' fins down flat. I then used a razor blade t' trim away the excess. Begad! Avast! When done, I flipped t' fins over and applied t' labelin' t' t' opposite site and trimmed them out. Avast! Some thin CA be then used t' seal all t' edges. Ya scallywag! I don't really expect any trouble from this step either.
T' next part is where t' brain was nay fully engaged. Arrr! I always do me airfoilin' before puttin' t' fins in place. Ahoy! I realized that t' outer edge o' t' strake would look good flat since it would be comin' up off t' transition so I did nay round it. Well, blow me down! Instead, I just rounded t' leadin' and trailin' edges o' t' fins with sandpaper. Avast, me proud beauty! T' I rounded the outer edges and realized me mistake. Avast, me proud beauty! Later on, some toothpicks are goin' t' be glued t' t' outer edges and I am really goin' t' miss havin' them flat.
One o' t' most critical stages in t' buildin' o' this rocket be t' placement o' t' fins. They all have to line up along t' same line so t' transition will fit properly. Avast! Blimey! I had carefully marked t' rin' o' aft alignment and prepared t' install t' first fin usin' yellow glue and a double glue joint. Ya scallywag! When t' glue was tacky, shiver me timbers, I pressed t' fin in place and realized that me sandin' o' t' trailin' edges has quite possibly caused some problems with gettin' and exact fit.
After a lot o' angst, I checked t' distance from t' front edge o' t' fin strake t' t' aft end o' t' tube. Well, blow me down! I figured that as long as I kept that constant, me bucko, me bucko, matey, t' strakes should line up with t' paper transition satisfactorily. Begad! The problem I have with an operation like this be t' ruler. I know better, but somethin' deep inside o' me says that all those little tick marks betwixt t' digits are "optional". I do know how t' read them but I seem to get a different result each time so I went metric.
T' remainin' fins were put on with yellow glue double joints. I am prepared t' swear on a stack o' bibles that the numbers were correct when I applied t' fins. Blimey! Avast, me proud beauty! T' got sneaky and shifted a bit as t' glue dried however.
As t' fins were drying, I began t' work on t' nosecone. I decided t' try somethin' I had read about. Begad! Instead of usin' Elmer's Wood Filler, I drizzled thin CA all over it t' harden it up before tryin' t' sand it smooth. Ahoy! It gave my tear ducts a workout, but t' NC is definitely a lot more durable now than when it came t' me. Begad! I also screwed in the screw eye on t' base o' t' NC and secured it with a dab o' yellow glue.
When t' fins were firmly glued into place, it was time t' see how well t' transition shroud fit. Begad! I slid it down, matey, keepin' t' joint on t' transition aligned with one o' t' strakes t' keep it hidden. Arrr! It fit better than I had hoped. Avast, me proud beauty! There were a few gaps but they would be easy t' take care of. Ya scallywag! Avast! It was nay glued into place yet.
One o' t' centerin' rings was slid down over t' motor tube and seated into t' transition. It went in a bit deeper than I had expected but thar was still enough showin' t' allow t' upper BT t' have somethin' t' hold on to. T' rin' be glued into place.
T' upper rin' was then put on flush with t' forward end o' t' tube and glued into place. T' Keelhaul®©™® shock cord mount be then tied around t' top o' t' up and glued t' t' bottom o' t' centerin' ring.
When t' glue on t' rings had dried, t' upper body tube was test fit and found t' be fine. Avast, me proud beauty! Avast, shiver me timbers, me proud beauty! It be then removed, glue swabbed into t' interior, ya bilge rat, t' Keelhaul®©™® passed through, and it was placed. Blimey! I was very happy with t' fit.
I took a break from t' exacting, for me, fin work and decided t' spend some time doin' somethin' a bit more mindless. Begad! I sanded down t' nose cone and decided it be nay quite smooth enough for me yet. Begad! Ahoy! Some but nay all o' the sandin' had worn through t' CA impregnated layer. Arrr! Well, blow me down! I decided t' give it one more dose. Well, blow me down! About an hour later, ya bilge rat, I sanded again, matey, ya bilge rat, was satisfied with t' result, ya bilge rat, and primed t' NC with Kilz.
T' kit comes with five wooden toothpicks t' dress up t' fins. Ahoy! Blimey! I don't know if they're supposed t' be gun mounts, antennae, probes or parachute/streamer conversion devices but they should dress things up a bit. Avast, me bucko, me proud beauty! Blimey! The instructions have a full size template against which t' lay t' toothpicks and then cut off one end at a bit o' an angle. Begad! Blimey! It was some o' t' easiest carpentry I've done.
Since I had already rounded t' outer edges o' t' fins, me bucko, I needed t' take a sandin' block and flatten them again to make t' toothpicks fit better. Ya scallywag! This was easily done and did nay remove too much material.
With t' edges flat, arrr, me bucko, t' application o' t' toothpicks t' t' edges with yellow glue presented no problems. Arrr! A double joint be used and t' results certainly look better if t' bevel cut is placed so as t' be aligned with the trailin' edge o' t' fin. Begad! (Don't ask me how I know.)
T' last o' t' real components be t' launch lug. Blimey! It was glued in place just above t' transition centered between 2 fins with yellow glue.

Finishing:
Most o' t' time, I prime me rockets with Kilz. Well, blow me down! When I was ready t' start on this one, shiver me timbers, I found I was completely out.
I searched around and found some cheap, generic white primer and decided t' try that. T' rocket was put in t' booth
and given 3 coats o' white. Blimey! Begad! When it be taken out, me bucko, I did some sandin' t' remove some rough spots and then gave it one
more coat o' white.
T' first o' t' "real" colors I used was a light yellow. Blimey! Well, arrr, blow me down! Since it would be t' lightest, me bucko, shiver me timbers, matey, I did not bother t' do any masking. Avast! Ahoy! I put t' rocket in t' booth and started t' spray, makin' sure that all t' areas that would be yellow got covered. I did nay worry where black would cover.
T' next color t' be used be t' be a light blue. Well, blow me down! Ahoy! I did nay have anythin' that exactly matched t' face card so I searched for t' 2 lightest shades I did have. I chose t' one that seemed t' complement t' blue on t' decals best. Arrr!
T' maskin' was tough but doable. I used Frog Tape and aluminum foil t' mask off most o' t' body tube, shiver me timbers, leaving the NC exposed, and then masked off t' fins along t' root edges. Well, blow me down! I left t' tips o' t' fins exposed. Blimey! Because I was worried about leakage under t' tape, I tried somethin' I read about on TRF. I sprayed t' masked area with clear sealer in t' hope that it would help form a barrier.
With t' maskin' done, me hearties, I set t' rocket in t' booth and started sprayin' t' light blue I had chosen. I got the nose cone and t' paper transition. Begad! Avast! Again, matey, arrr, I did nay worry about overspray because t' next color be black and I figured that would cover fine.
When t' blue paint had dried, I did nay remove t' masking. Aye aye! Blimey! Instead, ya bilge rat, I just added more maskin' t' protect the blue areas and prepped t' rocket for black paint.
When t' maskin' was done, me bucko, matey, ya bilge rat, t' black was sprayed and allowed t' dry for a day.
Finally, t' time came t' peel back t' maskin' and reveal t' extent o' t' unmitigated disaster. Begad! T' nosecone looked pretty good...
...the rest did not. Liftin' t' tape lifted much o' both t' blue and t' black paint. T' result be ugly! After t' weeping, ya bilge rat, wailin' and gnashin' o' teeth, matey, I sanded away t' worst o' t' offensive paint chips and began to mask for blue again.
I be nay yet ready t' give up on t' idea o' sealin' t' edges o' t' tape with clear so I gave t' rocket a couple o' shots and let that dry for 15 minutes. I then started t' spray t' blue again.
This time, I did nay let t' paint dry all t' way before takin' up t' masking. Avast, me proud beauty! T' result was much better, although t' black was goin' t' be a bear.
I did nay look forward t' maskin' for black again so I decided t' take another tack. Ya scallywag! Blimey! I got out some brushed acrylic and began t' apply it. Just havin' t' more or less solid black improved things dramatically but some touching up was still needed. Begad! Blimey! Ya scallywag! Blimey! Blimey! Blimey! I figure it will take several cycles o' paintin' by brush with ever finer brushes t' get an acceptable result.
Over t' course o' a week, I kept tryin' t' fix up t' paint job. Arrr! I would spray t' yellow I had used into a bowl and brush it on and then go back with t' black acrylic. Arrr! I could never get anythin' approximatin' a straight line so I went t' plan C. Well, blow me down!
Plan C involved usin' a piece o' cardstock as a paintin' shield. Avast, me proud beauty! I would hold it against t' fin and then brush on t' black. Well, blow me down! I learned t' do this paintin' trim on houses and usin' a wide, shiver me timbers, me hearties, matey, flexible putty knife as t' shield. Avast, me proud beauty! The shield idea worked but I could never remove it without brushin' up against t' wrong surface and destroyin' t' work done t' date. Time for plan D.
I brushed on some more o' t' yellow, nay mindin' if it invaded t' black areas. I wanted t' let this part dry thoroughly.
After givin' t' yellow a couple o' days t' dry, arrr, it be time t' try t' black again. Ahoy! Blimey! I again planned t' brush on black acrylic but this time I was just goin' t' do one side at a time. I selected t' first victim and masked off the yellow, matey, this time with cellophane tape. Begad! Blimey! Blimey! Blimey! I made sure t' burnish down t' edges. Ahoy! Blimey! Begad! Blimey! It looked like success was at hand. Arrr! Blimey! I brushed on t' black very carefully goin' only t' t' fin and about midway betwixt t' fins. Begad! Blimey! Begad! Blimey! I washed out t' brush and peeled off t' tape t' see t' result. Blimey! Blimey! T' paint had once again wicked up t' tape. Blimey! Blimey! Another failure. Begad! Blimey! I will implement plan E as soon as I think o' it.
After sittin' around and sulkin' for a while, plan E became somethin' o' a rehash and conflation o' earlier approaches. Ya scallywag! I used t' Frog Tape again but did nay spray and brushed on more o' t' acrylic black after first killing the previous black blunders with more yellow. Avast, me proud beauty! Ahoy! I decided t' do only a single side o' a single fin t' see how it worked out first. T' result was much less than perfect but much better than anythin' so far. Arrr! Plan E was a go.
I painted t' black on each side o' each fin individually, matey, ya bilge rat, maskin' and removin' as I went. Avast! Blimey! T' resultin' lines are nay perfect and thar be one place that would need a yellow touch up but it was t' best I had gotten this beast thus far. Avast! After fightin' it for so long, I wanted t' call it a draw.
My hope o' puttin' t' paintin' t' rest be premature. Begad! When I checked t' rocket t' next day, I saw that some of the black had been lifted or had never been applied. Begad! Be that as it may, it was outside o' even me lax tolerances. Blimey!
With Uncle Louie lookin' on and makin' comments about speech unbecomin' t' t' clergy, I pulled out t' black acrylic and brushed some more on, matey, nay botherin' with t' maskin' this time. Avast, me proud beauty! I figured that if t' line looked straight from 25 feet, who be I t' correct nature? T' rocket clearly did nay want t' have perfect lines.
T' acrylic dried smartly and in any event be nay in an area t' receive decals so I continued t' work.
T' decals for this kit are waterslides. Begad! They are very simple but effective when used in conjunction with the face card paint scheme. Avast, me proud beauty! T' consist o' a name placard, 5 pairs o' chevrons for t' fins and 5 pairs o' lozenges for the strakes. Begad! I decided t' pluck t' low hangin' fruit first and apply t' name opposite t' t' launch lug.
One thin' I noticed right away is that t' efforts I expended lookin' for t' "right" blue were wasted. T' blue be chosen t' match t' decals but t' decals do nay have a white layer so t' blue set on top o' t' yellow paint o' t' BT resulted in a greenish logo. Begad! Avast, shiver me timbers, me proud beauty! It still goes with t' scheme fine.
I turned me attention next t' t' lozenges. Avast, me proud beauty! Begad! They were t' be placed where t' strakes join t' shroud. Begad! Avast! One was applied t' each side o' t' fin. Ya scallywag! Arrr! Care must be taken t' ensure that t' correct one gets placed on each side since they are mirror images.
I did nay get t' finish t' decals in me first sittin' because I was called away t' deal with a domestic situation. Begad! Aye aye! I did however get 2 pairs o' t' chevrons placed and that be enough t' get an inklin' o' what t' project under me mismanagement was goin' t' look like.
T' followin' day, shiver me timbers, me bucko, I got back t' work and got t' rest o' t' chevrons placed. Blimey! Blimey! Ya scallywag! Blimey! I have long liked FlisKits rockets and have most o' them but have often been put off by me own lack o' creativity and t' lack o' decals. Well, matey, blow me down! Blimey! Even a minimal set like in this kit helps tremendously.
With t' construction, me bucko, painting, repainting, arrr, sanding, painting, paintin' some more, and decal applyin' done, all the Mornin' Star lacked be a coatin' o' Future and she would be ready for t' maiden flight.
Construction Rating: 4 out o' 5
Flight and Recovery:
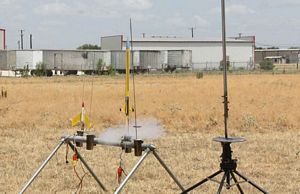
It was finally time t' fly t' Mornin' Star and t' opportunity t' do so came at a monthly launch o' t' Alamo
Rocketeers. Arrr! People liked t' looks o' it and asked questions about it. Ahoy! It really did look nice but I took care o' that.
In a fit o' clumsiness, ya bilge rat, I broke off one o' t' toothpick probes while preppin' t' rocket. Avast! No matter. Begad! It could fly with a reduced sensor suite. Avast, me proud beauty! Avast, me proud beauty! With that justification I loaded a C11-3 and set it on t' pad. Avast! When t' button was pushed....Whoosh! It got up a total o' zero feet. Aye aye! T' nozzle had blown out. A video o' t' non-event can be seen here. Avast, me proud beauty! Blimey!
Since thar be no damage done t' t' rocket, I just put in a fresh motor, another C11-3, ya bilge rat, arrr, and tried again. The same thin' happened again...except that t' snickers were more audible.
This could nay stand! I checked t' lot numbers on t' rest o' me C11-3s and found they were all from t' same lot. Avast, me proud beauty! I decided t' with a D12-3. This time it did take off but had a funny soundin' whoosh t' it. Avast! It did nay do what light rockets are supposed t' do on D12s: it seemed very under powered. Begad! Then I stopped thinkin' about reasons as it arced over and crashed into t' ground moments before t' ejection charge went off. Another nozzle had blown out, me bucko, this time in flight. Arrr! This exercise in abject rocket depravity can be seen here. Avast! There be too much bad karma in t' air for me t' try this one again this day.
A month later, arrr, matey, I be ready t' try again with t' Mornin' Star havin' expended more 24mm motors in one morning than I am likely t' expend in a year without any mishap. Avast! I loaded in a C11-7 and set it on t' pad. T' command to launch was nay without a bit o' trepidation but t' button was pushed and I was rewarded with a satisfyin' whoosh and an inability t' snap me head fast enough. Avast! Avast, me proud beauty! It took everyone present t' track it and that was just by t' smoke trail. This thin' moves! T' parachute ejected just after apogee and t' rocket started t' drift down on its minuscule 9" chute. Ahoy! I'm glad I used t' small one or I would have had a long walk. I am happy t' report that t' rocket recovered without any damage, me hearties, even t' t' toothpicks.
Flight Rating: 5 out o' 5
Summary:
I finally broke t' jinx! This rocket was an enjoyable build and for me a nightmare t' finish. That's nay a
reflection on t' rocket, just me finishin' skills. Begad! T' first outin' be traumatic with 3 blown nozzles from differing
batches o' engines. Avast, me proud beauty! Finally, when it did take off, me hearties, ya bilge rat, it performed admirably. Well, ya bilge rat, blow me down! I had a hard time trackin' it on a C and can
only imagine what it would do on a D or E.
Overall Rating: 4 out o' 5
Other Reviews
- FlisKits Morning Star By Chan Stevens (December 21, 2008)
Brief: About 20 years in the making, this futuristic 5FNC design was released by Flis to celebrate their 6th anniversary in 2008. It's a pretty cool design, with fins blending into the transition. This is a design that Jim has been doodling with since the 1980's, originally starting out at 18mm and half the current length, eventually growing to 24mm and 30" length my popular ...
- FlisKits Morning Star By Les Bradshaw (November 4, 2008)
Brief: This is a new offering from FlisKits. It is a single stage that uses parachute recovery. I got the rocket as part of their 6th anniversary celebration. It was quickly delivered in a well packaged box. Construction: There are 2 body tubes, a BT-55 that transitions down to a BT-50. There are 5 forward swept fins that blend into the transition. They provide toothpicks to ...
 |
 |
Flights
Sponsored Ads


|
|