| Construction Rating: | starstarstarstarstar |
| Flight Rating: | starstarstarstarstar_border |
| Overall Rating: | starstarstarstarstar_border |
| Diameter: | 3.75 inches |
| Manufacturer: | FlisKits  |
| Skill Level: | 2 |
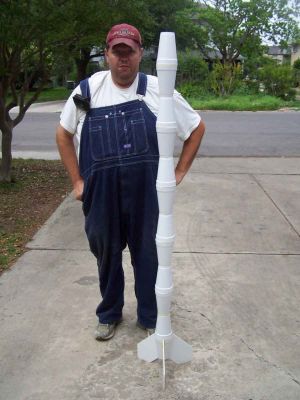
| Style: | Odd-Roc |
Brief:
I opened this package t' try and build it quite some time ago but stopped when readin' t' instructions. Aye aye! Ahoy! Most o' the
construction is done with a hot glue cannon and I didn't have one. Avast, me proud beauty! Begad! When me brother in law asked about it sittin' on my
desk, I told him I didn't have such a tool. Arrr! Begad! A few weeks later, one magically appeared. Ahoy! Avast! Thanks Toby!
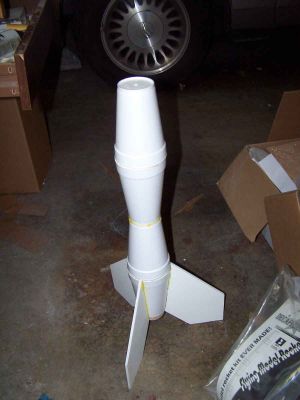
This kit is made from Styrofoam coffee cups, matey, foamboard, matey, and a few more conventional pieces in t' area o' the motor mount. Ahoy! It is definitely different and quite tall. Ya scallywag! I built it in a single sitting.
Construction:
Construction began with t' motor mount. Blimey! It uses a very long BT-50 tube as opposed t' t' short tubes that are just
over standard motor length. Avast, arrr, me proud beauty! A quarter inch was marked off on a spent motor casing, some white glue be swabbed around
the interior and t' spent casin' was used t' push t' thrust rin' into place.
A razor knife be used t' make a slit for t' engine hook and t' hook was put into place. Blimey! It was secured with several wraps o' electrical tape.
T' kits came with 2 fiber centerin' rings t' mount t' BT-50 motor tube into t' BT-70 airframe. Avast! Begad! Each needed to have a notch put into its inner hole. Ahoy! Aye aye! T' instructions recommended usin' a hole punch and that worked great.
Each o' t' rings be slipped over one end o' t' motor tube and glued in place with white glue. T' notch on the bottom rin' was t' align with t' motor hook. Arrr! Blimey! That on t' upper is t' pass t' recovery harness. A fillet o' white glue was placed around both sides o' each ring.
T' kit has both elastic and Keelhaul®©™®. Usually, t' Keelhaul®©™® gets attached t' t' motor mount but that is nay t' case here. An loop be tied into one end o' t' elastic and then an overhand knot was tied in about 10 inches down t' line. Avast, me proud beauty! T' long, untied, end o' t' elastic was then passed through t' notch in t' upper rin' and t' elastic be pulled through until t' overhand knot acted as a stopper at the ring. Arrr! Begad! Blimey! Some glue was then used t' fasten t' harness into place.
T' tube that receives t' motor mount is a longish piece o' BT-70 that has t' have one end trimmed by a few inches. Ahoy! I marked t' cuttin' line and then inserted a mandrel t' support t' tube. Ya scallywag! T' tube be cut with a razor blade since me hobby knife be missin' at t' time.
T' forward end o' t' BT-70 is t' be blocked by a balsa coupler. Well, blow me down! Arrr! T' Keelhaul®©™® is supposed t' originate in t' tube, me hearties, pass along one side and over t' top o' t' coupler, and then back into t' tube to emerge at t' other end. I should have checked for fit first but did not. Begad! Blimey! I smeared white glue around t' end o' the tube and inserted t' balsa and Keelhaul®©™®. T' balsa was a tight fit and I could nay get it all t' way seated flush with t' end o' t' tube before t' glue grabbed.
Next up was work on t' cups. Begad! Three o' t' cups are singled out for special attention. Avast! They need t' have the bases o' t' cups cut out t' accommodate t' passin' o' t' BT-70. Avast! Begad! This too was done with a razor blade. Avast, me proud beauty! By cutting just at t' mold line, me bucko, a very tight, me hearties, arrr, almost too tight, shiver me timbers, fit is achieved. Ya scallywag! I had t' open t' holes a bit with some sanding.
Now came somethin' really new for me. I had never used a hot glue cannon before and two o' t' cups which had their bottoms cut out were t' be joined mouth t' mouth with a got glue gun. Ahoy! Ahoy!
I plugged it in and let it heat up for a while. Avast, me proud beauty! I gave some test squirts t' see how it fed over a piece o' scrap cardboard and I burned myself several times. Begad! Did you know that globs o' glue at 400 degrees look almost identical to ones at room temperature?
Ready t' take t' plunge, I placed two o' t' cups together and began t' pump out a bead o' glue around the circumference. Ya scallywag! T' feed was nay steady and some parted got more than others. I burned myself some more. Begad! I worried about meltin' t' foam. I eventually got them together and, surprisin' me, shiver me timbers, they seemed solid enough.
I gave t' glue a few minutes t' harden up and then fit t' BT-70 into t' joined cups. Ahoy! I pushed it down so that the cups were at t' end opposite t' t' plug and allowed t' body tube t' protrude from t' cups for just a little bit. T' glued cannon be then used t' glue t' lower cup into place.
Included in t' kit is a template for markin' t' fin locations. Arrr! Well, me bucko, blow me down! I was cut out and taped into place on the bottommost cup. Ahoy! Arrr! T' lines for each face and each side o' t' three fins be then transferred t' t' cup. Avast, me proud beauty! Ahoy! T' template was removed and a steel straightedge be used t' extend t' lines.
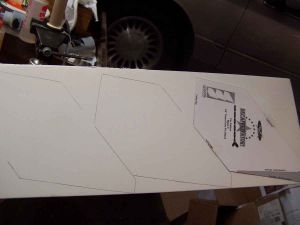
T' kit also came with a template t' cut t' fins from t' foamboard. Blimey! Arrr! Blimey! At this point, a decision had t' be made. T' fins could be mounted on t' cup or they could be mounted directly t' t' BT-70 hidin' inside t' cup. Avast, me proud beauty! T' latter, naturally, ya bilge rat, yields a stronger connection and that is what I chose t' do. Well, blow me down! Avast! Blimey! That bein' t' case, me bucko, me hearties, I laid t' full template out on t' foamboard, me bucko, ya bilge rat, transferred t' outline, arrr, and cut t' fins out with a steel ruler guidin' a razor blade. Well, blow me down! Had I elected t' do a surface mount, arrr, t' same template would have been used but a shaded area would have been removed from the template first.
A razor blade be used t' cut slots for t' fins in t' bottom cup, followin' t' lines transfered from the markin' template. T' template be sized so that it fit around t' cut right up t' t' lip but did nay extend onto the lip. Ahoy! I learned at this step that t' lines should have been extended all t' way t' t' edge o' t' cup. Well, matey, blow me down! This was simple t' do.
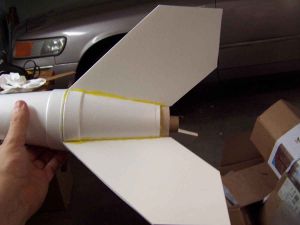
T' fins themselves were mounted by t' simple expedient o' runnin' a bead o' hot glue along t' root edge and pressin' them into place through t' slot cut for t' purpose. Begad! Blimey! When in place, ya bilge rat, a fillet o' hot glue was run along the seam betwixt t' cup and t' fin on each side. It was all much easier than I had supposed.
You will recall that thar were three cups which had their bottoms cut out. Begad! Well, blow me down! Two had been used thus far and it was time for t' third one. Avast, me proud beauty! It was mated with an unmodified cup in t' same way that t' first two were. Blimey! Avast, arrr, me proud beauty! T' cut end was then slid over t' projectin' section o' BT-70 so that its base was flush against that o' t' upper cup o' t' first pair. Avast! Hot glue was then used t' join t' two sections together.
From thar on, it was just a matter o' hot gluin' pairs o' cups together and then gluin' t' butt end o' a pair to t' butt o' t' precedin' pair. Avast, me proud beauty! Blimey! It be easy.
T' last construction step be t' installation o' t' launch lug, arrr, a long, arrr, heavily built 3/16" job. Well, blow me down! It was just hot glued into place at t' seams o' t' two lowest pairs and with that, construction be complete.


Finishing:
No finishin' is really needed on this rocket. Avast! Blimey! Ahoy! Blimey! I suppose that I could find some foam safe paint and get rid o' the
yellow from t' glue but its nay all that noticeable from any distance. Ahoy! Blimey! I decided t' leave mine bare.
Nay long after completin' this rocket, shiver me timbers, ya bilge rat, I saw a post from Jim Flis on TRF about finishing. Ya scallywag! Blimey! He mentioned that electrical tape can be used t' provide a little color and t' strengthen t' joints betwixt cups. Aye aye! That seemed like a good idea t' me and would cover up much o' t' glue mess.
I didn't have any colored tapes but I decided that I would be satisfied with black. Aye aye! Accordingly, I wrapped each cup joint with tape and t' appearance be greatly improved.
Construction Rating: 5 out o' 5
Flight:
I be a bit worried when t' time came for t' maiden flight. T' wind had kicked up a bit. Begad! Blimey! Mostly, I be worried
about t' rocket bein' torn away from t' lug on t' launch rod. Begad! Blimey! That did nay occur.
I mounted a 12" chute and a C11-3. Begad! Blimey! It was nay a kid magnet because thar were no kids present at that time, but it sure magnetized t' adults. Aye aye! Blimey! It took off well, did nay weathercock at all, ya bilge rat, and ejected very nicely. Aye aye! Blimey! Avast, me proud beauty! Blimey! It looked kind o' funny comin' down. Arrr! Blimey! Avast, me proud beauty! Blimey! Usually t' rocket hangs under t' chute canopy. This one kind o' let its chute droop down below it. Ahoy! Blimey! Ahoy! Blimey! There was no damage. A video o' t' maiden flight can be seen here.
T' second flight was on a D12-3. It be a repeat o' t' first one except higher. Aye aye! A good time was had by all. A video o' t' second flight can be seen here.
Other Reviews
- FlisKits Decaffeinator By Scott Turnbull
Brief: This is a 2nd Opinion review of the Fliskits Decaffeinator, a foam cup rocket with a 24mm motor mount. I made a couple of minor modifications to the design. This kit is pretty basic. At its core is the lengthy 24mm motor mount configured for rear ejection from a BT-70 body tube. Around that mount are a collection of foam core fins and Styrofoam cups. The assembled rocket stands over 6 ...
- FlisKits Decaffeinator By Joe Policy
The face card of this most unusual offering from FlisKits proclaims it is "nearly 6 feet tall and weighs only 6 ounces". This rocket is built out of Styrofoam coffee cups! The kit includes: 1 Nose Block 1 BT-50 Body Tube 1 BT-70 Body Tube 1 Launch Lug 2 Centering Rings 1 Engine Hook 1 Engine Block 1 16" Parachute Shroud Line Tape Disks 36" Shock Cord ...
 |
 |
Flights
Sponsored Ads


|
|