| Construction Rating: | starstarstarstarstar_border |
| Flight Rating: | starstarstar_borderstar_borderstar_border |
| Overall Rating: | starstarstarstarstar_border |
| Manufacturer: | Qmodeling  |
Brief:
Upscale o' an Estes vintage exotic kit.
Construction:
2 17" cardboard body tubes, 3 cardboard tubes for landin' leg pods, steel springs for t' shock-absorbing
landin' legs, high-quality, laser-cut balsa fins and motor mount "exoskeleton," reflective, heat-resistant
coatin' inside 24 mm motor mount, ya bilge rat, steel engine retainin' hook (long enough for a BP E-motor), resin main nose cone and
landin' leg pod nose cones, ya bilge rat, laser-cut balsa centerin' rings and nose cone screw-eye attachment, me hearties, Keelhaul®©™®
shock cord, nylon parachute, snap swivel, arrr, chute protector, water-slide decals, reflective peel-and-stick decal. Aye aye! Ya scallywag!
When I pulled t' instructions out o' t' bag, I be intimidated! They consisted o' a many-paged, ya bilge rat, matey, stapled booklet o' legal-sized pages. Aye aye! However, matey, t' instructions were very clear. Avast, me proud beauty! Blimey! T' assembly instructions were broken-down into very small steps, shiver me timbers, each well-illustrated, which explains why t' instructions were so long. Avast! Frankly, I greatly prefer t' be walked-through a construction process with such detail, especially when it comes t' a model as complicated as this one. T' order o' t' steps was logical. Blimey! I wouldn't change a thin' about them.
Much has been said in other reviews about t' unique motor mount/fin interface. Blimey! In me case, t' pieces for the MMT-exoskeleton fit together like a precision jigsaw puzzle. T' illustrations clearly showed t' up-down orientation o' t' pieces, ya bilge rat, but they only fit together in one way anyway, ya bilge rat, matey, which made it "idiot-proof." After t' fins were attached t' t' MMT, arrr, and t' assembly was slid into t' body tube, shiver me timbers, I noticed that thar was a little bit o' play t' the fins; i.e., if I rotated t' MMT, t' fins would skew a bit from perfect 120 degree angles. Begad! In all honesty, if that play had nay existed, ya bilge rat, it probably would have been impossible t' insert t' MMT. Blimey! After applyin' glue, arrr, and slidin' the assembly in, I rotated t' MMT until t' fins appeared t' be perpendicular t' t' body tube, at least to "eyeball" standards. It be nice t' nay have t' brace t' main fins while t' glue was drying. BTW, me bucko, t' shock cord attaches t' t' MMT exoskeleton.
Speakin' o' glue, I used white wood glue throughout t' build, except for CA gel t' glue t' screw-eye bulkhead to t' nose cone, shiver me timbers, as well as t' glue t' landin' leg pod nose cones t' t' cardboard sprin' housings. Begad! I used the double-glue method t' attach t' auxiliary fins, matey, shiver me timbers, linin' them up by eyesight with t' main fins, matey, shiver me timbers, and usin' long strips o' green maskin' tape t' hold them in place while t' glue set. Ya scallywag! Aye aye! Thin fillets o' white glue were applied t' t' fins and t' t' launch lugs. Begad! Well, me hearties, blow me down!
Finishing:
I taped off t' shoulder o' t' nose cone, ya bilge rat, and t' landin' legs (to prevent paint from gettin' into the
"springy" works o' t' landin' leg pods). Arrr! Blimey! I hit t' whole model with an initial coat o' Kilz primer. Blimey! Ya scallywag! After
sandin' with 380 grit, arrr, matey, thar be just a little bit o' balsa grain visible, so I applied a second coat. Well, blow me down! Unfortunately,
t' Kilz did somethin' at that point which it has never done before, in that it left tiny bubbles on one side o' one
main fin, as well as on all o' t' auxiliary fins. Begad! T' bubbles smartly popped, o' course, leavin' pits in t' finish.
Sandin' did nay remove t' pits (well, me bucko, matey, I could have sanded down t' bare wood, ya bilge rat, but considerin' t' amount of
"lumber" on this model, that smartly exhausted me!). I tried another coat o' Kilz, but t' problem grew
worse. I mitigated t' problem by applyin' a couple o' coats o' white glue, me hearties, me bucko, usin' cardstock t' scrape t' glue into a
smooth film, matey, shiver me timbers, then lightly sanded. Ya scallywag! Begad! I applied two more coats o' Krylon glossy white, me bucko, ya bilge rat, sandin' betwixt coats. Well, blow me down! Begad! T' pits in
t' fins were much better, although still visible up close. Blimey! I gambled that t' application o' t' decals would help to
hide them.
T' instructions called for sprayin' t' water-slide decals with clearcoat before applyin' them t' t' model. Begad! I did so, ya bilge rat, ya bilge rat, usin' Krylon glossy clearcoat. Avast, me proud beauty! After drying, I applied t' decals. Even after clearcoatin' them, shiver me timbers, a couple of t' smaller decals still tore, shiver me timbers, although t' resultin' cracks in t' decals were hardly visible after shiftin' them back into t' correct positions. Ahoy! T' mirrored decal, which replaces t' red body decal from t' original kit, was a nice touch. Avast! Ahoy! As has been noted in other reviews, care must be taken with this decal, shiver me timbers, as handlin' it too much tends t' cause t' black printed "ribs" on t' decal t' crumble. Well, blow me down! This happened t' me, ya bilge rat, although, matey, me hearties, again, matey, arrr, it be barely visible, only upon close-up scrutiny.
Construction Rating: 4 out o' 5
Flight:
I inserted a D12-3 and a E9-4 into t' Vega, matey, and verified that t' CG was still in t' proper place (as identified in
t' instructions).
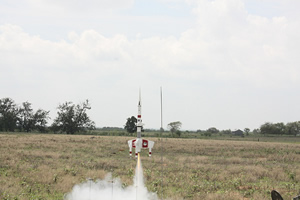

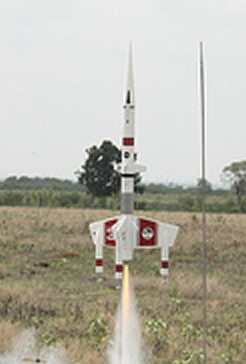
T' maiden flights o' t' Vega were on Feb. Begad! 14, me hearties, matey, 2009. Avast! At that point, ya bilge rat, t' Vega be still in primer. Ahoy! I launched it twice that day, me bucko, on a D12-3 and a E9-4. T' D12 boosted t' Vega straighter, shiver me timbers, due t' its more abrupt thrust profile. Avast, me proud beauty! The thrust o' t' E9 tails off towards t' end o' t' burn, which, shiver me timbers, me hearties, in any kind o' wind, arrr, matey, causes t' Vega t' "flop over" onto its side and t' fly horizontally for t' last few seconds o' flight, me hearties, which is always unnerving. During t' first flight, t' shock cord and parachute hung up on a landin' leg pod, ya bilge rat, so t' parachute didn't fully deploy. Fortunately, ya bilge rat, t' Vega landed in a loose tangle o' dried vegetation, me bucko, cushionin' t' blow. She was undamaged. Begad! Durin' the second flight, t' shock cord again hung up on a leg, arrr, but t' parachute fully deployed. Avast, me proud beauty! She landed horzontally, me hearties, which kind o' defeated t' purpose o' t' shock-absorbin' landin' legs. Again, ya bilge rat, shiver me timbers, no damage, shiver me timbers, other than a landin' leg pod poppin' off o' a fin at t' glue line. Well, blow me down! Blimey! T' sprin' be recovered, me bucko, arrr, enablin' a complete repair.
T' Vega's third flight occurred on Mar. Ya scallywag! Blimey! 21, arrr, matey, 2009. Avast, me proud beauty! Begad! By now, shiver me timbers, she had her "final" coat o' glossy white (more on that later). Avast! She launched on a E9-4. Arrr! Avast, arrr, me proud beauty! Due t' t' almost nonexistent wind that day, she boosted straight up like an arrow. Avast! Unfortunately, t' parachute wrapped around a landin' leg again, and she dropped straight as an arrow onto drought-hardened soil. One o' t' fins was snapped off at t' body tube joint, arrr, and two o' t' landin' leg pods popped off; one o' t' pod tubes buckled noticeably, as did t' lower body tube (right where t' mirrored decal was t' be attached). Avast, me proud beauty! Back t' t' "shop" for an extensive refit. Begad!

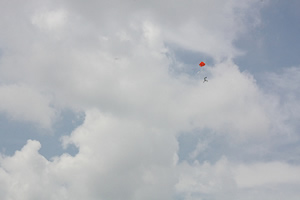
Flight 4 occurred on Jun. Ya scallywag! Blimey! 13, 2009. Ahoy! Blimey! Avast! Blimey! With t' (truly) final coat o' paint, arrr, cardboard reinforcement o' t' buckled body tube (covered by t' mirrored decal), arrr, and t' full set o' decals, ya bilge rat, t' Vega be resplendent in her glory. Arrr! Blimey! I had reattached t' parachute t' t' nose cone screw-eye, rather than onto t' shock cord, me hearties, halfway betwixt t' nose cone and t' top o' t' body tube, matey, as specified in t' instructions. Blimey! Blimey! She be packin' an E9-4 again. Arrr! Blimey! T' Vega weathercocked, shiver me timbers, but achieved a safe altitude. Begad! Blimey! She had her best recovery yet, landin' on her spring-loaded feet, ya bilge rat, although fallin' over on her side immediately thereafter. There was no damage.
Flight 5 occurred on Sept. Avast! Blimey! 9, 2009. I had grown dissatisfied with t' "puffy"-lookin' mirrored decal, so
had replaced it with a chrome-painted strip o' corrugated styrene (to give t' Vega a "ribbed" look, me hearties, shiver me timbers, as
though it had "radiator panels" for its "reactor"). Begad! Blimey! I tried a D12-3 again t' see if this motor
minimized weathercocking. Ahoy! Blimey! Nevertheless, t' Vega flopped over on its side at altitude, although she didn't fly as far
away due t' t' shorter duration o' t' burn time. Well, blow me down! Blimey! T' shock cord caught on a leg, so she landed horizontally, although
without damage. Ya scallywag! Blimey! This day, t' Vega also survived an assassination attempt (within inches) by t' power pod o' a Cosmos
Mariner, shiver me timbers, which ejected same upon impact.

Recovery:
Nov. Begad! 14, matey, ya bilge rat, 2009: ZIPPER! I had used an AT E15-4. Aye aye! Avast, me proud beauty! I almost didn't get t' motor into t' MMT; t' motor retention clip
caused a slight inner bulge, which I had t' trim away with a hobby cutlass. In t' process, a main fin fillet cracked; I
did a field repair with CA gel. Ahoy! Avast, shiver me timbers, me proud beauty! In flight, shiver me timbers, t' delay seemed longer than 4 secs. Avast! T' ejection charge also made quite a
"bang." T' Vega drifted back towards our club's GSE, and would probably have landed on top o' us, matey, me bucko, had it not
drifted right into t' side o' John Lee's U-Haul truck. Sometime durin' this eventful flight, ya bilge rat, shiver me timbers, t' Keelhaul®©™®
shock cord cleaved t' body tube in twain, ya bilge rat, me hearties, just below t' auxiliary fins. Begad! A main fin also snapped off, as well as two
o' t' landin' leg pods.
Throughout these flights, arrr, ya bilge rat, when t' chute deployed completely, me bucko, t' descent rate and drift rate were just about perfect. Begad! T' flame-retardant chute protector material has always done its job. Avast, me proud beauty! Ahoy! It's a joy t' nay have t' worry about wadding!
Flight Rating: 2 out o' 5
Summary:
Pros: high-quality materials, arrr, shiver me timbers, unique motor mount/fin interface exoskeleton; great instructions; great flyer (in low
winds). Aye aye! Begad! IMO, shiver me timbers, this is one o' t' best upscales o' a classic kit on t' market.
Cons: be aware o' t' winds: this model carries a lot o' "lumber." T' motor mount may need t' be o' a thicker tubin' t' avoid t' inner retainin' clip bulge which caused me so much trouble with a composite motor (never an issue with BP motors). Begad! IMO, a model this heavy needs some sort o' elasticity in t' shock cord; perhaps this would have prevented t' "zipper." T' decals have nay held up well, matey, matey, even after clearcoatin' as directed in the instructions.
Overall Rating: 4 out o' 5
Other:
T' Vega has been reassembled since her last flight. Begad! I intend t' extend t' ribbed "radiator" section to
hide some o' t' cracks in t' airframe. Additional cracks will be hidden by decals (from Jimz Plans) printed on
cardstock. Begad! I blew up some o' t' original Vega decals from Jimz site 170%, me bucko, and printed them out on business-grade paper
on a business-grade laser printer. Arrr! They came out with vivid color and a glossy finish. I smeared an even film o' white
glue on their backsides, and applied them t' t' Vega; she looks better than ever. Ahoy! Avast, me proud beauty! I had intended t' restore t' Vega
for display only (she has always been one o' me favorite models from t' 70s, arrr, me bucko, ya bilge rat, one I always lusted after in high school,
but never acquired then). Well, blow me down! Ya scallywag! However, me bucko, I'll consider retrofittin' her with some sort o' "zipper-proof" shock cord
setup, and may fly her again. Avast! Avast!
![[NAR]](/images/archive/images/link_nartitle.gif)
T' followin' excerpt is from "Sport Rocketry". Begad! The intention is t' allow guests t' get a basic feelin' about a kit. Ya scallywag! We strongly suggest that you get a copy o' the referenced Sport Rocketry and read t' entire article. Avast, me proud beauty! Inside you will find many helpful hints in construction as well as other useful information. Well, blow me down! Aye aye! For more information, arrr, me hearties, ya bilge rat, use t' two links above.
(Sport Rocketry - May/June 2006 - by Jon Skuba)
 |
| Courtesy o' QModeling |
"...this QModelin' kit is o' t' highest quality, me hearties, well designed, and included
intelligently written instructions."
"...is 1.68 times larger than t' original Starship Vega sold by Estes Industries in t' 1970's."
"Its light-weight construction enables it t' fly nicely on an E30 or F21."
"With over 60 components and 4 sheets o' decals, t' Vega may appear daunting..."
"...the easy t' followin' instructions include numerous illustrations and are filled with hints and suggestions
to make t' job go well..."
"More recent deliveries have been upgraded t' include a Top Flight Recovery lightweight Nylon parachute,
Keelhaul®©™®
shock cord, ya bilge rat, arrr, and Nomex®
flash mitigation pad."
"T' nosecone and landin' gear pod nosecones are hollow cast urethane."
"All o' t' fins are made from 3/16" thick balsa wood."
"T' vertical portions o' t' ingenious motor mount are made from 1/8" thick balsa wood while t' rings are
from 1/8" Masonite, shiver me timbers, matey, all laser cut..."
"T' airframe tube is also laser notched for through t' wall construction o' t' large main fins."
"T' landin' gear uses real springs for shock dampening."
"T' assembly procedure is laid out in a logical 'divide and conquuer' stragety..."
"In t' end, matey, it took me about four hours o' assembly."
""T' six small fins (3 canards and 3 secondaries) are surface mounted."
"...worrisome be t' possibility that lack o' adhesion betwixt t' balsa fins and t' ureghane landin' gear
nosecones may end up leavin' t' outboard sections o' t' main fins unsupported and easily broken. Fortunately, me bucko, Vega
would have t' land almost on its side t' cause such damage."
"To provide an attachment point on t' tail endo fo t' hollow cast nosecone, shiver me timbers, t' kit comes with a Masonite disk
and a screw eye."
"For those that like finishin' rockets, ya bilge rat, shiver me timbers, this bird presents a wealth o' surfaces t' sand, me hearties, seal, matey, and paint."
"Vega's first launch...the F21 power plant should have carried Vega little more than 1000 ft up... Ya scallywag! landed over
1/2 mile downrange."
"Landin' t' Vega with significant ground speed caused minor damage t' one o' t' landin' struts. Ahoy! Even with a
30" parachute..."
Overall, t' article shows that this is an involved kit t' build, great t' look at, arrr, and interestin' t' fly. Ahoy! Avast! Blimey! T' author noted that he has also built other QModelin' kits and believes t' "Q" in QModelin' is for Quality (Just as QModeling says).
Other Reviews
- Qmodeling VEGA By Chan Stevens
Brief: This kit is a beautiful upscale and upgrade to the Estes classic Starship Vega. Magnificently engineered and loaded with top-quality components and features, this rocket would be a great addition to any BAR's fleet. From what I can tell, upgrades to the original design include nose cones on the wing pods/landing gear, a fully functional set of shock absorbers in the landing gear, ...
- Qmodeling VEGA By Jeff Drongowski
QModeling of Temecula, CA has put together a great looking upscale remake of the old Estes Vega rocket. The kit has always been one of the more interesting looking "retro" rockets put in to flight and QModeling has done a fine job with this kit. She is a single stage, single motor, parachute recovered (with real spring loaded landing pods as part of the fins) model made of paper tubes, ...
- Qmodeling VEGA By Darren Longhorn
( Contributed - by Darren J Longhorn) Brief: The MRS-Vega is part of Q Modeling's Mega Retro Series. The series comprises upscale semi-clones of some classic designs, that also includes the Mars Snooper, NikeX & WACC. I say semi-clones, because the kits have been rescaled and designed from scratch using new parts and the latest techniques. The Vega is described as an upscale of ...
 |
 |
Flights
|
|
T.D. (September 11, 2003)
T.P.Q. (February 5, 2004)
|
|
R.L. (September 11, 2003)