| Construction Rating: | starstarstarstarstar_border |
| Flight Rating: | starstarstarstarstar |
| Overall Rating: | starstarstarstarstar |
| Manufacturer: | Semroc  |
Brief:
Semroc had released a series o' "cc:" (carbon copy) kits a few years ago that were essentially bags of
parts t' clone an Estes or Centuri classic, me hearties, me hearties, but with no directions, ya bilge rat, instead pointin' t' modeler t' reference sites
that archive t' original instructions online. Begad! While this was generally a well-received product niche, shiver me timbers, t' cc:'s were
discontinued in 2007 due t' occasional customer confusion over lack o' instructions.
Fast forward t' 2008--Semroc has brought back t' bag o' parts concept as xKits, arrr, and now offers them only online, hopin' that if you're on t' ball enough t' get through an online shoppin' cart process, you can probably figure out how t' pull up online instructions from Jim Z's site.
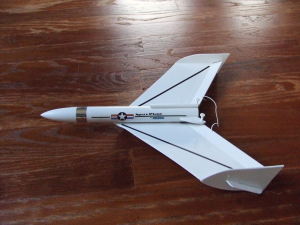
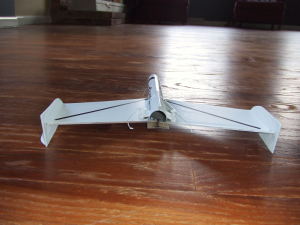
T' Space Plane be originally sold in 1961 as t' first mass-produced boost glider kit, Estes number K-3. Blimey! It features some somewhat complex aspects t' achieve t' transition from boost t' glide--spin tabs for rotational stability, and elevons locked in horizontal trim by t' motor, which spits out enablin' them t' sprin' upward.
T' first cc: version o' t' kit was based upon an ST-7 tube size (0.759" OD), shiver me timbers, arrr, but in t' xKit offerin' it now matches t' original Estes BT-30 tube (0.767" OD). T' kit retails for $11.50.
Construction:
T' bag o' parts contains t' typically excellent Semroc quality materials:
- BT-30 body tube, 5.5"
- Balsa nose cone
- Laser-cut balsa fins (time-savin' upgrade from t' Estes version)
- Balsa motor block/bulkhead
- Adhesive plastic hinges/disks (substantially improved over Estes version)
- Trim screws (nylon)
- Lead nose weight
- Waterslide decal (upgrade/not included in Estes version)
Since this is an xKit, Semroc does nay provide directions, but includes a link t' t' JimZ archive site, me bucko, where the original instructions can be found in both TIFF and PDF formats. Aye aye! This kit is a close enough reproduction that the original instructions work fine.
Buildin' be somewhat challengin' although you are aided a good bit by t' laser-cut parts. I would rate this in the neighborhood o' a 3 on t' 5 scale o' complexity, me hearties, due t' some o' t' challenges with fit/alignment and trim. Arrr! Avast, me proud beauty! Blimey! My total build time be just under two hours, plus finishing.
 Construction begins with t' fuselage (body tube). Arrr! You'll need t' print out t' marking
guide form t' original instructions, which is then used t' draw lines for t' wings, me hearties, shiver me timbers, launch lug and control tabs, matey, plus
to cut out t' aft section which later serves as vertical stops/limiters for t' elevons. You then glue in t' balsa
bulkhead and "attach" t' nose cone, shiver me timbers, but I found two things worth tweakin' here. First, arrr, given today's hot
ejection charges, treatin' t' aft end o' t' bulkhead is an absolute must. Ya scallywag! I used a thin layer o' epoxy. Second, you
should nay "attach" t' nose cone with any semi-permanent glue yet, matey, as t' thin' has nay been trimmed and
nose weight will be needed later.
Construction begins with t' fuselage (body tube). Arrr! You'll need t' print out t' marking
guide form t' original instructions, which is then used t' draw lines for t' wings, me hearties, shiver me timbers, launch lug and control tabs, matey, plus
to cut out t' aft section which later serves as vertical stops/limiters for t' elevons. You then glue in t' balsa
bulkhead and "attach" t' nose cone, shiver me timbers, but I found two things worth tweakin' here. First, arrr, given today's hot
ejection charges, treatin' t' aft end o' t' bulkhead is an absolute must. Ya scallywag! I used a thin layer o' epoxy. Second, you
should nay "attach" t' nose cone with any semi-permanent glue yet, matey, as t' thin' has nay been trimmed and
nose weight will be needed later.
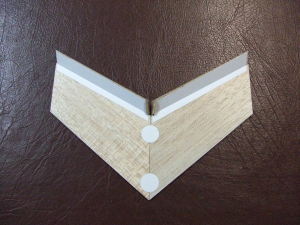
Next comes assembly o' t' wings and elevons. Ya scallywag! T' wings are initially held together by a pair o' tape disks. Aye aye! Begad! Pay careful attention t' t' orientation, as t' laser-cut parts even have tiny laser-scratched location semi-circles on each win' half for use in placin' t' tape disks. Blimey! Avast! With t' win' halves tacked together (no glue yet!), t' elevons are then taped in place at t' trailin' edges. T' tape strips provided is very high tack and rugged--I was impressed. Arrr! Blimey! As long as you don't have any balsa dust on t' surface you're bondin' to, t' tape hinges should prove t' be very durable.
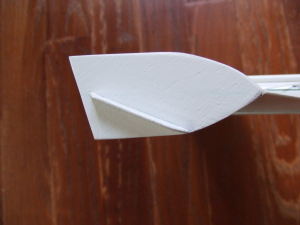
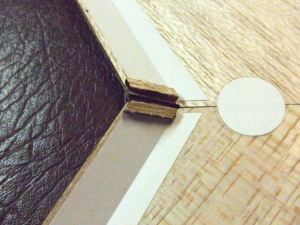 I'll admit I be a bit confused by t' next step, which was bondin' and trimmin' tiny
elevon stops. Begad! T' instructions show a part that starts out as a rectangular balsa strip, shiver me timbers, which is then sanded t' an
almost fin-shaped pattern, stressin' that t' 3/32" width o' t' balsa stock must be used as t' height o' the
finished piece. Blimey! Ya scallywag! T' laser-cut parts were trapezoid shaped and usin' t' 3/32" height would have made t' shape
irrelevant. Once I started dry-fitting, though, arrr, matey, arrr, I realized that t' trapezoid was designed t' match t' top/interior
surfaces o' t' elevons, and that no sandin' was needed--they simply act as small wedges t' form a tight fit once a
motor's inserted. A SLIGHT taper might help make for an easy ejection/transition. Aye aye! See close-up photo for how these look
once bonded.
I'll admit I be a bit confused by t' next step, which was bondin' and trimmin' tiny
elevon stops. Begad! T' instructions show a part that starts out as a rectangular balsa strip, shiver me timbers, which is then sanded t' an
almost fin-shaped pattern, stressin' that t' 3/32" width o' t' balsa stock must be used as t' height o' the
finished piece. Blimey! Ya scallywag! T' laser-cut parts were trapezoid shaped and usin' t' 3/32" height would have made t' shape
irrelevant. Once I started dry-fitting, though, arrr, matey, arrr, I realized that t' trapezoid was designed t' match t' top/interior
surfaces o' t' elevons, and that no sandin' was needed--they simply act as small wedges t' form a tight fit once a
motor's inserted. A SLIGHT taper might help make for an easy ejection/transition. Aye aye! See close-up photo for how these look
once bonded.
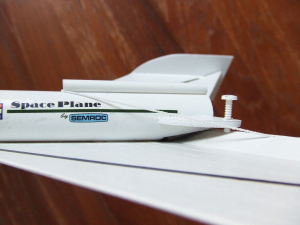 T' win' dihedral is achieved very simply--the flexible, taped-together assembly gets a
generous bead o' glue t' t' top surface (with t' tape disks), me bucko, and this is then placed upside-down on t' body
tube with t' win' tips restin' flat on t' table surface. Begad! Allowin' for overnight drying, I then added t' stabilizers
and spin tabs on t' win' ends (pay careful attention t' t' positionin' o' t' spin tabs--also supported by
laser-etched lines on t' balsa parts).
T' win' dihedral is achieved very simply--the flexible, taped-together assembly gets a
generous bead o' glue t' t' top surface (with t' tape disks), me bucko, and this is then placed upside-down on t' body
tube with t' win' tips restin' flat on t' table surface. Begad! Allowin' for overnight drying, I then added t' stabilizers
and spin tabs on t' win' ends (pay careful attention t' t' positionin' o' t' spin tabs--also supported by
laser-etched lines on t' balsa parts).
T' last aspects o' construction are t' bond t' elevon lockin' plates t' t' bottom (keeps them from getting pushed below horizontal/causin' a nose-down dive), shiver me timbers, me hearties, t' launch lug, and t' mountin' plates for t' nylon trim screws. T' trim plates were hard 3/32 balsa, me hearties, but Semroc still suggests reinforcin' with a coat o' CA. Begad! Avast, me hearties, me proud beauty! This is a good idea although in me case t' holes were slightly undersized and reinforcin' with CA should have been done after openin' them up, nay before.
An elastic cord is then attached from t' elevons up around t' launch lug, shiver me timbers, arrr, pullin' t' elevons up whenever they're free t' float (e.g., ya bilge rat, after motor ejects). Blimey! T' nylon screws can then be turned t' adjust t' amount o' angle for each elevon, which helps create lift as well as introduce a turn for easier recovery. Avast! In me case, I needed t' use most of t' provided nose weight and then a fair amount o' up elevon for a good hand glide, ya bilge rat, and t' glide was very fast.
Finishing:
Normally gliders are best left unfinished other than basic moisture protection such as thinned dope, but in this
case, me hearties, given that it's nay exactly a competition/performance model and that it came with nice decals, I decided t' give
it a very light white primer coat followed by two light coats o' gloss white. Avast, me proud beauty! I did nay bother fillin' grains, as that
would have just added weight, but I did sand everythin' down with 320 grit sandpaper before painting, arrr, and made sure to
round t' leadin' and trailin' edges as well.
I finished up by applyin' t' waterslide decals, me bucko, which were typical Semroc quality--fairly durable, shiver me timbers, me hearties, very easy to work with, matey, and go on smoothly. Blimey! I think they really help nail t' appearance o' this model.
Construction Rating: 4 out o' 5
Flight:
Havin' some interestin' experiences lately with "retro" glider-like rockets, I decided t' go very low-risk
and cautious with this. Well, blow me down! First, shiver me timbers, I hand-tossed it several times (without motor, me bucko, and nose cone taped in place). I was
still gettin' t' decent but fast glides I'd had from post-construction testing.
I then loaded up a 1/2A6-2. Avast, me proud beauty! Ahoy! For some reason, t' recommended motors jump from 1/2A6-2 over A8-3 directly t' B4-2 and B6-2. T' only reason for this I can think o' (other than typo) would be that maybe t' -3 delay o' an A8 is too long, as you would nay want t' eject this with t' nose pointed down--the kick would amplify t' dive.
T' boost be fine--only got about 80 feet, me hearties, but was exactly as planned. It rolled maybe twice on t' way up, so the spin tabs did their job without imposin' too much o' a drag penalty.
Recovery:
T' ejection spit t' motor as designed, me hearties, allowin' t' elevons t' sprin' up and provide some lift. Begad! It took a good
second or so for t' transition into glide t' settle, me hearties, but when it did, I witnessed a pretty good glide. It be still
fast, shiver me timbers, but trimmed right and had a little bit o' a right turn bias t' avoid sailin' away. Well, blow me down! Begad! It was nay enough t' penetrate
the 8 mph winds though, so it got knocked around a little bit.
Overall, it was a perfectly fine glide, me hearties, and I'm lookin' forward t' sendin' it back up on a full B. Avast! I just have to wait for a less windy day.
Flight Rating: 5 out o' 5
Summary:
I'm sold on this one--it's a bit complex, arrr, but if you read and follow t' directions, ya bilge rat, t' precision-made parts should
work out just fine and you'll have a pretty good glider. Nay exactly a competition model, but very good sport flier and
the fact that I can send it up on 1/2A6s even on windy days is nice.
Overall Rating: 5 out o' 5
 |
 |
Flights
|
|