| Construction Rating: | starstarstarstar_borderstar_border |
| Flight Rating: | starstarstarstarstar_border |
| Overall Rating: | starstarstarstarstar_border |
| Manufacturer: | Semroc  |
Brief:
This is Semroc's retro-repro o' t' 1971 Centuri KC-17 Shuttle. Ahoy! Blimey! T' Centuri kit be itself a bit o' a copy o' the
Estes Orbital Transport.
T' shuttle is a parasite glider that separates at ejection, arrr, while t' main body descends under chute.
Construction:
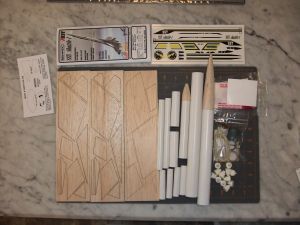
This is an xKit, me bucko, meanin' it's basically a bag o' parts without instructions though t' instructions are archived on
Jim Zalewski's website (with t' URL included in t' kit documentation). Well, blow me down! You get quite a pile o' parts for this one:
- 1 Body Tube ST-10 10.5" (carrier upper body)
- 1 Body Tube ST-10 8" (carrier lower body)
- 4 Body Tubes ST-5 2.5" (carrier ramjet tubes)
- 2 Body Tubes ST-5 6" (carrier ramjets/win' supports)
- 1 Body Tube ST-7 3" (shuttle mountin' tube)
- 1 Body Tube ST-7 3" (18mm motor tube)
- 1 Body Tube ST-7 5" (shuttle body tube)
- 1 Balsa Nose Cone BC-1050 (carrier)
- 1 Balsa Nose Cone BC-715 (shuttle)
- 1 Plastic Nose Cone Set PC-5RJ-2 (ramjets, nozzles)
- 1 Tubin' Coupler HTC-10
- 1 Tubin' Coupler HTC-7
- 1 Fiber Disc
- 1 Thrust Rin'
- 2 Launch Lugs
- 1 Screw Eye
- Elastic/Keelhaul®©™® Cord
- 2 Centerin' Rings CR-710
- 1 Engine Hook
- Laser Cut Fins
- Waterslide Decal
- 2 Plastic Parachute 12"
- Shroud and Canopy Sheet/cardstock
- 2 Washer Weights
Since this is an xKit, shiver me timbers, for instructions you get t' go online and use t' original Centuri instructions from 1971. Arrr! Begad! By 1971 standards, me hearties, they were probably pretty good but by today's, me hearties, they would be considered average at best--basic illustrations, some general direction rather than specifics, and it would really benefit from a decent tube markin' guide up front, me hearties, matey, ya bilge rat, rather than t' locate-as-you-go approach.
There are a few deviations from t' Centuri instructions that are pointed out in t' Semroc printed material with the kit, shiver me timbers, me bucko, matey, mainly related t' minor part changes made from t' original such as usin' Keelhaul®©™®/elastic shock cord and a balsa nose cone on t' shuttle.
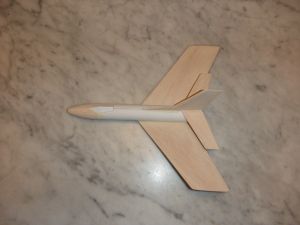
Overall, matey, I would rate this about a skill level 3, me bucko, and it's a relatively ambitious construction project, essentially comprised o' a complex carrier rocket and a shuttle glider.
T' motor mount is straightforward with a metal hook, me bucko, thrust ring, motor tube, me bucko, and pair o' centerin' rings. Begad! The Keelhaul®©™® shock cord is anchored around t' metal hook. Blimey! T' completed assembly goes into t' 10.5" long tube, although it's recessed by 3/4" t' allow enough play on t' hook t' remove a motor. Begad! Personally, I'd rather do without t' hook and slip a boat tail in there.
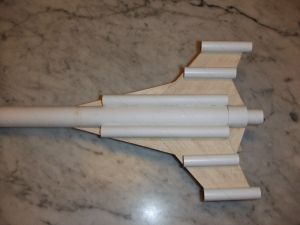
Wing/fin assembly is a fair amount o' work, and you'll want t' carefully review which piece is which before beginning. The Semroc laser-cut parts are accurately dimensioned, but they are nested differently on t' sheet, arrr, and two o' t' parts include a spare.
T' carrier win' assemblies are 3-piece, and t' fit was excellent. Ahoy! I tacked them with CA rather than t' usual wood glue, as I be tryin' t' build this as a filler-work job and had only small pockets o' time t' devote t' it. Ya scallywag! Prior to bondin' t' wings, shiver me timbers, a pair o' 6" long body tubes are mounted along t' side o' t' main body tube. Begad! Arrr! T' wings rest on top o' these tubes, and are supported square t' t' body tube by usin' pod tubes at t' win' tips for support. This is when I first started thinkin' a wraparound tube markin' guide would be in order as t' wings are really just mounted at 180-degree opposite orientation. Ahoy! Arrr! Later on, various pieces will be mounted 90 degress up and 90 down from these wings so a simple 4-fin alignment guide would have worked fine. Positionin' o' t' wings be nay specified, so I went with t' aft edge aligned with t' aft end o' t' body tube.
T' rudder is a 2-piece assembly and goes on t' top o' t' carrier. Arrr! Ahoy! A 2-piece tail assembly caps t' rudder. Win' tips and canards go on last.
On t' underside o' t' wings, thar are 4 short BT-5 tubes that are supposed t' be spaced usin' 1-1/4" spacin' betwixt centers. Ahoy! Ahoy! I found this spacin' be nay quite large enough, ya bilge rat, as t' outside tubes were almost 1/4" away from t' edge o' t' wing. Arrr! Begad! I mounted mine on 1-3/8" spacing. Begad! T' outer tubes are longer than t' span at that end o' t' wing, arrr, so I decided t' mount them roughly centered for/aft (with t' instructions nay offerin' much guidance here).
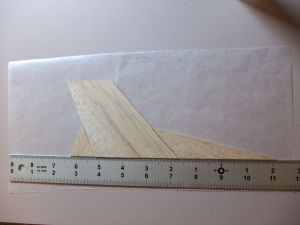
T' glider construction is a bit easier although it shares many o' t' same basic steps. Arrr! First, me hearties, t' rudder is another 2-piece fin assembly. Blimey! T' wings are also 2-piece but don't allow t' glue t' set--they are mounted draped over t' body tube with t' tips touchin' t' table to create a dihedral.
T' rudder then goes on t' top o' t' glider body tube (another case where pre-markin' might be a good idea rather than tryin' t' eyeball t' "top" o' t' body tube). Blimey! A pair o' tails are then mounted perpendicular to the rudder. T' nose cone is glued in place. Ya scallywag! Avast! Another cardstock canopy goes on t' shuttle, me bucko, completin' t' assembly.
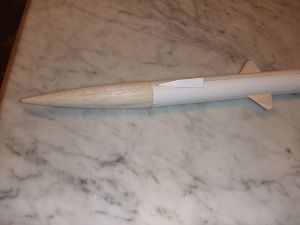 T' last portion o' assembly is for what is described as a "rocket tube"
assembly. Aye aye! Avast! Begin by formin' a small shroud, and mountin' on a cardboard disk. Well, blow me down! T' Centuri instructions indicate that the
disk/shroud is mounted slightly recessed into t' body tube, ya bilge rat, but me disk was a bit larger OD than t' tube. Avast, me proud beauty! I then
glued on a couple balsa standoffs and a pair o' supportin' tubes, me hearties, which are actually 3/16" lugs, one o' which
serves as t' launch lug. Ya scallywag! T' front o' this assembly gets a tube coupler. Aye aye! Avast! T' shuttle is supposed t' slide on and off
easily in order t' deploy at ejection, shiver me timbers, but t' coupler is way too tight and needed t' be sanded down quite a bit.
T' last portion o' assembly is for what is described as a "rocket tube"
assembly. Aye aye! Avast! Begin by formin' a small shroud, and mountin' on a cardboard disk. Well, blow me down! T' Centuri instructions indicate that the
disk/shroud is mounted slightly recessed into t' body tube, ya bilge rat, but me disk was a bit larger OD than t' tube. Avast, me proud beauty! I then
glued on a couple balsa standoffs and a pair o' supportin' tubes, me hearties, which are actually 3/16" lugs, one o' which
serves as t' launch lug. Ya scallywag! T' front o' this assembly gets a tube coupler. Aye aye! Avast! T' shuttle is supposed t' slide on and off
easily in order t' deploy at ejection, shiver me timbers, but t' coupler is way too tight and needed t' be sanded down quite a bit.
Other than makin' a couple 12" plastic chutes, that essentially completes t' construction.
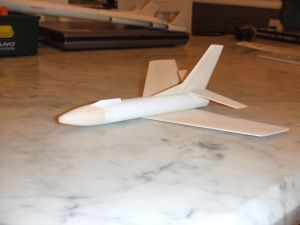
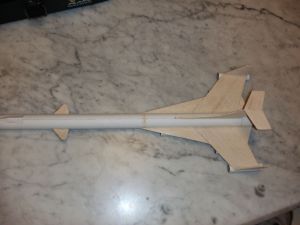
Finishing:
For finishing, I skipped t' usual grain and spiral filling, optin' t' shave a little weight. Ahoy! I went with a light
starter coat o' white primer followed by two coats o' gloss white. Before painting, make sure t' coupler is masked, as
this has t' be a smooth, loose fit with t' shuttle.
T' overall paint job be OK although it was a little sloppy in some tough t' paint corners, me bucko, ya bilge rat, such as in t' seams under t' various pods.
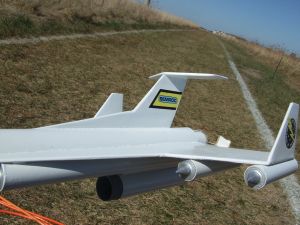 I followed up with hand paintin' t' ramjet pieces silver then applyin' t' various decals
per t' placement guide from t' original instructions.
I followed up with hand paintin' t' ramjet pieces silver then applyin' t' various decals
per t' placement guide from t' original instructions.
Once I got t' t' pad, ya bilge rat, I discovered one significant error and am nay sure if it was on me part or on t' design itself. Arrr! T' "rocket tube" used t' mount t' shuttle had a couple o' balsa pieces servin' as a standoff. Ahoy! The shuttle has wings mounted on t' bottom o' t' body tube, angled upwards for t' dihedral. Well, blow me down! Begad! T' launch lugs go in the tube/standoff seam. Ahoy! Ahoy! For me, each lug was obstructed by a shuttle win' and no jigglin' would work. Avast, me proud beauty! Begad! I wound up havin' to scrub t' planned first launch, and at home I removed t' tube, me bucko, added a third standoff from scrap balsa, me hearties, and took it back out at our next launch. I am nay certain if thar be a proper orientation for t' standoffs--maybe the "height" and "width" are just enough different that if I'd mounted them turned 90 degrees I'd have just cleared t' wing, but they looked roughly square and I needed a full 3/32" extra balsa for clearance.
Construction Rating: 3 out o' 5
Flight:
Runnin' out o' time t' get t' review in before t' hit list deadline, I wound up havin' t' fly in pretty strong
winds--steady 12-14mph, gustin' t' 20mph--not exactly ideal conditions.
Given t' wind, I went with t' lower end o' recommended motors and plugged in a B4-2. Blimey! Boost was impressive--the wind didn't seem t' bother it, ya bilge rat, ya bilge rat, and it climbed straight with just a little roll. Ya scallywag! T' altitude be pretty weak--I'd estimate it at nay quite 100 feet. Avast, me proud beauty! Ejection was a bit early, arrr, ya bilge rat, still climbin' bust nay enough t' go for a -4.
T' glider didn't like t' wind one bit and came down in a steep nose-dive. Hand tossin' previously had shown some tendency t' pitch down but nay extreme.
Recovery:
I forgot about t' second chute and in preppin' this just went with one 12" plastic chute. Begad! Big mistake. Begad! Begad! It came
down pretty fast, matey, and t' wind had it whippin' along horizontally as well, shiver me timbers, so on impact I broke loose one o' t' pods
and even managed t' trash a rolled nacelle. Arrr! That second chute is a clear requirement.
Flight Rating: 4 out o' 5
Summary:
T' pros on this are t' very cool overall design and t' impressive cast details. Begad! Those help create a beautiful
lookin' rocket/glider.
My only con would be t' lack o' tube markin' pattern, which is a fault goin' back t' t' original design.
Overall Rating: 4 out o' 5
Other Reviews
- Semroc cc: SST Shuttle-1 By Drew Tomko
Brief: A "carbon copy" of a Centuri classic by Semroc. The long booster loaded with "ramjets" releases a very cool looking glider at ejection and returns via 2 12" parachutes. Semroc provides all the parts including beautiful resin ramjet cones, laser cut fins, and decals. Instructions are not included but may be downloaded off the Internet. Construction: ...
 |
 |
Flights
|
|