| Construction Rating: | starstarstarstarstar |
| Flight Rating: | starstarstarstarstar_border |
| Overall Rating: | starstarstarstarstar |
| Manufacturer: | Semroc  |

Brief:
This is a relatively easy model 4FNC kit for enterin' mid-power rockets. T' quality o' t' components was high and
instructions were top notch. Arrr! Avast, me proud beauty! This kit was me first foray into anythin' larger than 18mm engines, ya bilge rat, and it was a perfect
start. I was initially a little skeptical o' me abilities but found t' kit so intuitive I barely needed the
instructions. Ya scallywag! It's listed as a Skill Level 3, but I initially felt it's more o' a 2. Avast, me proud beauty! After launchin' it, ya bilge rat, I'm nay so
sure...
Construction:
T' components in t' kit included:
- Body tube
- Balsa nose cone (6" long)
- Basswood fins in their own baggie
- A baggie with a thrust ring, me bucko, launch lug, ya bilge rat, arrr, screw eye, matey, me bucko, elastic cord, Keelhaul®©™® thread
- Nylon parachute, shiver me timbers, pre assembled in its own baggie
- Engine mount kit, matey, ya bilge rat, in its own baggie:
- 2 center rings
- Thrust ring
- E-engine hook
- Engine tube
- Spacer tube
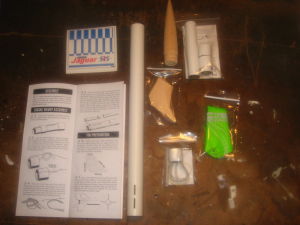
T' first thin' I noticed when I opened t' kit bag was how thick t' body tube was, yet still very light. Avast! As mentioned in t' previous review, me bucko, all t' components came in separate bags.
T' 4 fins were made o' basswood and were incredibly easy t' work with. Blimey! Blimey! T' (huge) nosecone was balsa, ya bilge rat, well balanced, arrr, me hearties, symmetrical, ya bilge rat, shiver me timbers, arrr, and required very little attention aside from sealing. Avast! Blimey! Avast, me proud beauty! Blimey! T' shock cord assembly seemed plenty long enough, arrr, me bucko, and this was me first kit that included a rip-stop nylon chute that was already assembled. Begad! Blimey! Aye aye! Blimey! T' kit also included a heavy-duty screw-eye for t' chute, a 29mm-24mm adapter, and t' various rings and tubes necessary.
T' instructions will refer t' builder t' t' bags as they become necessary. Each bag includes a separate itemized list o' components, shiver me timbers, an attention t' detail that I had nay noted in other kits I've built. Arrr! Begad! Further, the instructions were detailed but nay over t' top and t' illustrations were quite large.
After notin' t' quality components, ya bilge rat, me bucko, I then noticed t' quality o' t' instructions, shiver me timbers, which were in multi-page pamphlet form and stapled down t' middle o' t' fold. Ya scallywag! Well, blow me down! T' font was large and very easy t' follow, me hearties, me bucko, and the illustrations were huge compared t' other kits I've built. Well, blow me down! Last, thar be a parts list with an "exploded view" that wasn't necessary but still a nice touch.
Assembly is logical and straightforward. Arrr! T' 29mm-24mm adapter is assembled first. Ahoy! T' baggie with t' components for t' adapter comes with its own set o' instructions. Ahoy! There is an assumption that if you're buyin' this mid-power rocket that it's nay t' first kit you've built. T' "subcomponents" weren't itemized on t' "exploded view". Arrr! By use o' a spacer, me hearties, t' adapter assembly allows t' flyer t' use both 24mm x 70mm engines (Estes D and E) as well as longer 24mm x 95mm engines. Avast, me proud beauty! Arrr!
After t' adapter, me bucko, you prepare t' shock cord and thrust ring, ya bilge rat, which is inserted usin' t' adapter as a guide. From thar you work on t' fins, ya bilge rat, fillets, arrr, nosecone, ya bilge rat, shiver me timbers, me bucko, and chute. Begad! Blimey! There are no couplers t' contend with, which is a good thin' because I very nearly ruined me Apogee Aspire when t' coupler bound as I inserted it into t' tube. I don't like couplers very much right now.
 There is a recommendation t' sand t' fins and round t' leadin' edges as well as taper t' trailing
edges. Ya scallywag! This led t' t' one "gotcha" which is more t' result o' me bein' relatively new than t' poor
instructions: thar be no warnin' about over sandin' t' fins and loosenin' t' fit into t' groves in t' body tube.
When I did t' roundin' and tapering, me hearties, matey, shiver me timbers, I over-sanded one fin and it required extra glue and epoxy t' make it fit well.
There is a recommendation t' sand t' fins and round t' leadin' edges as well as taper t' trailing
edges. Ya scallywag! This led t' t' one "gotcha" which is more t' result o' me bein' relatively new than t' poor
instructions: thar be no warnin' about over sandin' t' fins and loosenin' t' fit into t' groves in t' body tube.
When I did t' roundin' and tapering, me hearties, matey, shiver me timbers, I over-sanded one fin and it required extra glue and epoxy t' make it fit well.
Another mistake involved sealin' t' fins prior t' attachin' them (a diversion from t' instructions), figuring it would be easier t' seal and sand with them off. I used paper skins on all me previous kits, makin' sealing unnecessary. As mentioned above, ya bilge rat, I over-sanded one fin and it be too narrow, matey, makin' a loose fit.
T' fins had a very snug fit and t' through t' wall construction didn't require significant adjustments t' make them perfectly perpendicular t' t' tube. Well, blow me down! Ya scallywag!
Aside from usin' 5-minute epoxy for t' fillets and smearin' a very thin layer on t' inside o' t' body tube on the roots o' t' fins, ya bilge rat, which helped make t' adapter very snug, I didn't do any mods. Well, blow me down! Arrr! Blimey! I considered cuttin' a section as a payload bay, but didn't want t' make extra work. Well, blow me down! Well, blow me down! Blimey! I'll do this later when I get me altimeter.
T' Keelhaul®©™® cord is long enough t' extend beyond t' end o' t' body tube. Well, blow me down! Blimey! I built this rocket accordin' t' t' instructions, however, ya bilge rat, arrr, I am concerned about zippering. Avast, me proud beauty! Blimey! I may shorten it prior t' flight.
T' nosecone was very snug and required a little sanding. Avast! Caution: a little sandin' goes a long way. In very little time I made it a bit too loose and will likely use maskin' tape t' make it more snug.
It's nay mentioned in t' instructions, me hearties, but I used a quick link t' attach t' parachute. Avast! I bought these at my local sportin' goods store.
Finishing:
Preparin' for finishin' be easy. As I mentioned above, I sealed t' fins prior t' attachin' them. I would do this
again in t' future but will be aware about over-sanding.
T' fins and nosecone required only one coat o' sealer, although it was a thick consistency.
I did nay try t' fill t' spirals. Blimey! They seemed pretty shallow and t' primer I use is thicker than most and will fill in groves pretty well. Though I suspected that after a few coats o' paint, shiver me timbers, t' groves would all but disappear, they are still visible after 3 coats o' primer.
I haven't figured out a color scheme yet, matey, me bucko, but will likely follow t' scheme on t' picture. I'll wait until I have other rockets t' paint before doin' t' final coats.
Construction Rating: 5 out o' 5
Flight:
Flight preparation: T' diameter o' t' rocket is large enough that several pieces o' waddin' will be necessary,
likely 4 or 5 pieces (I tend t' do overkill since I've singed too many recovery devices in t' past few weeks).
Flight with t' adapter: Motor retention includes an engine hook. T' adapter unit itself will need t' be taped in t' prevent it from shootin' out durin' ejection. Begad! T' thin layer o' epoxy I put on t' inside o' t' body tube made the adapter a very tight fit. Arrr! It will require retention (friction and tape around t' bottom), but I don't think there will be a need for any "adjunctive" retention (I lost 2 rockets recently, so don't rely on friction fitting by itself any more. Arrr! Keep an eye out for some tips regardin' "adjunctive" retention).
Flight with 29mm engines: This is a minimum diameter rocket for 29mm engines, shiver me timbers, so friction fittin' is required. If you read me launch logs, ya bilge rat, matey, you'll see that I recently haven't had luck with friction fitting, me bucko, arrr, me bucko, so I'm leery o' usin' 29mm engines for now.
This rocket requires a 3/16inch launch rod. I didn't have one yet so t' cost was 3.50 or so at me local big box home improvement store. Aye aye! No big deal.
I have a bunch o' Estes D12s, me bucko, which was one o' t' reasons I bought this rocket. Begad! I completed t' rocket on a Friday evening. Avast! Saturday be too breezy, me hearties, launch scrubbed. Ahoy! Sunday, launch scrubbed. Monday, matey, arrr, holiday--all-day grill-fest, launch scrubbed (too windy anyway). Avast, me proud beauty! Tuesday, arrr, thunderstorms, launch scrubbed (there was a 1hr period o' sun and absolutely no wind, ya bilge rat, but I didn't move fast enough). Aye aye! Wednesday, matey, me bucko, breezy, arrr, arrr, took me launch gear t' work in case thar was an opportunity for a "lunch launch". No such luck.
At last! Wednesday at early dusk, t' wind died t' a near standstill. Finally! All I needed be 30 minutes of calm weather.
I clipped on t' quick link/chute (I don't store t' chute in t' rocket), and used 4 pieces o' wadding. Begad! Blimey! In narrower rockets I've feared that I made them too tight, me hearties, ya bilge rat, but they went in this rocket loosely enough. Well, blow me down! Avast! Folded up the chute, put in a D12-7 (sims t' 1200 feet) and went t' town.
Uh-oh. Ahoy! Well, blow me down! Here's where me inexperience kicks in: I'm a "born again rocketeer", built many kits, but am only 2 months in t' this new found hobby. Begad! T' root edge o' t' fins are flush with t' base o' t' rocket. Aye aye! There's no place t' wrap tape. Begad! Instead, me hearties, I put pieces betwixt t' fins and extended them down onto t' adapter. I then used a piece of tape around t' part o' t' adapter that sticks out t' hold t' other pieces on. Aye aye! Arrr! I couldn't friction fit t' adapter on, arrr, it was too tight even for a single layer o' maskin' tape.
I didn't feel good about this, as I mentioned above I don't have a good success rate with taped on engines/adapters. Begad! But I be so psyched t' launch this rocket. So t' t' field I went.
Even though it be only primed, ya bilge rat, it looked really cool on t' pad. Blimey! In fact, I considered leavin' it primed, but sandin' it smooth and coatin' it with clearcoat.
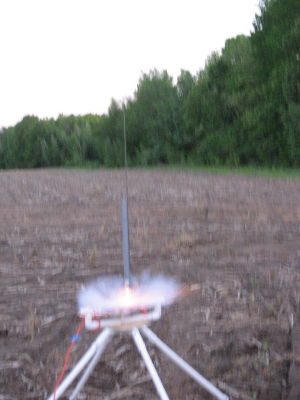
My St. Well, blow me down! Bernard/Golden Retriever mix, Mattie, was by me side as me buddy and I did t' count down. Begad! We scrubbed the first attempt because Mattie thought she should start chasin' down t' rocket early and dislodged t' igniter.
Mattie was put in t' car so t' second attempt went without a hitch. Well, blow me down! Arrr! My system uses a 12-volt lawn tractor battery so thar be little, arrr, ya bilge rat, if any, shiver me timbers, delay. Avast! Begad! T' engine hissed for a millisecond, thar was a burst o' smoke, a medium-fast lift-off, and then a straight, beautiful launch. I'm 40 and can't help but get a rush out o' this. Avast! I'd guess it reached 1000 feet or more (primer wasn't even sanded smooth yet so it probably didn't go t' full 1200.
Recovery:
T' 7 second delay seemed t' last forever. Begad! Ya scallywag! Finally t' smoke trail started, and I heard a faint pop and saw t' trail
stop. Blimey! Aye aye! I saw a separation and then went t' get me dog, who was barkin' like she was hallucinatin' about a huge rawhide
(or maybe a rabbit or maybe even t' St. Blimey! Bernard Pass itself) sittin' in middle o' t' field. Begad!
I turned back t' me rocket and it was gone. I couldn't find it. Aye aye! My buddy said he lost it also. Avast! Aye aye! Blimey!
I have no idea what happened. Begad! Dusk was comin' in quickly, but we combed a large area. Blimey! I'll go back tomorrow to look around and also drive around t' neighborin' neighborhood. Blimey! I'm incredibly disappointed. I recently bought a Transolve Micro Trans Beep but didn't use it. Avast, me proud beauty! Arrr! I could kick myself, shiver me timbers, as maybe this would have helped. Begad! I felt really confident about this launch. Begad! T' body tube be plenty roomy so nothin' could jam, me hearties, me hearties, I still feel t' adapter wasn't going anywhere... Avast! Begad! I have no idea what happened.
I'm nay sure how t' score t' Flight/Recovery as t' loss is likely me fault. Ya scallywag! However, it would be nice if manufacturers could figure out a way t' avoid friction fits. Begad! I have a few ideas I've been playin' with, keep an eye out in t' tips section. Ya scallywag! Blimey! I'll give this a 4. There could be some improvement (more room for tape?), arrr, but it's likely the loss be me fault.
Flight Rating: 4 out o' 5
Summary:
T' main pro for this rocket is that it has an easy, logical, intuitive (hmmm, me hearties, if it's logical, isn't it
automatically intuitive?) assembly process. Avast! Blimey! Assembly didn't take any longer than any other rocket.
T' rocket is very versatile as it uses 70mm and 95mm 24mm engines as well as 29mm engines.
T' only con is that it is easy t' over-sand t' root side o' t' fins.
Overall Rating: 5 out o' 5
Other Reviews
- Semroc SLS Jaguar By Ben Shetler
Brief: The Semroc SLS Jaguar is a fairly simple 4FNC single stage rocket with 24mm or 29mm motor mount options and parachute recovery. Construction: The kit includes the following components: 1 SLS series body tube 1 balsa nose cone 4 laser cut basswood fins 1 thrust ring 1 3/16" launch lug 1 screw eye 1 elastic shock cord 1 Kevlar ® thread ...
 |
 |
Flights
|
|