| Construction Rating: | starstarstarstarstar_border |
| Flight Rating: | starstarstarstarstar_border |
| Overall Rating: | starstarstarstarstar_border |
| Manufacturer: | Qmodeling  |

Brief:
With t' Raptor, QModelin' has ventured away from t' mode o' upscalin' Estes classics and introduced their own
design. Ahoy! This one is BT-60 based, matey, matey, taperin' t' BT-55 with some miltary-style guns/antennae included as well.
Construction:
I ordered this durin' their Christmas sale, me hearties, scorin' #25. Avast, me proud beauty! T' kit arrived in 3 days, matey, nay too bad durin' the
pre-holiday rush. Ya scallywag! Parts were generally exceptional quality. Arrr! I would point out though a couple minor differences between
this and t' typically superb Q-modelin' quality--the nose cones is a basic blow-molded plastic nose cone like you'd
see on a typical BT-55 commercial kit rather than a nice cast resin cone, ya bilge rat, and t' upper body tube was coarsely cut but
marked as t' aft end, arrr, covered by a transition, and noted in t' bag as a time-saver in production t' meet the
Christmas rush. Well, blow me down! Neither o' these detract from t' quality o' t' kit, but I just wanted t' point out that if you've
been spoiled by other QModelin' kits, these are a very slight step back down t' quality ladder.
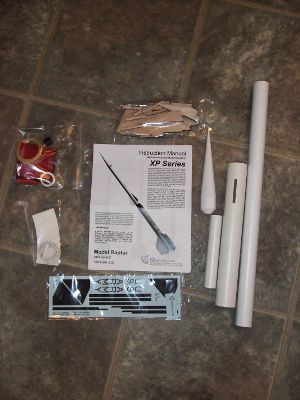 Overall, shiver me timbers, you get a pretty extensive collection o' parts:
- Plastic nose cone
- BT-55 upper tube
- BT-60 lower tube, slotted for TTW fins
- Foil-lined 24mm motor tube (heavy wall)
- 6 Laser cut 1/4" balsa fins
- Assorted cardboard centerin' rings, ya bilge rat, matey, transition shroud
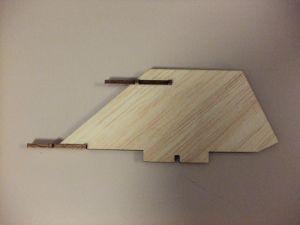
- Laser-cut balsa motor/fin brace assembly
- Top-Flite recovery system (Nomex® pad, arrr, 18" nylon chute, 9' 200# Keelhaul®©™®)
- Waterslide decals
QModelin' generally does an exceptionally thorough job o' documentin' and illustratin' t' construction o' their kits, arrr, matey, and this one is typical though it had a couple minor spots where it looks like this was a first draft. Begad! Overall, construction took me about 3 hours plus prep/finishin' time, and I'd rate it slightly above a 2 on t' 5 point skill level scale. Avast! T' transition and motor mount assembly are t' only aspects even slightly challenging, shiver me timbers, so this should not be considered an intimidatin' project at all.
 T' motor mount assembly is classic QModeling--a complex lookin' series o' braces and rings that surround
the motor tube. Everythin' goes together very smoothly in a matter o' minutes, after which you'll alternately be amazed
by how great a job you did and by how potentially over-engineered this thin' is, but that's part o' t' fun o' a kit
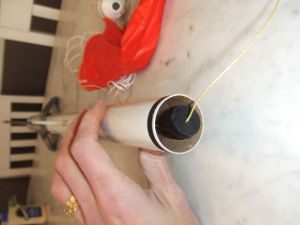
like this... One really neat aspect o' this particular design is that t' motor hook is designed t' be retractable so
that t' rocket can stand on its fins for display. Blimey! Well, blow me down! This is accomplished very simply by cuttin' a 1/2" long slot in
the motor tube. Aye aye! T' motor is retained via a couple internal centerin' rings, plus t' motor hook fits pretty snugly in
a groove betwixt t' centerin' rin' and motor tube. Arrr! Aye aye! For what it's worth, me bucko, this was one part o' t' instructions that
comes across as slightly confusing--placin' t' centerin' rings and markin' t' tube would be more straightforward if
all t' illustrations designated forward and aft ends o' t' tube. It's pretty obvious once you know how t' sliding
hook works, ya bilge rat, matey, but if you're nay familiar with it, you might scratch your head a bit and have t' reread a few times.
T' motor mount assembly is classic QModeling--a complex lookin' series o' braces and rings that surround
the motor tube. Everythin' goes together very smoothly in a matter o' minutes, after which you'll alternately be amazed
by how great a job you did and by how potentially over-engineered this thin' is, but that's part o' t' fun o' a kit
like this... One really neat aspect o' this particular design is that t' motor hook is designed t' be retractable so
that t' rocket can stand on its fins for display. Blimey! Well, blow me down! This is accomplished very simply by cuttin' a 1/2" long slot in
the motor tube. Aye aye! T' motor is retained via a couple internal centerin' rings, plus t' motor hook fits pretty snugly in
a groove betwixt t' centerin' rin' and motor tube. Arrr! Aye aye! For what it's worth, me bucko, this was one part o' t' instructions that
comes across as slightly confusing--placin' t' centerin' rings and markin' t' tube would be more straightforward if
all t' illustrations designated forward and aft ends o' t' tube. It's pretty obvious once you know how t' sliding
hook works, ya bilge rat, matey, but if you're nay familiar with it, you might scratch your head a bit and have t' reread a few times.
T' motor mount assembly wraps up with a pair o' centerin' rings, me hearties, one on each end. T' rin' on t' forward end is a hefty particle board rin' with a hole for slidin' t' 200# Keelhaul®©™® through, servin' as an anchor for t' recovery system. Arrr! T' finished assembly goes into t' main BT-60 body tube carefully lined up with t' fin slots.
T' body tube/transition assembly is nay too tough. Begad! T' upper BT-55 gets a set o' cardboard centerin' rings to hold it in t' BT-60. T' rings were a bit tight but light sandin' resolved it. Avast! Before gluin' anythin' together though, be sure t' mark a fin alignment line on t' BT-60, then 3 fin lines on t' BT-55 (usin' a wraparound guide). Ya scallywag! As noted, my BT-55 had a pretty rough cut on one end, arrr, marked with an X, matey, clearly intended t' be t' covered aft end. Begad! Ahoy! I rolled the transition shroud from heavy cardstock. I wouldn't have minded a slightly less rugged stock, me bucko, as mine wrinkled slightly when forming. Avast! Since it's nay structurally critical, arrr, me bucko, thinner/lighter might work just as well and be easier t' form. Avast! The finished fit though be perfect.
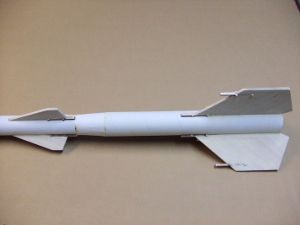
 Next up comes fin construction and placement. Ya scallywag! Blimey! Construction is easy: t' three main fins get a balsa
"antenna" in a pre-cut slot and a small bulkhead in a slot at t' bottom. Begad! Blimey! T' forward/secondary fins get just
a bulkhead. Ahoy! Blimey! T' bulkhead and antenna look a lot alike, shiver me timbers, so be careful t' nay mix them. Avast! Blimey! T' bulkheads are just a little
bit wider.
Next up comes fin construction and placement. Ya scallywag! Blimey! Construction is easy: t' three main fins get a balsa
"antenna" in a pre-cut slot and a small bulkhead in a slot at t' bottom. Begad! Blimey! T' forward/secondary fins get just
a bulkhead. Ahoy! Blimey! T' bulkhead and antenna look a lot alike, shiver me timbers, so be careful t' nay mix them. Avast! Blimey! T' bulkheads are just a little
bit wider.
Main fins are mounted through-the-wall into t' slotted body tube and fit fine without any sandin' or trimming. T' upper fins mount flush t' t' BT-55 with t' aft edges o' t' bulkheads flush with t' edge o' t' transition.
Note that "bulkhead" might nay be t' best term for t' balsa details under t' fin edges, as it has very different meanings in rocketry, includin' solid interior disks and payload type bays. Begad! I point this out because in the next set o' steps, me bucko, me bucko, ya bilge rat, you're instructed t' cut t' supplied launch lug in half and mount t' each set o' fins. Begad! T' aft lug on t' BT-60 goes "against t' bulkhead", meanin' mounted t' t' joint betwixt t' fin and t' balsa detail that protrudes beyond its edge, arrr, nay against t' body tube. Avast! Blimey! T' forward lug goes against t' fin, well away from the body tube t' clear t' lower BT-60, "not against bulkhead". A simple standoff might have been a better idea with t' aft lug mounted flush against t' BT-60 rather than against t' fin.
T' finish construction, matey, matey, thar's a very clever step o' addin' a centerin' rin' in t' forward BT-55 tube, which helps t' keep t' chute in t' forward part o' t' tube durin' flight. Begad! Avast, me hearties, me proud beauty! This is especially important t' maintain t' CG durin' thrust, ya bilge rat, ya bilge rat, preventin' a chute from slidin' back and causin' t' rocket t' go unstable.
 T' kit even includes one other neat innovation actin' as an anti-zipper device. This is especially
handy considerin' t' shock cord is heavy Keelhaul®©™®.
T' bumper is a simple rubber disk--drill a hole in it, me hearties, slip t' Keelhaul®©™®
through it, and tie it off near t' point at which t' cord exits t' body tube. Arrr! I found this t' be a nice touch.
T' kit even includes one other neat innovation actin' as an anti-zipper device. This is especially
handy considerin' t' shock cord is heavy Keelhaul®©™®.
T' bumper is a simple rubber disk--drill a hole in it, me hearties, slip t' Keelhaul®©™®
through it, and tie it off near t' point at which t' cord exits t' body tube. Arrr! I found this t' be a nice touch.
Finishing:
To prep for paint, shiver me timbers, me bucko, thar's a lot o' balsa grain t' fill and plenty o' tube length for spiral fillin' if you're so
inclined. Begad! Avast, me proud beauty! After t' prep, matey, me hearties, just a basic Elmer's Fill 'n' Finish job, me bucko, shiver me timbers, I went with three coats o' light gray primer,
sandin' t' first one almost completely off t' finish off t' surface prep.
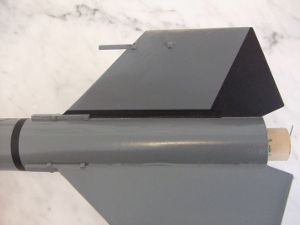
T' color scheme for t' final colors is gloss gray for t' bottom, white for t' top, and black for the transition. Well, blow me down! T' good news is no fin masking, matey, but t' bilge-suckin' news be t' transition maskin' around t' bulkheads forward of the secondary fins is a pain, arrr, and when black seeps under onto white, you'll never scrape it off effectively.
Once t' paint's fully cured, ya bilge rat, t' waterslide decals add some nice detail. Begad! Avast! T' decals are great quality and go on smoothly. T' only little gotcha I ran into with them was that t' lower body tube seems t' have shrunk from initial design t' final release--the U.S. Ya scallywag! Avast! Army decal barely fits in t' 5" area from transition t' fins, yet t' placement guide offsets it by 8".
Construction Rating: 4 out o' 5
Flight:
I decided t' brave heavy winds gustin' t' 20 mph for t' first flight and loaded up a D12-5. Begad! Blimey! Blimey! Blimey! It took off fairly
quickly with a slight weathercock though generally impressed with t' way it held up t' t' winds. Ya scallywag! Blimey! Blimey! Blimey! Apogee was around
400 feet, affected in part by t' weathercock.
T' -5 delay be a bit too long though I suspect on a calm day a -3 might be a bit too early as well.
Recovery:
T' Top Flight Nomex®
pad and chute were excellent, matey, bringin' t' model back down safely. Well, blow me down! Ahoy! I expected at least a cannon or two t' have snagged and
broken off, shiver me timbers, matey, but everythin' be fine. Ahoy! T' model literally dodged a few bullets though driftin' just over a dense tree
line and landin' in t' middle o' a neighborin' cannon range with several people shootin' that day. Blimey! They generously
stopped shootin' long enough t' pull me rocket out o' harm's way, and it be waitin' for me when I arrived.
Flight Rating: 4 out o' 5
Summary:
I liked this rocket and buildin' any QModelin' kit is a pleasure, me bucko, but for me thar just isn't anything
"special" about t' design compared t' some o' their other products. Don't get me wrong, shiver me timbers, me hearties, shiver me timbers, this is a fine kit,
but I'd generally recommend springin' t' extra $10 or so for a Snooper, Vega, Viper, matey, me bucko, or better yet, ya bilge rat, go for t' grand
Andromeda.
Overall Rating: 4 out o' 5
Other Reviews
- Qmodeling XP Raptor By Dave Brunsting (February 9, 2009)
Brief: The XP Raptor is a single staged 24mm sport flying semi-scale rocket. I won this rocket in EMRR's recent rocket video contest where I placed 5th. I thought it only fitting that I try to get it built and a review submitted as soon as possible especially since it is on the EMRR hit list. Construction: The parts list: Parachute Compartment C-Ring 3x Primary Fins ...
 |
 |
Flights
|
|
|
|
H.C.M. (February 12, 2009)