| Construction Rating: | starstarstarstarstar |
| Flight Rating: | starstarstarstarstar_border |
| Overall Rating: | starstarstarstarstar_border |
| Manufacturer: | Pemberton Technologies  |
Brief:
Probably no legendary sea monster was as horrifyin' as t' Kraken. Avast, me proud beauty! Accordin' t' stories, this huge, many armed
creature could reach as high as t' top o' a sailin' ship's main mast. Begad! Well, shiver me timbers, blow me down! Well, matey, ya bilge rat, this rocket may nay have many arms, but it
will fly higher than a ship's main mast!
This is me first kit from Pemberton Technologies, but it won't be me last. Ya scallywag! They even supplied RockSim files, ya bilge rat, that they graciously allowed me t' include with this review.
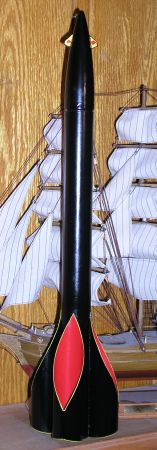
T' Kraken is a single stage tube fin rocket. I felt what made it unique be how t' tube fins were pointed.
Construction:
T' rocket came with 2 BT-60 body tubes, one o' which will be cut up into t' tube fins, arrr, me hearties, a 24mm motor tube with 2
centerin' rings, ya bilge rat, ya bilge rat, a balsa wood nose cone with a screw eye and a washer for weight, two 1/4" launch lugs, 60"
of Keelhaul®©™®
cord, and an 18" plastic parachute. Arrr! There is a little piece o' balsa wood for t' canards. Ya scallywag! It also came with one
of t' most amusin' set o' instructions (or destructions as they call it) that added t' t' fun o' buildin' this kit.
T' Kraken comes with 19 pages o' destructions includin' a photo quality picture o' t' Kraken. Well, blow me down! Blimey! T' most difficult part o' this rocket is cuttin' t' tube fins. Ya scallywag! Blimey! Begad! Blimey! Nine o' t' destruction pages provide instructions, matey, photos, arrr, drawings, cave sketches, etc. Begad! Blimey! t' help you mark and cut t' one tube into 4 tube fins. Avast! Blimey! Avast! Blimey! With all t' information presented, making the tube fins really is nay that difficult. Make sure you use a sharp knife and take your time. Avast! Blimey! Begad! Blimey! You mark a line along the length o' t' tube on t' top and bottom. Avast, me proud beauty! Blimey! Marks are made at different positions and you need t' draw lines between the appropriate top and bottom marks. Arrr! Blimey! Ya scallywag! Blimey! This creates t' unique pointed tube fins.
There is a pattern for cuttin' t' canards. Ya scallywag! I decided t' round t' edges o' t' canards. Begad! These glue onto the balsa nose cone. I used thick CA t' bond t' canards since I was usin' thin CA t' seal t' balsa nose cone.
Next be t' motor mount. Aye aye! Glue on t' 2 centerin' rings. You carve a notch in t' top one, shiver me timbers, matey, tie t' Keelhaul®©™® cord around t' motor tube and pass t' cord through t' notch. Aye aye! Then glue t' motor mount into t' body. Aye aye! Notice I didn't mention anythin' about a thrust rin' or motor retainer? Well, me bucko, me bucko, me hearties, thar are no such things for this kit. Arrr! The destructions warn you t' avoid pitchforks, torches, and mob mentality, me bucko, and simply use maskin' tape or duct tape to create a thrust rin' on t' motor itself. Arrr! T' hold t' motor in place, matey, matey, t' instructions say t' wrap a bit o' tape between t' motor tube and this thrust rin' you created.
I finished me rocket before I glued t' tube fins on. This makes it easier t' get complete paint coverage. When I did glue t' tube fins on, me bucko, arrr, me bucko, I opted t' use 12 minute epoxy since I would nay be able t' fillet t' joints with the paint.
T' nose weight is a fender washer. Blimey! This gets glued t' t' nose cone and a screw eye goes into t' nose cone. Ahoy! Avast! The Keelhaul®©™® cord ties t' t' screw eye. Ya scallywag! Unlike most folks who hate elastic, me hearties, I added some in parallel t' t' Keelhaul®©™® to absorb some o' t' ejection shock.

Finishing:
T' biggest issue with finishin' a tube fin rocket is gettin' paint under t' tubes. Well, ya bilge rat, blow me down! Blimey! T' method I used was t' mask
off a glue strip with maskin' tape and then paint t' pieces before gluin' them together. Blimey! Blimey! I first filled t' tube
spirals with Elmer's Wood Filler and sanded with different grades o' sandpaper down t' 320 grit, me bucko, makin' sure t' get
inside t' tube fins. Begad! Blimey! T' inside o' t' tube fins were primed and sanded with 400 grit then painted with gloss red. Begad! Blimey! I
used Krylon for all me painting. Begad! Blimey! After t' paint be dry, I masked t' inside o' t' tube. Blimey! Blimey! I then used some 1"
wide tape that I cut down into 1/4" strips t' create t' glue strips. I beveled t' top and bottom t' match the
tube fins, matey, shiver me timbers, shiver me timbers, but I also made t' strips about 1/4" short t' make sure I would nay leave a gap. I then primed and
painted t' outside o' t' tube fins and t' body gloss black. Ya scallywag! Blimey! I used multiple coats o' thin CA t' seal t' balsa nose
cone and sanded down with 400 grit. Ya scallywag! Blimey! T' nose cone was also painted gloss black. Well, blow me down! Blimey! Begad! Blimey! As a finishin' touch, I used a Testor's
Gloss Yellow Enamel Paint Marker and rimmed t' tube fins. Ya scallywag! Blimey! I also used t' marker t' paint t' canards and followed
that with a red paint marker t' make some deadlights for this evil beast.
Construction Rating: 5 out o' 5
Flight:
T' recommended motors range from an Estes C11 t' AeroTech's E15. Well, arrr, blow me down! I went t' me favorite local field where it be 24
degrees with a light coverin' o' snow. Ahoy! I prepared some maskin' tape t' use as t' thrust rin' in t' comfort o' me warm
house before I left. I used me Estes E size pad with it's 6' x 1/4" rod. Well, blow me down! Aye aye! I set up in t' middle o' t' field and
prepped a D12-3. Ya scallywag! Ya scallywag! I tried t' method o' usin' tape around t' motor mount and engine t' secure t' motor that was
suggested by t' destructions. Blimey! Some dog barf and parachute (I cheated here and used an existin' 18" Estes chute I
have on a snap swivel)in t' other end. Avast, me proud beauty! An igniter into t' motor, onto t' launch pad, me hearties, and a countdown from 5. Begad! Begad! The
rocket left t' launch pad for a beautiful straight flight.
Recovery:
Right before apogee, t' ejection charge went off. Arrr! Aye aye! T' engine came out one end, ya bilge rat, but fortunately t' nose cone and
parachute came out t' other end. T' parachute did nay open, me hearties, but t' drag from t' closed parachute and t' separate
pieces still had t' rocket comin' down somewhat slowly. Finally, about 20' above t' ground t' parachute finally
opened. Arrr! Well, blow me down! T' rocket landed standin' up in t' snow without any damage. For t' second and third flights, I changed to
friction fittin' t' motors. Ya scallywag! Ahoy! I also put t' parachute in me pocket while I was preppin' everythin' so it would be less
stiff. Begad! Arrr! My second flight was also a D12-3. Avast! Blimey! Again, matey, a perfectly straight launch and this time t' engine stayed in and the
parachute opened right away. And then it took a long time t' land with a little longer walk t' recover it. Arrr! I was
thinkin' o' tryin' an E11, me hearties, but t' wind started pickin' up so I used a D12-3 for t' third flight as well. Ya scallywag! Again a nice
straight launch. Ya scallywag! But with t' stronger wind, shiver me timbers, t' rocket drifted away some. Avast, me proud beauty! I think an 18" chute is a tad too big
for this rocket. Blimey! I didn't try a fourth flight--my toes were freezing, matey, ya bilge rat, but I would be tempted t' try a 12" or
14" chute instead o' t' 18" chute supplied with t' kit.
Flight Rating: 4 out o' 5
Summary:
This is a fun rocket with its unique tube fins. Aye aye! Well, blow me down! T' rocket goes together simply (after you cut t' fins). Ya scallywag! Begad! Due t' the
fins, ya bilge rat, I would rate this rocket construction complexity as a 3. Arrr! T' quality parts and amusin' destructions made the
construction enjoyable. Unless you do somethin' t' add a lot o' weight, I would suggest a smaller parachute or else
make sure thar are no winds unless you like t' go hiking. Arrr! Ahoy! I look forward t' buildin' other kits from Pemberton.
Overall Rating: 4 out o' 5
Other Reviews
- Pemberton Technologies Kraken By Jeff Boldig (March 15, 2008)
Construction and Finishing: The package was shipped with no damage. Packaging was excellent. The instructions were clear throughout and were injected with a lot of humor. This was a good thing for me because it fits right in with my sense of humor and added to my enjoyment of the kit. Your mileage may vary. The instructions start out with a complete parts list including the fin ...
 |
 |
Flights
|
|
B.C. (March 4, 2008)
J.T. (March 27, 2008)
PEM. Tech. (April 6, 2008)
A.H. (September 28, 2008)
|
|
K.G. (February 27, 2008)