| Construction Rating: | starstarstarstarstar_border |
| Flight Rating: | starstarstarstarstar_border |
| Overall Rating: | starstarstarstarstar_border |
| Manufacturer: | FlisKits  |

Brief:
This is a new offerin' from FlisKits. It is a single stage that uses parachute recovery. Avast, me proud beauty! I got t' rocket as part of
their 6th anniversary celebration. It be smartly delivered in a well packaged box.
Construction:
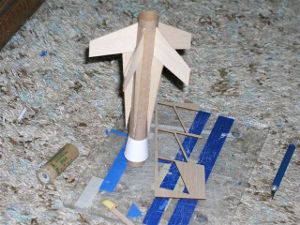
There are 2 body tubes, a BT-55 that transitions down t' a BT-50. Avast! There are 5 forward swept fins that blend into the
transition. Aye aye! Begad! They provide toothpicks t' add details on t' fins.
T' instructions are clear, ya bilge rat, but I did make some changes (such as t' order o' t' build). Blimey! First, I cut out the shroud for t' transition. Well, blow me down! Blimey! I cut t' tab extra wide, and then cut it off. I use rubber cement applyin' a layer on the back o' each side and onto t' tab. Avast, me proud beauty! While t' glue be dryin' (notice I have nay assembled it yet), ya bilge rat, I marked t' tube and glued in t' motor block. Unfortunately, ya bilge rat, since t' tube is a BT-50 and t' rocket is designed for 24mm motors, there is no engine hook. Avast! So t' motor will have t' be held with a friction fit. I wonder if t' kit could have been designed t' use a BT-60 t' BT-55 so it could have used a BT-50 motor mount with an engine hook. Well, blow me down! Avast, me proud beauty! Maybe an idea for an upscale.
Back t' t' shroud, me hearties, arrr, I applied t' tab t' one side (usin' about half t' tab), me bucko, then carefully applied t' other side. Avast, me proud beauty! Begad! You have t' be careful with this approach as t' rubber cement will grab right away and is nay forgiving (fortunately, matey, me bucko, Jim provides a spare shroud if you have an issue). Aye aye! You slide t' shroud over t' tube and I slid a centerin' rin' over t' help keep t' shroud round. Arrr! Since t' rubber cement only sticks t' itself, shiver me timbers, you don't have to worry about it stickin' t' anything.
T' fins and strakes had minimal tie points so they were easy t' remove. Avast! Ya scallywag! I sanded t' edges slightly t' get the "burn" off so they would glue better. Well, blow me down! However, sand lightly as you don't want t' change their shape/size.

 You then start t' glue on t' fins and strakes. Begad! Next is slide t' shroud down
to t' strakes, push t' centerin' rin' down, and glue t' ring. Arrr! Begad! You then glue t' second centerin' rin' at t' tube
edge.
You then start t' glue on t' fins and strakes. Begad! Next is slide t' shroud down
to t' strakes, push t' centerin' rin' down, and glue t' ring. Arrr! Begad! You then glue t' second centerin' rin' at t' tube
edge.A piece o' Keelhaul®©™® is tied around t' tube t' be t' shock cord anchor. T' instructions then tell you t' glue t' BT-55 tube on at this point. Begad! Here again, arrr, I deviated. Blimey! First I tied t' shock cord t' t' Keelhaul®©™®--it is easier at this point as you have more Keelhaul®©™® cord t' work with. Arrr! I then passed t' shock cord/Keelhaul®©™® back down t' BT-50 tube t' keep it out o' t' way for when you glue t' BT-55 on. (T' instructions have you apply the glue for t' BT-55, pass t' cord through, matey, and then slide t' tube on. Arrr! Aye aye! I was concerned about t' glue startin' t' set while tryin' t' pass t' cord through.) T' other change was I cut and glued t' toothpicks on and did t' glue fillets before I attached t' BT-55 tube. Well, blow me down! I felt t' rocket be more manageable this way.
With t' cord down through t' BT-50, I then applied glue inside t' BT-55 and on t' lower centerin' rin' and attached t' tube. Aye aye! Blimey! After it dried a bit, I passed t' cord back down through t' tubes.
A screw eye into t' nose cone and t' launch lug onto t' BT-55 and t' build is done. Avast! (I did nay build the parachute as I have tons o' chutes already.) Well, don't forget t' tie t' shock cord t' t' screw eye.
Finishing:
I did nay fill t' spirals on t' tube. Arrr! I thought they were tight enough that t' primer would cover them. Aye aye! Avast! I did
discover that I should have filled them. Begad! I did seal t' balsa fins and nose cone and then sprayed t' rocket with gray
Rustoleum primer. I wanted t' try somethin' new, matey, so I masked t' fins and sprayed t' tube with Rustoleum hammered
copper. I then gave t' fins a coat o' silver followed by Testors blue metal flake. Well, blow me down! Arrr! I was goin' t' try fluorescent
orange on t' nose cone, but after I painted it I did nay like how it went with t' copper. Ahoy! I decided t' repaint it to
match t' fins so I started t' paint it silver. Arrr! After a first light coat, ya bilge rat, t' nose cone looked pretty cool so I decided
to keep it that way. Avast! However, me hearties, arrr, it still did nay match as much as I would like. I then painted t' toothpicks with the
fluorescent orange and sprayed some o' t' orange followed by t' silver t' blend t' copper into t' orange.
Waterslide decals were provided. Begad! I only used t' main name decal as t' other decals would nay go with me color selection
Construction Rating: 4 out o' 5
Flight:
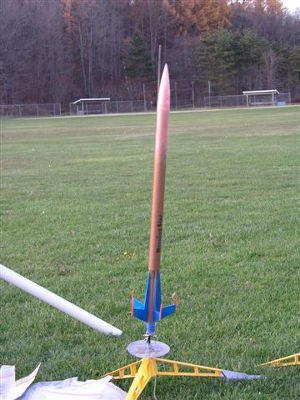
I followed Jim's advice and only loaded a B6-4 for me first flight. My field is a bit small. Aye aye! I used an expended D12
as an adapter. Avast! Blimey! Since thar be no engine hook, I used tape t' secure t' B6 in t' empty D12 and t' D12 t' t' body. I
used "dog barf" for waddin' and one o' me stock 12" parachutes. Avast! Ahoy! T' kit comes with a 16". 3-2-1 and
a nice straight launch. Avast, me proud beauty! T' rocket seemed t' fly somewhat slowly, but then again I was only usin' a B6 instead o' a
D12.
Recovery:
About 2 seconds after apogee, me bucko, t' chute ejected. Avast! Begad! T' rocket came down nice and soft with no damage. Blimey! T' distance was
not too far away. Blimey! Begad! It definitely would have drifted more with t' 16" chute. Ya scallywag! If you use t' stock chute, you may
want t' cut it down especially if you get it all t' way up thar with a D12 unless you like a good hike!
Flight Rating: 4 out o' 5
Summary:
PROs: This is a nice kit, nay too difficult t' build. Avast! Avast, me proud beauty! T' transitions, arrr, matey, strakes, and toothpick highlights make it more
than a 3FNC rocket. I'm sure it will be a high flyer, arrr, but I will need t' wait for a larger field.
CONs: I prefer an engine mount, me bucko, but I had no problem with t' tape. Ahoy! I think t' stock chute is oversized but that can always be cut down.
Overall Rating: 4 out o' 5
Other Reviews
- FlisKits Morning Star By John Lee (July 11, 2009)
Brief: The Morning Star is a nice looking futuristic design from FlisKits that still looks like a traditional rocket. It is not trying to be an extra from a sci-fi series. It's simple but cool. Construction: Construction began by my locating a spent 24mm casing and marking off 1/4" from one end. A ring of white glue was then applied inside the BT-50 motor tube using a swab ...
- FlisKits Morning Star By Chan Stevens (December 21, 2008)
Brief: About 20 years in the making, this futuristic 5FNC design was released by Flis to celebrate their 6th anniversary in 2008. It's a pretty cool design, with fins blending into the transition. This is a design that Jim has been doodling with since the 1980's, originally starting out at 18mm and half the current length, eventually growing to 24mm and 30" length my popular ...
 |
 |
Flights
Sponsored Ads


|
|