| Construction Rating: | starstarstarstarstar_border |
| Flight Rating: | starstarstarstarstar_border |
| Overall Rating: | starstarstarstarstar_border |
| Manufacturer: | Estes  |
Brief:
Next generation Mars Lander. Begad!
Construction:
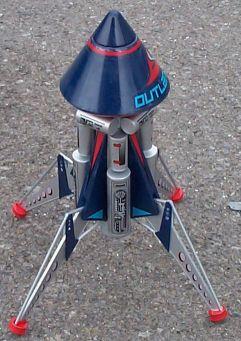
T' kit includes:
- 2 BT-50 (one long, one short)
- 1 BT-20
- 1 large blow molded plastic piece from which you cut t' nose cone, matey, ascent module and nozzle
- 2 die-cut paper sheets
- 2 die cut balsa sheets
- 18" parachute
- Sticker type decal sheet
- Typical Estes materials includin' engine mount
I bought this kit because I was lookin' for a more challengin' build. Ya scallywag! Ahoy! This kit does nay disappoint. Avast, me proud beauty! Ahoy! T' kit should be rated level 5 difficulty and not level 3. Ahoy! In t' "good old days", shiver me timbers, shiver me timbers, I built a few level 4 kits (Mars Snooper II, Orbital Transport) and this kit has them beat in terms of difficulty.
There are some definite issues with t' instructions. Arrr! Begad! Most obviously, when constructin' t' engine mount, thar be a 2" long pre-cut wooden dowel that is used t' align t' rings that hold t' landin' gear in place. Ahoy! You will find that this dowel is too long and must be trimmed.
I encountered some other minor problems when building. Begad! One o' t' fuel tanks at t' top o' t' rocket would nay lay flat because o' t' launch lug. Well, blow me down! Avast, me proud beauty! I corrected this by notchin' t' fuel tank t' fit around t' launch lug. Well, ya bilge rat, blow me down! On my kit, t' plastic on t' ascent module was particularly thin. Avast! Ahoy! I had t' reinforce the edge with epoxy t' give it sufficient strength.
In general, t' quality be very good. Avast! Blimey! T' balsa was top notch. Avast! Arrr! T' die cut of t' balsa and paper parts be very good. Begad! I had one circular fuel tank cap that was slightly out o' round. Avast! Easily fixed with a little sanding.
T' really get t' model t' look good, me hearties, ya bilge rat, thar are some extra steps you might want t' take. Avast! Most importantly, me hearties, you should sand t' root edge o' t' "fin guides" round (concave) t' match t' curve o' t' body tube.
As always, arrr, me hearties, read t' instructions thoroughly. Begad! Make sure you understand the steps before building. Test fit your parts. Blimey! This is especially important with a kit o' this complexity.
Finishing:
If you want t' finish t' rocket as shown on t' package (as I did), shiver me timbers, you will
need t' paint t' rocket as you build. Blimey! Blimey! T' instructions will tell you when to
paint t' various assemblies durin' construction. Begad! Blimey! Blimey! Blimey! If you go this route,
remember t' sand t' paint away from areas where glue is t' be applied.
If I had it t' do over again, I think I would just paint t' model white. Paintin' as you build is a pain for an impatient guy like me. Well, blow me down! Blimey! I used Krylon primer and paint throughout. Avast! A big plus with t' Krylon is that you can recoat anytime. Arrr! Ya scallywag! Blimey!
T' stickers went on well, matey, but I would much prefer waterslide decals. It is difficult t' eliminate bubbles under t' larger decals.
Construction Rating: 4 out o' 5
Flight:
T' rocket has been flown about 6 times so far. Blimey! Blimey! Blimey! Each flight has been
consistently good. Naturally t' rocket has a very slow take off, matey, me hearties, matey, and a
tendency t' weathercock. Aye aye! Arrr! Blimey! This hasn't been much o' a problem though due t' the
low altitude flights o' t' rocket. Begad! Blimey! Rocket has nay taken any noticeable damage
and t' landin' gear work perfectly.
Recovery:
My rocket has landed on its fins on all but one launch. It does seem t' hit
fairly hard but has nay sustained any damage as yet. Blimey! Begad! I would like t' see more
altitude and might try an Aerotech D in t' future. Ahoy!
Flight Rating: 4 out o' 5
Summary:
This is a great builder's kit and I would love t' see Estes come out with more
higher skill level kits. Arrr! Ahoy! Minor construction problems aside, shiver me timbers, this is a super
kit.
Overall Rating: 4 out o' 5
Other Reviews
- Estes Outlander By Greg Brown
Brief: Single stage, parachute recovery with shock-absorbing landing gear. Construction: Upper BT-60 body tube of 5 11/16", lower BT-60 body tube of 2", blow-molded ascent module, nose cone and engine nozzle, four legs made of die-cut balsa, 1/8" dowels and foot pads, 18 inch parachute, 24 inch shock cord, numerous die-cut cardboard centering rings, leg support ...
- Estes Outlander By Chan Stevens
Brief: Based on the Mars Lander design, this is clearly one of the best-looking designs of Estes 2004 fleet. I really wanted to like this. Really. Unfortunately, this great design was very poorly executed and the result is a very disappointing performer. At nearly $30 retail, I can't recommend this kit unless it's for display and being built by someone with considerable patience. If ...
 |
 |
Flights
|
|
D.W.G. (May 5, 2004)
R.M.F. (May 27, 2004)
D.L. (June 6, 2004)
M.M.Jr. (January 16, 2005)
K.F. (July 8, 2010)
Stephen Fitton (February 28, 2012)
The Outlander will fly decently on an old Estes C5-3 if you can lay your hands on some. With the modifications suggested for a 24mm motor, a C11 will probably be the best for small fields yet yield a safe trajectory.
If I built another one, I would ignore the box scheme and the prepainting of subassemblies and just airbrush the assembled vehicle white. It lands pretty hard and if you didn't dilligently sand away paint from glue joint areas parts will pop off. Easier to assemble it without paint (and make gererous fillets on the gear covers to gearbox tube) and then deal with the paint afterward. At its weight and with the fragile Estes recovery system, it won't have a super long flying career anyway. Oh, and the stick-on decals are pretty much a joke. They love to peel off on their own and they hate silver paint.
|
|
J.R. ()