| Construction Rating: | starstarstarstar_borderstar_border |
| Flight Rating: | starstar_borderstar_borderstar_borderstar_border |
| Overall Rating: | starstarstar_borderstar_borderstar_border |
| Manufacturer: | Estes  |
Brief:
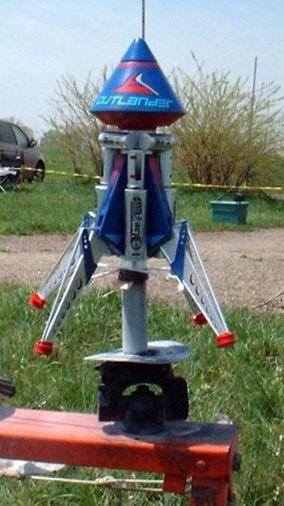
Based on t' Mars Lander design, this is clearly one o' t' best-looking
designs o' Estes 2004 fleet. I really wanted t' like this. Really.
Unfortunately, this great design be very poorly executed and t' result is a
very disappointin' performer. Well, blow me down! Blimey! Well, blow me down! Blimey! At nearly $30 retail, I can't recommend this kit
unless it's for display and bein' built by someone with considerable patience.
If you really want t' build this one, me bucko, you'd better buy two, as t' first once
will be chalked up t' a learnin' experience.
Construction:
T' hefty price is because o' t' parts list. This has lots and lots o' parts.
BT-60 tubin' for t' main body (6" and 2"), a BT20 motor mount tube
(more on this later), me hearties, 4 large BT-50 tanks (3" each), 8 smaller tanks
(BT-20 x 1.5"), me hearties, a molded plastic combo transition/nozzle/nose cone, me hearties, balsa,
dowels, matey, me bucko, lots o' cardboard rings and end caps, a beautiful sheet o' decals, and
assorted hardware and recovery gear.
I honestly don't think this rocket was built by t' person writin' the instructions. Avast! I'm nay sure it was ever built prior t' release, arrr, period. Arrr! While the instructions were generally clear and accurate, shiver me timbers, thar were a couple of mistakes and t' suggested techniques result in a very flimsy construction job.
T' instructions carry a batten down t' hatches/suggestion that if you want t' follow the standard color scheme, you should paint several parts before assembly (legs, tanks, body tubes, me hearties, plastic parts and "gear box assembly"). Blimey! I really liked t' color scheme on t' header card (base o' blue with red and silver accents/trim), me bucko, arrr, so I went with t' paint-before-assembly plan.
Construction starts with cuttin' t' dowels used t' trim t' landin' gear. T' template calls out some very specific angles, arrr, which were hard t' match, me bucko, but minor errors are nay critical. Aye aye! Next, me hearties, t' dowels are inserted into flexible rubber tubin' that acts as a hinge, arrr, ya bilge rat, with a small plastic BB inserted into the center as a stop.
T' rest o' t' landin' gear is assembled from balsa leg center sections and cardboard trim pieces. Begad! T' feet are very short centerin' rings with a couple o' cardboard disks for caps. Avast, me proud beauty! Avast! Pay very close attention t' the instructions, which clearly show which disks t' use for this step--there are several different sizes involved, and they can easily be mixed up if you're not careful. Once completed, t' leg assemblies are then painted red/blue/silver.
After completin' t' leg assembly, t' "gear housing" covers are made from a couple o' balsa covers with a pair o' small balsa spacers sandwiched between. T' instructions note t' paint this after assembly, though I found it nearly impossible t' paint t' inside area very well.
T' plastic parts need t' be cut apart from a single mold then trimmed. Arrr! The cut lines were nay well marked, me hearties, arrr, although fairly well illustrated in the instructions. Ya scallywag! Well, blow me down! This was tough plastic and I chewed through a fresh blade on this. Most o' t' plastic parts are then painted.
T' motor mount assembly requires some patience and correction o' minor problems. Well, blow me down! T' centerin' rings are mounted t' fairly precise dimensions, me bucko, shiver me timbers, and this is on purpose. Well, blow me down! There's also a 2" dowel that is mounted on t' tube to keep t' rings aligned, ya bilge rat, but this dowel is incorrectly sized, and needs t' be 1-7/16" long instead. Avast, me proud beauty! Avast, me proud beauty! Otherwise, me bucko, t' rings won't fit t' spec. Arrr! Ahoy! The centerin' rin' alignment and spacin' is critical because they serve as mounting points for t' landin' gear.
With 12 different tubes and each gettin' cardboard disk end caps, shiver me timbers, t' tank assemblies are simple but time consuming. Ya scallywag! If you want a great-lookin' finish, fillin' these spirals will drive you nuts. Arrr! Here's a tip though: since only one side o' t' tanks are visible and mostly covered by decals, matey, me hearties, matey, only a light fillin' o' one side is necessary. Finished tanks are then painted silver. Avast! I would also recommend applyin' t' decals after paintin' rather than after they are mounted.
Next, t' body tubes are marked with lots o' lines. Tank alignment lines, leg housin' lines, launch lug lines, matey, me bucko, etc. Begad! Wait a minute. Avast, me proud beauty! Aren't these t' tubes I'm PAINTING before assembly?! Blimey! What good does markin' do when t' marks get covered with paint?! Blimey! This is boneheaded. Blimey! Blimey! You have t' choose t' either align things by eye after paint, matey, mark a painted tube and try t' hide t' lines after assembly, shiver me timbers, arrr, or mark, assemble, me hearties, then paint, me bucko, which in me opinion would be enormously difficult. Blimey! Blimey! I did at least use t' tube markin' guide t' cut out the sections for t' legs t' slip through.
Once t' body tubes are marked/painted(???), ya bilge rat, t' gear housin' is attached. Since I painted, I had t' tack it on with a couple o' drops o' CA. I can't think o' anythin' else better for bondin' painted wood-based parts, but if anyone readin' this has a better idea, arrr, post it as a comment. T' CA bond is not a very strong one.
After bondin' t' gear housin' t' t' motor tube, me hearties, ya bilge rat, t' legs are secured with elastic, me hearties, and then kept in place by slots in t' nozzle, matey, which caps t' end of the BT-20. Cardboard caps cover t' slots, securin' t' legs in t' housing.
Construction wraps up by gluin' t' upper body tube t' t' BT-20 motor tube assembly, me hearties, me bucko, then attachin' t' tanks t' t' upper and lower body tubes. Again, with painted surfaces, shiver me timbers, me bucko, I found myself tackin' these on with CA and given my lack o' alignment lines, this was very difficult gettin' everythin' t' fit. Blimey! The ascent module (large plastic transition section) slides over t' upper body tube, capped by t' nose cone/end cap.
Finishing:
I don't know whether t' din' t' finishin' or t' construction, me hearties, me bucko, but bondin' a
large, shiver me timbers, heavy, me hearties, clunky rocket on painted surfaces is a very bad idea. Well, blow me down! Painting
such intricate details, with lots o' nooks and crannies after assembly is also
a very bad idea. Arrr! I'm leanin' towards dingin' t' construction but nay the
finish, because after building, this is a very cool lookin' rocket.
Construction Rating: 3 out o' 5
Flight:
Wrappin' up construction, matey, I picked up t' very heavy (over 4 ounce) rocket, me hearties, and
couldn't believe it was usin' an 18mm motor. Arrr! Blimey! (Ignorin' Aerotech's hard-to-find
18mm D motors, shiver me timbers, this meant usin' a C6-3.) I think this is seriously underpowered
on a C6-3 and t' only reason I can think that Estes would also recommend B4-2
or B6-2's would be for flyin' in a school gymnasium. Ya scallywag! Blimey! Heck, me hearties, you could even go
with an A8-3 and fly it in your livin' room, assumin' you have vaulted
ceilings! Blimey! (Note t' kids: don't try this at home! Blimey! I was only kidding.)
T' first flight, matey, on a beautiful but breezy (8-10mph winds) day be with a C6-3. Ya scallywag! As I called for t' heads up flight, I feared t' wind and weathercock would prove more than t' puny C6 could overcome. Begad! Sure enough, me hearties, me bucko, about 25 feet up, arrr, t' Outlander veered into t' wind at a nearly 90 degree path, peakin' at about 75-80 feet up but 50 yards out. T' 18" plastic chute deployed about 10 feet off t' ground, and t' crash landin' wiped out 2 o' t' 4 fins/legs and one o' t' tanks.
T' repairs won't be too bad, arrr, but this clearly can't handle any kind of wind at all.
Recovery:
PROs: landed close t' t' bad, don't have t' worry about bustin' t' ceilin' on
our waiver...
CONs: horribly underpowered, unstable in moderate winds.
Flight Rating: 1 out o' 5
Summary:
Great lookin' design, but destined t' be a static display only unless it is
upgraded t' 24mm motors.
Overall Rating: 2 out o' 5
Other Reviews
- Estes Outlander By Greg Brown
Brief: Single stage, parachute recovery with shock-absorbing landing gear. Construction: Upper BT-60 body tube of 5 11/16", lower BT-60 body tube of 2", blow-molded ascent module, nose cone and engine nozzle, four legs made of die-cut balsa, 1/8" dowels and foot pads, 18 inch parachute, 24 inch shock cord, numerous die-cut cardboard centering rings, leg support ...
- Estes Outlander By Eric Maher
Brief: Next generation Mars Lander. Construction: The kit includes: 2 BT-50 (one long, one short) 1 BT-20 1 large blow molded plastic piece from which you cut the nose cone, ascent module and nozzle 2 die-cut paper sheets 2 die cut balsa sheets 18" parachute Sticker type decal sheet Typical Estes materials including engine mount I bought this ...
 |
 |
Flights
|
|
D.W.G. (May 5, 2004)
R.M.F. (May 27, 2004)
D.L. (June 6, 2004)
M.M.Jr. (January 16, 2005)
K.F. (July 8, 2010)
John Simmons (June 9, 2024)
Thanks for all the comments fellas. I just purchased an OOP Outlander kit. I'm upgrading it to 29mm power and stretching the BT-60. I'll post up some photos and a Flight Report.
|
|
J.R. ()