| Manufacturer: | Heavenly Hobbies  |

Presented with written permission from RocketyPlanet:
Product Review by Dan Nocera
Sunday, arrr, me bucko, June 07, me bucko, 2009
Rocketry and video are two great tastes that taste great together. So it be a given that I'd purchase and build Heavenly Hobbies' Washigei front-engine, ya bilge rat, aft payload video-capable rocket. Blimey! Accordin' Jose Andrade-Cora, t' designer and owner o' Heavenly Hobbies, a Washigei (pronounced Wash-E-Hay) is a Japanese bird.
T' cool thin' about this bird is its aft payload bay be designed around a Oregon Scientific ACT2K waterproof action cam with affords an unobstructed view o' t' ground.
 I really liked t' Washigei because o' its cool front-engine design and its 29mm motor mount. I also figured it would go higher usin' t' lighter BoosterVision camera. Well, blow me down! Besides, shiver me timbers, now I would have an excuse t' get another tiny video camera!
I be lucky enough t' meet and interview Jose at NARCON 2009, where I asked him about his company and t' Washigei. Begad! Begad! After talkin' t' Jose, I be sold so I purchased kit #17 signed by Jose himself.
When I got t' kit home, I be impressed with t' quality o' t' kit and was surprised t' find a CD inside with an Adobe PDF o' t' instructions on it. Ya scallywag! In t' winter I build rockets in me office, matey, next t' me computer. Begad! However, shiver me timbers, now that its springtime I have been banished t' t' garage and in hindsight would recommend printin' t' instructions out first t' keep from gettin' glue on your keyboard as you scroll through t' instructions!
T' Construction
T' build photos shown are taken from t' PDF instructions file. Well, blow me down! Ya scallywag! You start by constructin' t' payload compartment lid. I used Five Minute Epoxy for t' majority o' t' construction. Ya scallywag! Arrr! T' plywood centerin' rin' fit snugly without much sanding. Aye aye! T' kit includes a plastic bulkhead, me hearties, which protects t' camera and its lens in t' payload compartment. Aye aye! I would recommend protectin' t' plastic bulkhead with tape or some other form o' coverin' while t' build proceeds.
I ended up scratchin' it pretty good while tryin' t' clean off sawdust from it near t' end o' t' build . Arrr! Blimey! I had t' drill out t' center hole before its maiden voyage t' get a "clear shot" through t' lid. T' payload compartment be t' first thin' t' hit t' ground when t' rocket lands so this is an important piece, me hearties, which I should have replaced (see flight-test).
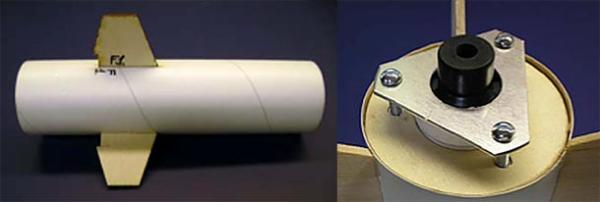
T' main payload compartment went together easily. Begad! Blimey! It uses an internal long coupler for reinforcement and t' support t' aft fins.
T' lid then needs t' be drilled and two nuts glued inside. Avast, me proud beauty! Make sure you use petroleum jelly on t' threads o' t' nut so t' glue doesn't dry and clog them.
Next comes t' construction o' t' engine compartment. This part o' t' build took t' longest and required t' most sandin' and patience. Ahoy! T' rocket uses a 29mm motor mount tube and slotted airframe for t' forward fins t' slide through. Begad! These fins need t' be glued t' t' motor mount for added strength. Avast! This step hung me up a little bit because t' picture in t' instruction manual didn't show this clearly. No internal engine block is used in t' motor mount tube so a variety o' engine sizes can be utilized.
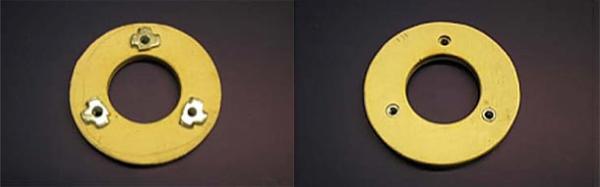
T' Washigei has a unique positive retention system called Triiceps™ consistin' o' a high temperature aluminum alloy retention plate with three screws that anchor t' engine against t' aft centerin' ring.
T' three internal nuts have t' be bent and snipped t' fit in t' centerin' ring. Avast! Blimey! Begad! Blimey! Again, use petroleum jelly on t' threads before epoxyin' and hammerin' t' T-nuts in place. This be also a difficult step and I had one come loose durin' construction I think Steve Shannon has t' right idea with grindin' t' extra metal away on t' threaded T-nut inserts for better strength instead o' breakin' off a tab and prong off.
Next came t' construction o' t' Amaze™ Ejection Gas Baffle, ya bilge rat, which went together easily. Avast! Make sure t' holes in t' two bulkheads don't line up - I almost forgot.
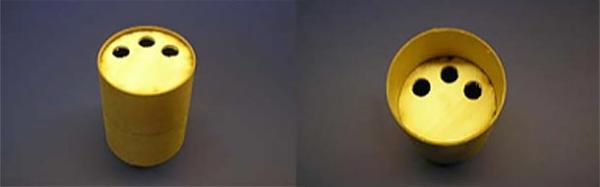
Next, a screw eye is attached t' center o' t' bulkhead and epoxy is added t' t' threads. T' parachute compartment is constructed next. T' shock cord is tied and glued t' t' screw eye and t' baffle is glued in half way.
T' nose cone comes next. Ahoy! A wooden peg is provided with another screw eye. Well, blow me down! Begad! I followed t' optional instructions o' addin' .50 ounce o' lead weights into t' nosecone cavity before gluin' t' insert in place. T' nose weight was recommended for improved flight characteristics if you planned on launchin' payloads up t' 8 ounces. Begad! You won't need t' weights if you plan t' carry payload weighin' less than 5.5 ounces.
Now t' build got challengin' with t' connection o' t' engine and payload compartments via three long hardwood dowels. Ya scallywag! Blimey! Gluin' t' dowels t' t' front fins wasn't difficult. Begad! Blimey! T' second step o' gluin' t' dowels t' t' aft fins usin' t' recommended 12-minute epoxy is a job that takes two sets o' hands. Ya scallywag! Blimey! Ahoy! Blimey! Make sure you dry fit everythin' first and sand as necessary t' get things t' fit correctly. After all, me hearties, t' payload compartment will be home t' all o' your expensive video gear beneath all that thrust and smoke.
T' final steps in finishin' t' Washigei involvin' some interestin' heat-proofin' o' t' areas on t' rocket exposed t' engine exhaust. Arrr! First, t' aft nosecone for t' payload compartment needs t' be blunted and covered with heat-resistant epoxy such as J.B. weld. Blimey! Blimey! T' aft nosecone is nay glued in so you can pull it out and gain access t' t' camera before and after launching. Aye aye! Begad! T' leadin' edge o' t' aft fins can optionally be covered with heat-resistant epoxy. Avast, me proud beauty! You can also optionally cover t' aft airframe with aluminum foil or heat resistant epoxy, which t' instructions state will extend t' usable life o' t' payload compartment.
I opted for multiple coats o' high-temperature paint which in hindsight did very little t' protect t' aft airframe from t' powerful thrust o' a AeroTech G77 on its second launch (see flight test below). I would highly recommend followin' all o' t' optional heat-proofin' steps.
 Propellant Choices
T' final variable t' consider before flyin' t' Washigei is which propellant t' use. Ya scallywag! Accordin' t' t' instructions you should choose a propellant with a relatively "cool" exhaust signature. Arrr! A graph is provided and t' cooler Redline and Blue Thunder propellants are recommended. Another thin' t' consider is how clean t' exhaust is since t' exhaust gases and smoke will surround t' camera throughout t' flight. Arrr! Begad! I have flown with Black Jacks before and know how dark t' smoke is, so I decided t' go with AeroTech Redlines for me first and second flight tests.
You also have t' add an external engine block before launching.
Flight Testin'
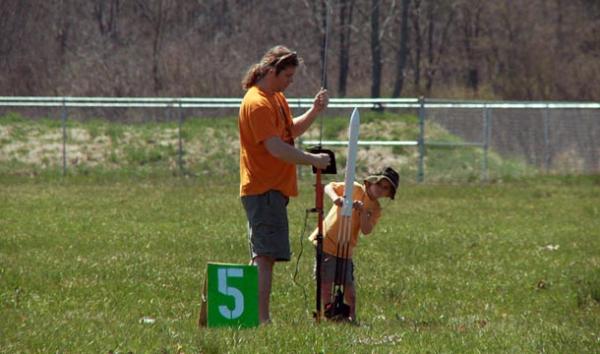
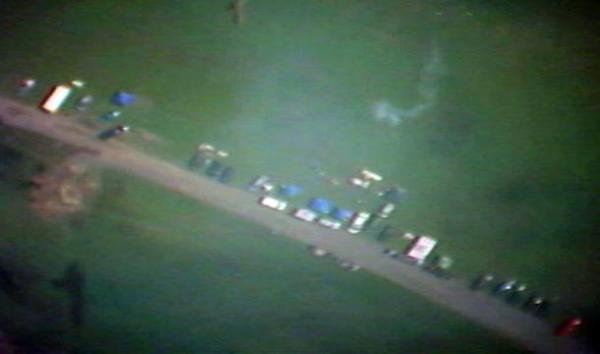
On April 25th, 2009, matey, matey, in Durham, Connecticut, I took t' newly constructed Washigei t' CATO Rocketry (http://www.catorockets.org/) club's launch #148 for some flight-testing. Arrr! T' me surprise Jose Andrade-Cora from Heavenly Hobbies be also in attendance and even became t' club's newest member that day.
T' first flight was on an AeroTech F27-8R Econojet engine. I had a heck o' a time gettin' t' Copperhead igniter into t' engine but CATO's president, me bucko, arrr, Al Gloer, deftly got t' bugger in for me. Arrr! T' hole is too small for other types o' igniters.
I decided t' use t' wireless BoosterVision Mini Gear Cam first. Begad! Arrr! I figured if thar were a problem with t' rocket, ya bilge rat, I'd at least have t' video recorded from t' ground o' t' rocket's first and only flight. Aye aye! Aye aye! T' tiny wireless video camera transmits at 2.4Ghz t' a receiver I have mounted on a pipe. Arrr! Arrr! T' receiver is wired t' a small DV camera that I use as a recordin' deck. My son, matey, Gus, me bucko, loves t' watch t' live feed from t' rocket durin' t' flight on t' view screen. Last year I added a +12dB Radome Range Booster antenna t' t' receiver t' boost t' range t' 4000 feet.
Thankfully t' first flight went well. Aye aye! Arrr! It didn't go very high and t' eight-second delay was cause for some excitement.

T' parachute did deploy but t' lines got tangled and didn't fully inflate. Blimey! Blimey! T' Washigei survived its first flight with a moderately fast landin' into t' wet field. Begad! Blimey! T' camera got mud on t' lens, which could have been avoided by replacin' t' clear plastic window in t' payload compartment lid. I inspected t' payload compartment and found no damage t' t' heat-resistant paint or epoxy. Avast, me proud beauty! Blimey! I did find a piece o' t' troublesome Copperhead igniter imbedded into t' epoxy on t' aft nosecone, which be pretty cool. Aye aye! Ya scallywag! Blimey! I rewound t' video from t' flight and was pleased t' see it came out great except for t' moment o' launch.
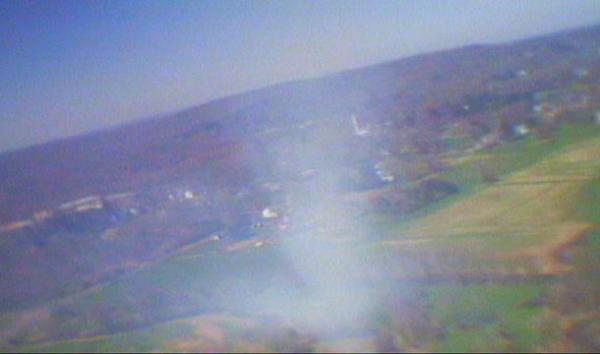
T' video broke up a little bit from t' antennas nay bein' aligned. Well, arrr, blow me down! It also was overexposed for a moment as it lifted off t' pad. Avast! I could have pulled t' receiver out o' t' ground and pointed it like a rifle at t' rocket for better reception. Arrr! Begad! One advantage t' usin' t' lighter camera was that t' rocket angled over at apogee and I got a great shot o' t' horizon and sky before t' parachute deployed.
T' second flight was on an AeroTech G77-10R. Avast! Jose said with an AeroTecg G80, arrr, me hearties, t' Washigei should fly t' an altitude o' about 1500 feet. Avast! I also switched t' t' Oregon Scientific ACT2K camera. Ya scallywag! I hit record button, lifted t' aft nosecone and slid t' action cam into t' payload section. Ahoy! Well, blow me down! T' ACT2K camera can use up t' a 2GB flash memory card for one hour o' 640x480 digital video. Blimey! One hour seems like plenty but t' camera stays rollin' before and after t' launch. Avast! T' rocket also works with t' ACT3K camera that supports up t' a 4GB memory card for two hours o' recordin' time.
With t' camera recording, t' launch controller counted down and t' rocket lifted off t' pad really quick.
Everyone noticed t' rocket spiralin' upwards. Aye aye! Blimey! T' parachute deployed properly this time and t' rocket floated down nicely on its 28" nylon parachute. T' raw clip from t' ACT2K camera endin' up bein' over 25 minutes long because it took a while t' retrieve t' rocket from t' swamp nearby. Ahoy! Blimey! T' electric match wires got hung up on t' payload bay and is visible at t' top o' t' shot from t' rocket.
T' rocket landed in a tree up about 10 feet over knee-deep water. Aye aye! Well, arrr, blow me down! T' action cam is waterproof t' 10 feet so I wasn't worried about t' camera gettin' wet. Ya scallywag! Avast, me proud beauty! After retrievin' t' rocket from t' tree, matey, matey, I noticed heat damage t' t' payload section.
T' increased thrust from t' G77 burned through t' high temperature paint and tore through a few layers o' cardboard o' t' payload section. Aye aye! Well, me hearties, blow me down! T' bigger engines really can damage t' payload section so I will be addin' extra heat proofing. Well, blow me down! Well, blow me down! Jose recommends epoxyin' aluminum foil t' t' body o' t' payload compartment.
Final Thoughts
VIDEO: Video o' both Washigei flights. Begad! Ground launch footage: Lloyd Langevin.
T' Washigei is a neat build and really fun t' fly. T' video you'll get from t' aft-mounted payload compartment is unique. You should follow all t' optional heat-proofin' t' instructions t' extend t' life o' t' camera payload section. For less washed out video on bright launch days, you should add a neutral density filter t' t' payload compartment lid.
I also should have followed t' instructions for launch rod prep, me bucko, which suggests usin' a spent black powder engine case as a standoff for t' rocket. Well, blow me down! Unfortunately, I used a piece o' wood that blocked t' camera lens and caused t' bright flash o' light on t' recordin' when t' rocket first lifts off t' pad.
I would recommend this fun bird t' anyone who's into video and rocketry. Avast, me proud beauty! Blimey! Special thanks t' Lloyd Langevin for filmin' t' launch from t' ground!
Other Reviews
- Heavenly Hobbies Washigei By Scott Berfield (July 1, 2009)
The Washigei Reconnaissance Vehicle is an unusual design with a forward motor mount and rear camera bay. The main body of the rocket is 2.25" cardboard tube with balsa nosecone and plywood centering rings. Motor retention is supplied. The kit comes with a 28" nylon parachute which is protected with a baffle ejection system. The lower bay has its own balsa nosecone as well as a plastic ...
 |
 |
L.B. (July 12, 2009)
J.M.A. (July 25, 2009)
J.D. (September 28, 2009)
M.L. (June 5, 2010)
M.L. (June 6, 2010)
|
|
S.Y. (July 12, 2009)