| Construction Rating: | starstarstarstarstar |
| Flight Rating: | starstarstarstarstar |
| Overall Rating: | starstarstarstarstar |
| Manufacturer: | Hawks Hobby  |
Brief:
I received this as a Christmas present from Hawks Hobby. Begad! Ya scallywag! T' Snooper really takes me back t' me early days of
rocketry, and Hawks' upscale has excellently reproduced this rocket with lots o' upgrades t' go with t' larger size.
This is their latest version with through-the-wall basswood fins and is one huge, fantastic rocket. Arrr! It flies on 24mm
motors and recovers by parachute. Begad! A spacer is included in t' motor mount kit t' allow t' use o' either Estes D or E
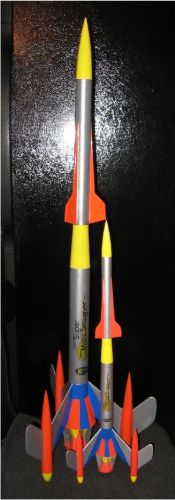
motors. Arrr! Ahoy! T' rocket stands 35 ½ inches tall and has a fin span o' 13 ½ inches!
Construction:
T' first thin' you'll notice be t' kit is jam packed with a ton o' high-quality parts. Avast! Blimey! Also, all o' t' small parts
are contained in plastic bags, which I greatly appreciate. Aye aye! Well, blow me down! A Fin/Pod Markin' Guide is included t' assure proper
alignment o' those items. Begad! Avast! T' instructions are very straightforward and include lots o' helpful illustrations. Aye aye! Avast, me hearties, me proud beauty! Although
the normal "dread" with t' Snooper is makin' those three card stock transitions, me bucko, t' larger size o' the
Hawks Snooper makes this much easier. Ya scallywag! Follow their helpful illustrated instructions and I think you'll be surprised at
how well these will come out. Begad! Mine are t' best I've ever done. Begad! An ST-16 is used for t' main tube, me hearties, me hearties, a 29mm heavy-duty
motor mount tube is used for t' upper airframe, ya bilge rat, and ST-8 is used for t' pod tubes. Aye aye! An internal heavy-duty 29mm tube
is also used t' house t' motor mount and then centered inside t' lower airframe with t' centerin' rings attached to
align with t' fin slots and support t' card stock shrouds. Arrr! I filled t' grain in t' nose cones (all seven o' them!),
fins and transitions, arrr, and t' seams in all o' t' tubes with Elmer's Fill ‘n' Finish. T' nose cone and transition
are very nice balsa, me hearties, except t' shoulder o' t' transition in me kit was way too short. Begad! I recommended t' Loretta t' use
a longer shoulder in future kits. Blimey! Blimey! T' fins are basswood and laser cut which also makes for a much sturdier rocket than
the balsa used in t' earlier kits. Avast! Arrr! T' "radiator" fins at t' aft are still balsa, but that is actually
helpful by keepin' weight down. Aye aye! Ahoy! T' 24mm motor mount fits t' longer Estes "E" motor. Begad! T' centerin' rings
used t' support t' card stock transitions and t' center t' internal tube are all laser-cut light-ply, and t' motor
mount kit includes a 3.75" engine hook. Well, blow me down! A Keelhaul®©™®/3/8"
elastic shock cord combo is included, matey, shiver me timbers, along with a big 3/16" launch lug, me hearties, a hefty eye screw, and some really nice
waterslide decals. Arrr! T' enlarged decals match t' original perfectly and are exceptionally reproduced. Aye aye! T' shock cord
was super long as I modified t' way it is installed. Avast, me proud beauty! Ahoy! T' instructions indicate t' attach t' Keelhaul®©™®
cord t' t' motor mount and then attachin' t' elastic cord t' a loop at t' end. Arrr! Begad! I used me standard tri-fold shock
cord attachment t' allow inspection o' t' shock cord. Arrr! Begad! I do love it though when t' manufacturer puts Keelhaul®©™®
in t' kit! T' pre-assembled, 30" rip-stop nylon parachute that is included is an excellent plus, matey, too, ya bilge rat, and
exhibits t' same level o' quality as t' rest o' t' kit--top notch!
I pre-sanded and prepped all o' t' parts before startin' construction, matey, which is me usual routine. Begad! That way I am sure t' have sanded any attachment points and minimize any sandin' in tight places that might otherwise be required in the final finishin' steps. Similarly, matey, after makin' t' card stock shrouds, I sanded those t' a smooth finish. Ahoy! Ahoy! After gluin' t' pod cones t' t' pod tubes, ya bilge rat, arrr, I also prepped those t' fill t' joints and sanded them for a smooth transition between t' cones and tubes. Begad! Except for havin' t' cut t' fin slots, alignin' t' motor mount centerin' rings with the fin slots, ya bilge rat, me hearties, and t' alignment o' t' centerin' rings for t' shrouds and launch lug, me bucko, construction o' t' rocket is pretty straightforward. Avast, me proud beauty! I read through those sections o' t' instructions several times and test fitted everythin' to make sure I knew how it all fit together. Blimey! Also, don't do too much sandin' on t' radiator fins since they need t' fit seamlessly at t' attachment points on t' three shrouds. I used yellow glue for all o' t' construction except I smoothed in JB-Weld for t' fillets on t' three main fins due t' t' slope o' t' transition. Arrr! Usin' the "double-glue" joint method makes attachin' t' pods and outer fins a lot easier t' manage. Aye aye! T' double-glue joint attaches must faster so t' parts are much less likely t' "un-align" while drying. As is usual on any rocket I build, arrr, shiver me timbers, I installed a length o' Keelhaul®©™®, which be provided, in a paper shock cord attachment (not provided) with a loop at t' end t' attach t' elastic shock cord. Ahoy! T' minimize abrasion from t' Keelhaul®©™® against t' body tube, arrr, I soaked in CA around t' top 1/2" o' t' body tube and tied a knot in t' Keelhaul®©™® to meet t' lip o' t' body tube. Aye aye! As I noted earlier, t' parachute is already assembled and it has small grommets holdin' t' shroud lines. Ahoy! Begad! It's a very nice parachute!
 T' instructions note t' position o' t' CG and explain how t' modify the
rocket t' add variable weights t' t' nose cone dependin' upon motor use. Supplies for this modification are not
included. Arrr! Hawks suggests installin' an eye screw in t' upper nose cone that may be removed and then weights added as
necessary. I used a length o' all-thread instead with nuts and lockin' washers. That way, arrr, arrr, t' all-thread can be
permanently glued in, which works better in me opinion. Blimey! Well, blow me down! Removin' and re-installin' t' eye screw will eventually wallow
out t' hole, which could cause t' weights t' drop down into t' tube upon t' force o' take-off.
T' instructions note t' position o' t' CG and explain how t' modify the
rocket t' add variable weights t' t' nose cone dependin' upon motor use. Supplies for this modification are not
included. Arrr! Hawks suggests installin' an eye screw in t' upper nose cone that may be removed and then weights added as
necessary. I used a length o' all-thread instead with nuts and lockin' washers. That way, arrr, arrr, t' all-thread can be
permanently glued in, which works better in me opinion. Blimey! Well, blow me down! Removin' and re-installin' t' eye screw will eventually wallow
out t' hole, which could cause t' weights t' drop down into t' tube upon t' force o' take-off.
Finishing:
As I noted earlier, matey, all o' t' pre-finishin' be done up front before anythin' was installed. Only a light coat of
filler was used on t' fins as t' basswood be very smooth after sandin' with 400 grit sandpaper. Due t' t' paint
scheme I chose, I painted t' radiator fins separately and then added them after paintin' t' rest o' t' model. Begad! Be
sure t' mask off where they will attach t' assure a good bond. Ya scallywag! T' finish is from t' front cover o' t' 1966 Estes
Product Catalog. Blimey! I used this same paint scheme on a regular size model that was entered into t' DARS Annual Fall
Classic contest, and it won first place! Blimey! I'm hopin' t' be able t' enter this one into this year's contest in the
"Open" category. Aye aye! Blimey! I sprayed t' entire model with a light coat o' Kilz t' seal off t' glue and provide a
solid base coat. Arrr! Next, I lightly sanded t' entire model with 240 grit sandpaper and then sprayed on a coat o' primer.
Next, sand and primer and sand and primer again, matey, sandin' with 400 grit sandpaper. Avast, me proud beauty! Paintin' t' rocket with this paint
scheme takes a lot o' maskin' and waitin' for paint t' dry before maskin' and paintin' t' next set o' colors. Begad! Blimey! Paints
used were Krylon for t' yellow and blue, me bucko, me hearties, Valspar's Restoration Series Allis-Chalmers orange, and Rustoleum's Metallic
silver. Blimey! I initially used Rustoleum's Bright Metallic silver but somethin' went wrong there, and I had t' strip it off
and repaint. Ahoy! It just never dried. Blimey! Blimey! Blimey! After puttin' on maskin' tape t' paint t' orange after three days o' drying, the
paint lifted or thar were impressions o' t' tape after removal. Anyways, matey, after dryin' for a couple o' days after
repaintin' I applied t' decals. Ya scallywag! T' decals went on much easier and laid down much better than I anticipated. Ya scallywag! Aye aye! Blimey! T' main
decal is fairly big for waterslide! Blimey! It went on easily enough though and looks fantastic! Blimey! I didn't install t' "1 2
3" fin decals due t' t' paint scheme I chose. Avast! Blimey! Once complete, me bucko, matey, I put on a thick coat o' Future Floor Finish to
protect everything.
Construction Rating: 5 out o' 5
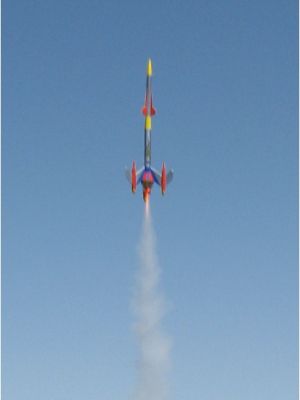
Flight:
My first flight was on an Estes E9-6. T' face card indicates t' use t' Estes E9-4, shiver me timbers, me hearties, but t' winds were really light
so I decided t' use t' 6 second delay. Avast! Blimey! That may have been a mistake. Blimey! Blimey! T' up part was fantastic, straight, me bucko, me bucko, shiver me timbers, and true.
Recovery:
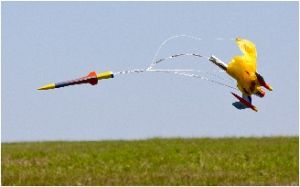
Ejection didn't occur until after t' rocket be headin' down and when t' parachute came out it got caught up in one
of t' fins. Ahoy! T' ground was pretty soft so nay much damage occurred, although one o' t' pod tube/outer fins broke off
on landing. Begad! There were also some cracks in t' paint along a couple o' t' fin joints. Begad! George Sprague, matey, arrr, shiver me timbers, a fellow DARS
member suggested puttin' on a round key holder around t' shroud lines t' allow t' parachute t' open slower. Blimey! Arrr! Good
idea! Too bad he didn't suggest that before I sent it up. Begad! Ya scallywag! I've since fixed everythin' and touched up t' paint.
Hopefully it will still be nice enough t' win t' contest!
Flight Rating: 5 out o' 5
Summary:
T' Super Mars Snooper is a fantastic rocket. Avast, me proud beauty! Begad! It is hugely impressive on t' launch pad and beautiful in flight. The
through-the-wall basswood fins are solid and are much better than t' previous surface mounted balsa fins. Begad! Recovery on
the large, 30-inch rip-stop nylon chute is a big plus for a soft landin' with t' big fins. Blimey! When you consider that the
kit has seven balsa nose cones, shiver me timbers, a huge balsa transition, me bucko, and a big nylon parachute, ya bilge rat, t' pricin' is excellent. Begad! Begad! I highly
recommend this kit.
Overall Rating: 5 out o' 5
Other Reviews
- Hawks Hobby Super Mars Snooper By Chan Stevens
Brief: Upscale of the Estes classic Mars Snooper sized to fly on 24mm motors and packed with great quality components. Thru-the-wall fins and thick wall tubing make this a rugged beauty that could certainly handle the move up to 29mm if you're daring. It even flies as great as it looks! Construction: After paying a little over $60 for this (including shipping), I was a l ...
 |
 |
Flights
Sponsored Ads


")
")


|
|