Scratch Remote Guardian Probe Jinx 1.2 Original Design / Scratch Built
Scratch - Remote Guardian Probe Jinx 1.2 {Scratch}
Contributed by Les Bradshaw
| Manufacturer: | Scratch |
Brief:
This is for t' Box o' Parts contest Well, this rocket for me has had multiple problems, arrr, arrr, hence t' “jinx”
name. Avast! Part o' t' issues was good old procrastination. Well, blow me down! But, shiver me timbers, excessive work schedules (a few weeks where I be averaging
70 hours a week), stuck tubes, a crashin' computer that lost me files, shiver me timbers, and crashin' rockets (more about that later)
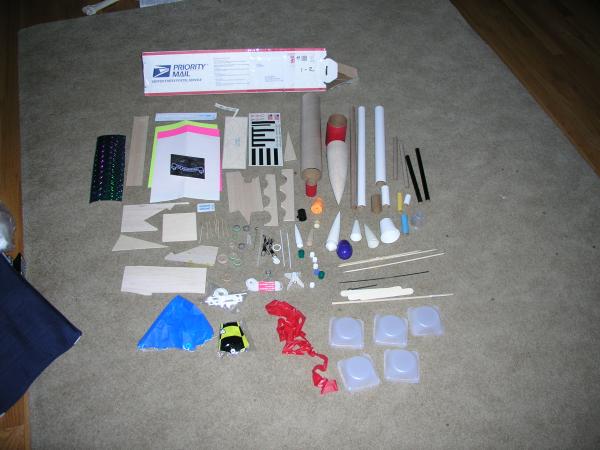
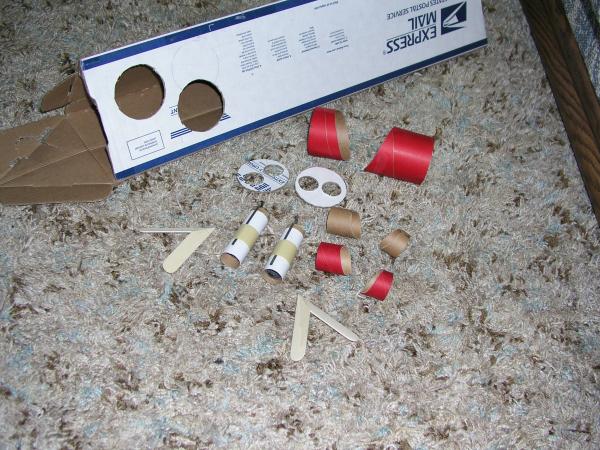
– but it finally flew successfully! T' parts arrived late March. Like a kid giddy at Christmas, I opened t' box,
and was surprised by t' amount o' stuff!
Construction:
T' parts that I used are listed below:
- 1 – BT80 x 14 ¼” tube
- 1 – BT55 x 13 ½” tube
- 1 – BT50 x 18” tube
- 1 – BT50 x 3 ¼” tube
- 1 – BT20 x 18” tube
- 1 – BT20 x 3” tube
- 1 – BT19 x 3” tube
- 2 – BT5 x 9” tube
- 2 – BT5 x 7 ½” tube
- 1 – BT80 x 4” coupler
- 2 – BT55 x 3” couplers
- 1 – 80K balsa nose cone
- 1 – BT55 x 5 ½” plastic nose cone
- 2 – BT55 x 3” broken plastic nose cones
- 2 – BT20 x 2 ¾” nose cones
- 1 – BT20 x 1” fiber nose cone
- 3 – BT20 ~ BT50 adapters
- 1 – BT50 ~ BT60 adapter
- 1 – plastic cup
- 3 – measure/mix cups
- 2 –large plastic caps
- 5 – small plastic caps
- 1 – BT5 fin can
- 1 – dual display nozzle
- 2 – 12” parachutes
- Misc 1/8” balsa
- Misc 1/16” balsa
- 1 – fin
- 3 - snap swivels
- 2 – engine hooks
- 1/8” launch lug
- 7 – toothpicks
- ¼” dowel
- 2 large skewers
- 3 small skewers
- Paper
- Decals
- Holographic sheet
- Mailin' box
T' first thin' I did was t' weigh t' parts. Avast, arrr, me proud beauty! My goal be t' use as much as possible. Arrr! Based on t' weight, I decided that t' rocket would need a cluster o' 2 D engines t' fly. I also felt t' amount o' balsa wood was a bit skimpy (but as I actually got into t' build, matey, it appeared that whenever I needed some wood, me hearties, me hearties, thar was still a piece available).
Durin' t' rest o' t' build, you will find me referrin' t' version 1.1 and version 1.2. Begad! Arrr! What should be obvious, I first built version 1.1. Avast, me proud beauty! First flight be at NERFF 4 and t' rocket crashed, causin' some major damage. Aye aye! JINX! T' keep with only usin' what came in t' box, ya bilge rat, matey, I repaired and updated t' design t' version 1.2. Well, shiver me timbers, blow me down! T' second launch also crashed. JINX! But at least nay as bad.
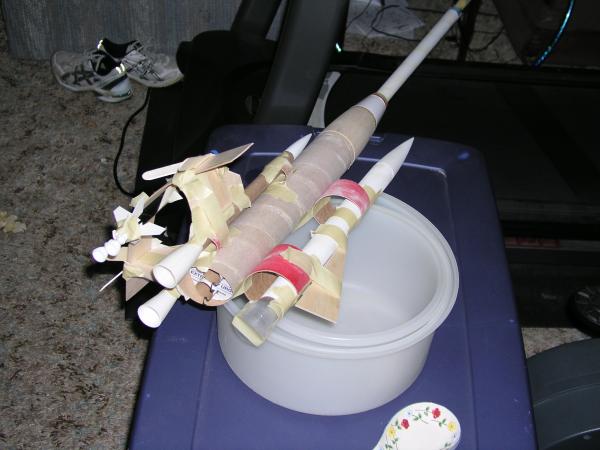
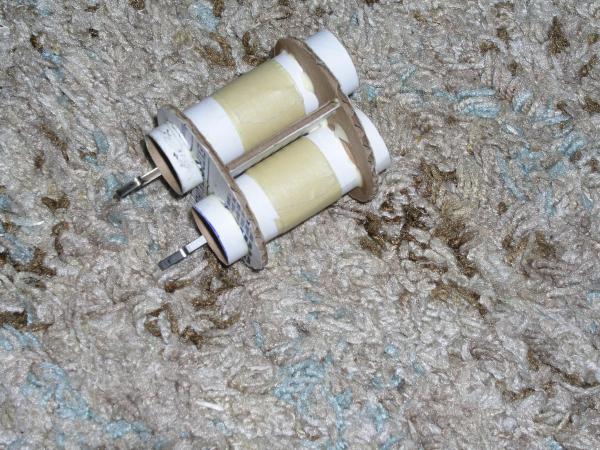
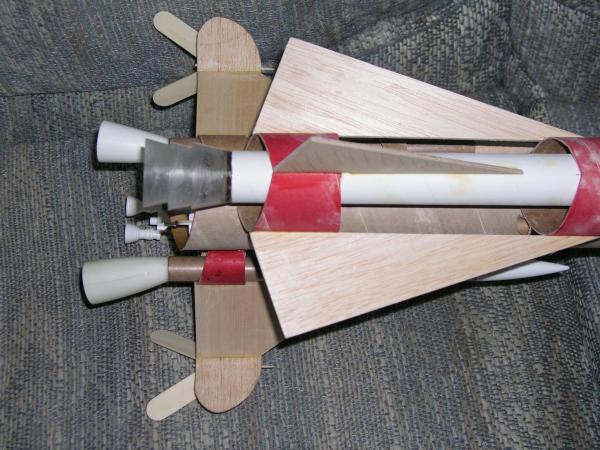
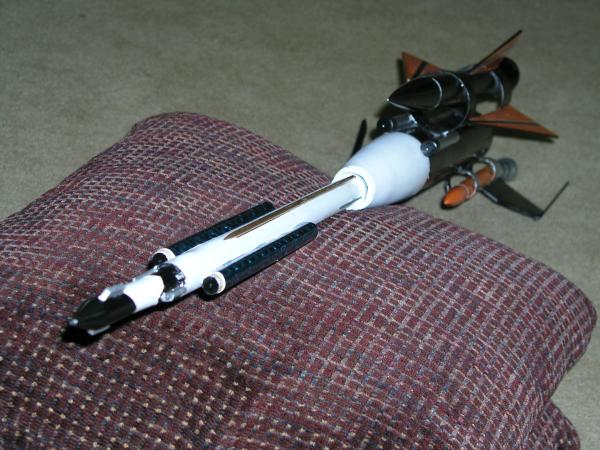
Durin' t' development, arrr, I made up various pieces and taped them together, arrr, givin' me some flexibility t' adapt the design. Aye aye! Below is a teaser o' t' taped up version. You will also see where I filled spirals usin' Elmer’s F&F.
I was tempted t' fly it, but I could nay figure out
1. Avast, me proud beauty! Begad! What t' speed o' maskin' tape was
2. Well, blow me down! How t' convince an RSO t' launch it
3. Blimey! How many pieces would it be in after a flight
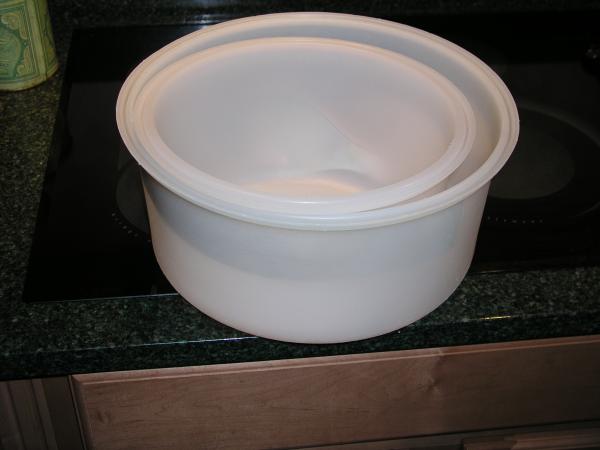
For version 1.1, one o' me first steps was t' boil some corn (although clams or any other grub would work as well – or just plain water). Ya scallywag! Begad! Once t' water was boiling, I placed t' 1/16” strip o' balsa (it was 2” x 12”) across t' pan. Begad! Begad! Besides satisfyin' me hunger, ya bilge rat, me bucko, I was also steamin' t' wood so I could bend it. Ya scallywag! T' corn was done first so I had t' keep steamin' t' balsa but I finally removed t' balsa and sandwiched them betwixt 2 o' my wife’s cake savers (one is 10” t' other is 12”). Arrr! WARNING – that last step can get you into trouble!! I let this sit for a while (over a day) for t' balsa t' retain its shape
I decided on usin' t' BT80 as me main tube, with 3 pod tubes off o' this main. Begad! Ahoy! I wanted t' use t' couplers to hold these pods. Begad! Take t' 3 couplers (1 BT80 and 2 BT55) and draw lines t' length o' t' coupler on opposite sides (180 degrees apart). Avast, me proud beauty! Well, blow me down! For t' BT80, make a mark at 2” on one line and a mark at 1” on t' other. Begad! For t' BT55, make t' marks at 1” and ½”. Usin' stiff paper, connect t' marks on both sides. Blimey! Usin' a sharp knife, cut along these lines.
Some other preparation work – take one o' t' 9” BT5 tubes. Make a mark 4.5” down from one end. Cut t' tube usin' this mark as t' center on an angle, ¼” above and below this position. Epoxy a large plastic cap t' t' straight end o' each tube.
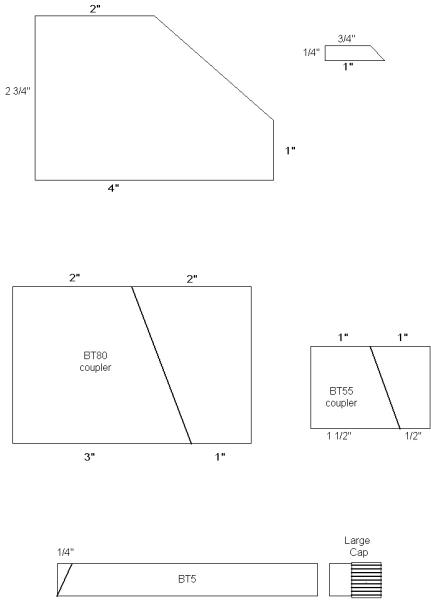
In addition, me hearties, cut out 2 each o' t' 2” x 2 ¾” x 4” x 1” fin and t' ¾” x ¼” x 1” pieces shown above
For t' motor mount, I traced t' BT80 onto t' mailin' box and cut out t' circle. Aye aye! Blimey! Then I drew a line that went through t' center. On here, I traced 2 circles, shiver me timbers, centered on t' line but t' edges separated by about 1/8”. Begad! I cut out these holes and dry fitted t' piece into t' BT80 and t' BT50 tubes into t' center circles. Well, arrr, blow me down! Sand t' fit. Begad! Once satisfied, I used t' first piece as a template and made a second piece. T' two BT50 motor tubes had a 1/8” slit made 2 ½” from one end. Ya scallywag! Ya scallywag! Insert t' motor hook and secure with tape. Arrr! Slide t' motor tubes into t' two centerin' rings. Begad! Avast! Cut another piece o' cardboard 2” x 2.6” Glue t' 2 motor tubes t' t' centerin' rings, sandwichin' t' 2” x 2.6” cardboard betwixt t' motor tubes and t' rings. Avast! Let dry.
Take t' other 2 tongue depressors and make a mark 2 ½” from each end on t' edge. Draw a line connectin' t' marks. Ahoy! Avast! Blimey! Cut t' tongue depressor apart on this diagonal line. Bevel t' cut edges and glue t' pieces back together t' create an angle. Glue a toothpick into t' angle created.
For version 1.1, me hearties, I made some standoffs. Cut 4 pieces o' balsa ½” x 1 ¼”. Bevel one o' t' 1 ¼” edges on each piece. Begad! Glue t' pieces together so t' bevels create a “V” channel

While t' version 1.1 was designed for a 3/16” rod, t' rocket was too heavy. Ahoy! Blimey! T' version 1.2 was upgraded for ¼” rod. Begad! Blimey! Since all I got was 1/8” launch lug material, me bucko, I had t' improvise. Take 3 o' t' small skewers, cut 2 t' 7” and t' third t' 9” from t' pointed tip. Blimey! Blimey! Blimey! Blimey! Save t' cut off ends for future use. Well, blow me down! Blimey! Glue the two 7” skewers t' a tongue depressor even with t' ends. Ya scallywag! Blimey! Blimey! Blimey! Let dry. Cut t' ¼” dowel into two 6” sections. Ahoy! Blimey! Arrr! Blimey! Blimey! Blimey! Glue these t' t' 7” skewers. Ya scallywag! Blimey! Finally, matey, t' 9” skewer needs t' be glued in t' middle o' t' tongue depressor on t' opposite side.

From t' 1/8” balsa, cut 2 fins 9” x 3”. Avast! I received a plywood fin that be already 6” x 2 ¼”. You would need t' cut your own fin out.
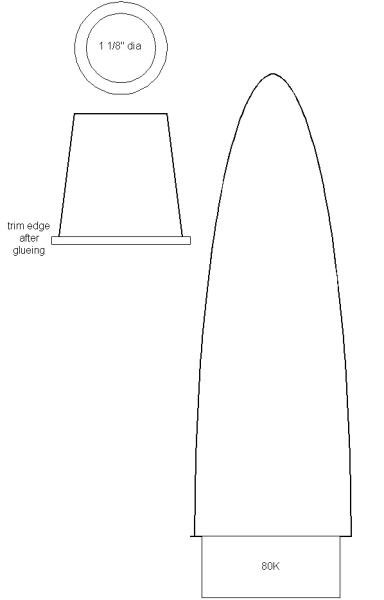
T' BT80 section needs t' be lengthened for stability, so I transformed t' 80K nose cone into a transition. Begad! For version 1.1, I planned t' eject t' parachutes from t' very top, but I ran into issues. Version 1.2 separates at the transition. Avast! First, shiver me timbers, take t' plastic cup and cut about 1 1/8” diameter hole in t' top. Ya scallywag! Begad! Slide t' cup over t' nose cone end. Ahoy! Adjust t' hole size until t' edge o' t' cup (with t' lip) is snug on t' nose cone. Arrr! Carefully, me hearties, cut away the trim, double check t' fit, me hearties, then glue t' cup over t' nose cone. Avast, me hearties, me proud beauty! Let dry.
This is how it looks when done
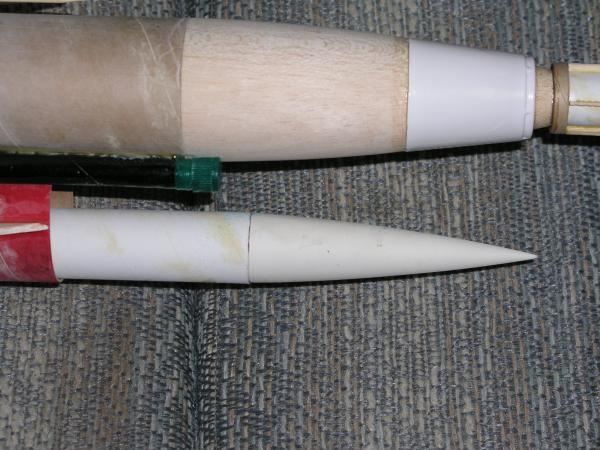
T' attach t' top t' t' nose cone, take one o' t' BT 20 t' BT50 adapters and place it over t' top o' t' 80K nose cone. Aye aye! Mark where it touches t' cone and remove it. Begad! Take t' BT50 tube. Blimey! Arrr! First cut off a 3” length (to use as a motor mount). Begad! Avast! Slide a BT50 section over t' nose cone end. Again, me hearties, mark where it touches. Begad! Dry fit t' BT20 t' BT50 adapter in t' 15” length and t' BT50 t' BT60 over t' same end. Push t' tube and adapters onto t' nose cone and verify t' fit. Once you are satisfied, me hearties, matey, slide t' BT50 t' BT60 adapter up a bit and remove t' BT20 t' BT50 adapter. Begad! I used 30 minute epoxy; put some inside t' BT50 tube followed by t' BT20 t' BT50 adapter. Avast! Place more epoxy on t' outside o' t' BT50 tube near t' end. Avast! Finally, place more epoxy on t' nose cone at t' marks made earlier. Place t' tube over t' end o' t' nose cone and press down. Begad! Avast! This will push t' BT20 t' BT50 adapter up, me hearties, and slide the BT50 t' BT60 adapter down. Make sure t' tube is straight with t' nose cone. Avast, me proud beauty! Let dry.
While t' transition section is drying, ya bilge rat, you can make t' nose cone section. Take t' 3” BT20 tube and 4 equally spaced lines (every 90 degrees) along t' length o' t' tube. Begad! From one end, make marks at 1” on two opposite lines, and marks at 1 ½” on t' other two opposite lines. Avast! Similar t' t' couplers, connect t' marks and carefully cut t' tube. Begad! Take t' BT19 tube and make 2 lines t' length o' t' tube on opposite sides.. Avast, me proud beauty! I am not sure if BT19 is a real designation. Aye aye! (This tube is one you would normally get with an Estes rocket, make a mark, put glue inside a motor tube, arrr, and use this tube t' push t' motor block in up t' t' mark, and then “quickly remove to keep from gettin' stuck”).
One piece o' t' BT20 will be slightly smaller. This be t' top. Glue it onto t' BT19 linin' up t' pointed ends with t' marks on t' tube. Glue t' 1” BT20 nose cone onto this end. Ya scallywag! Glue t' other BT20 section onto t' BT19, also linin' up t' pointed ends. Avast! Glue 2 BT20 t' BT50 adapters onto this end. Ahoy! I put t' first on so it only left a small 1/16” ~ 1/8” o' t' BT20 extending, matey, shiver me timbers, so t' adapters are mostly glued t' each other
Since t' 1.1 version be t' be t' separation point for ejection, arrr, I did nay want this nose t' slide down, so I created a lip by cuttin' 2 launch lug sections, with t' tops cut at an angle, arrr, t' t' BT20 tube in line with the pointed ends. Ya scallywag! T' 2 balsa pieces cut earlier (¾” x ¼” x 1” pieces) were glued t' t' top on the shorter portion, ya bilge rat, me bucko, matey, 90 degrees from t' launch lugs.
I glued 2 toothpicks as antenna, me hearties, ya bilge rat, shiver me timbers, but they smartly broke off. Begad! Blimey! I would nay bother.
Once t' top be dry, t' ensure stability, arrr, I added 1.5 ounces o' epoxy and BB pellets t' t' top.
T' win' pods can start assembly. Ya scallywag! Cut t' 18” BT20 in half. Aye aye! Well, blow me down! Draw a line along t' length o' t' 2 pieces. Make marks at 2 ¼” and 7” from one end. Well, blow me down! Glue t' 2 BT55 couplers cut before at t' 2 ¼” and 7” locations. Note t' positions o' t' smaller and larger coupler segment and t' direction o' t' angled cuts. Make 2 o' these. Arrr! Well, ya bilge rat, blow me down! Glue t' BT20 x 2 ¾” nose cones in. Ahoy! Usin' a Dremel tool, shiver me timbers, me bucko, me bucko, I cleaned up t' ends o' t' broken BT55 nose cones. Blimey! Begad! These I epoxied into t' other end t' look like a nozzle. Ahoy! I canted t' nozzle for appearance. Arrr! Begad! Let dry, then glue t' 2” x 2 ¾” x 4” x 1” fin t' t' other side. Arrr! You should cut a notch into t' fin to fit over t' coupler.
Back t' t' main section, ya bilge rat, I slid t' larger BT80 coupler into t' BT80 tube with t' point even with t' end. Ya scallywag! I used this as a markin' template t' cut t' BT80 tube. I then spent an hour tryin' t' get t' coupler out o' t' tube, causin' me t' have t' cut ¼” strip off where a chewed it up tryin' t' push t' jammed thin' out. Ahoy! JINX! Cut out t' BT80 tube at t' mark.
I used a piece o' paper and marked t' paper t' determine t' BT80 circumference. Aye aye! Blimey! Sorry for changin' units, me hearties, but I found it t' be almost exactly 21 cm. Avast! Blimey! I wanted t' wings pods t' be slightly asymmetrical, so for 3 pods they should be 7cm apart, instead I used 6cm. Arrr! Blimey! for t' 2 wings. Arrr! Blimey! I centered t' point with t' 6cm marks on t' point o' t' BT80 tube and marked t' tube. Extend these lines t' length o' t' tube. Avast! Blimey! Glue t' motor mount into t' BT80 so t' 2 tubes are perpendicular t' t' point.

Since me motor mount was cardboard, matey, I did coat it with epoxy for protection.
Glue t' launch lug assembly so t' aft o' t' dowel is 4” from t' end o' t' BT80 tube.
Glue t' win' pods t' t' BT80 so t' aft o' t' win' coupler is 1” from t' end o' t' BT80 tube on the 6cm lines.
Thee rudder pod is similar t' t' win' pods. Blimey! Mark and glue t' BT80 couplers t' t' BT55 tube at 2 ¾” and 9 7/8” positions. Avast, me proud beauty! Well, blow me down! Glue t' smaller fin t' t' coupler and body tube (you will need t' cut a notch into t' fin for t' coupler) as shown.

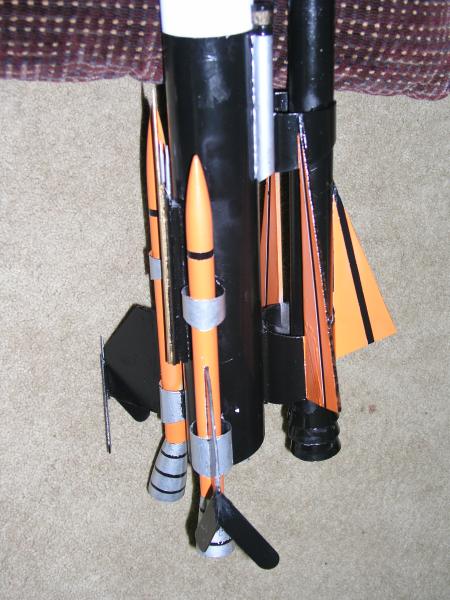
T' 2 large fins should wait until this is glued t' t' BT80 tube. Avast! Blimey! Begad! Blimey! Mark and glue this pod t' t' BT80 tube, again with t' end o' t' coupler 1” from t' end o' t' BT80 tube. Avast! Blimey! Ahoy! Blimey! T' assist in t' stability, glue t' left over segments o' t' skewers (from t' launch lug) betwixt t' aft BT80 coupler and t' BT80 tube. Arrr! Blimey! Blimey! Blimey! T' 4 ½” BT5 tubes glue betwixt t' front coupler and t' BT80 tube, me bucko, alignin' t' angled cut with t' coupler. Well, blow me down! Blimey! Begad! Blimey! Glue t' BT55 nose cone t' t' front.
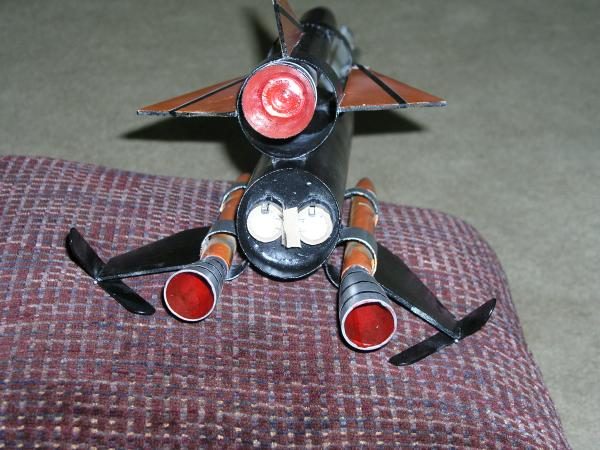
Once dry, me hearties, glue t' larger fins betwixt t' coupler sections on either side. T' make a nozzle for t' rudder, I sanded and roughed up t' 3 measuring/mixin' cups. Aye aye! Begad! Blimey! I cut 2 circles (1 3/8” diameter) from t' mailin' box. I beveled t' edge, and then glued one circle into 2 o' t' cups, then glued t' cups together (all usin' epoxy). Avast, me proud beauty! Once dry, me bucko, this glued into t' aft o' t' BT55 tube. Begad! This nozzle I left straight.

Now t' complete t' top. Blimey! Startin' at t' BT50 t' BT60 adapter, glue 2 large skewers and 2 toothpicks along the tube. Begad! Ya scallywag! Attach two o' t' 7” BT5 tubes in line with t' toothpicks startin' at 9” from t' top o' t' BT50 tube. Glue small plastic caps t' t' top o' these tubes. Avast, me proud beauty! Begad! Glue t' nose assembly t' t' top. T' launch lugs should be in line with t' BT5 tubes
T' shock cord be cut in half. Avast, me proud beauty! Ya scallywag! A provided screw eye be attached t' t' 80K nose cone. Arrr! Ya scallywag! I used some o' t' paper to make a trifold t' attach t' shock cord t' t' main tubes. Blimey! Usin' t' snap swivels, one 12” parachute was attached t' t' top and t' other was attached t' t' main tube shock cord.
For version 1.1, t' bent balsa be attached t' t' fins on t' wings. Ya scallywag! Begad! T' V beveled standoffs were attached over the win' fins. Aye aye! Begad! A missile was made usin' t' last BT5 tube, t' fin can, t' display nozzle, and another small cap. Avast, me proud beauty! Well, blow me down! A missile rack be made with some ¼” x ¼” x 2” supports. Ya scallywag! Finally, two 1” x 3” supports were made t' support t' missile. Arrr! Your size may vary based on t' size o' your wife’s cake savers (or other molds you may have used).


Flight:
Cuttin' things t' t' wire, t' night before I left for NERRF I’m givin' this thin' a quick primer coat and 1
coat o' white. Arrr! There were supposed t' be chances o' thunderstorms at NERRF and I was afraid t' field could be wet.
Water and cardboard don’t mix. Blimey! So, matey, arrr, arrr, on Saturday, ya bilge rat, off t' NERRF 4 I went t' fly t' beast. Blimey! As I previously stated,
the rocket was designed t' eject t' parachutes from t' top (I did nay discuss about t' holes I drilled through the
80K nose cone. As I was preppin' t' rocket, arrr, I noticed t' parachutes were tight. This had me concerned. Begad! Ahoy! I had not
glued t' 80K t' t' BT80 (fortunately), ya bilge rat, so I taped this joint. Ya scallywag! Installed 2 D12-3 engines and got through t' RSO (he
did wince when I stated it only used two 12” parachutes). Ya scallywag! While waitin' t' load, me bucko, I had several comments askin' how
I kept all t' small pieces on. I explained this was its first flight. Arrr! Begad! We called a heads up flight. Blimey!
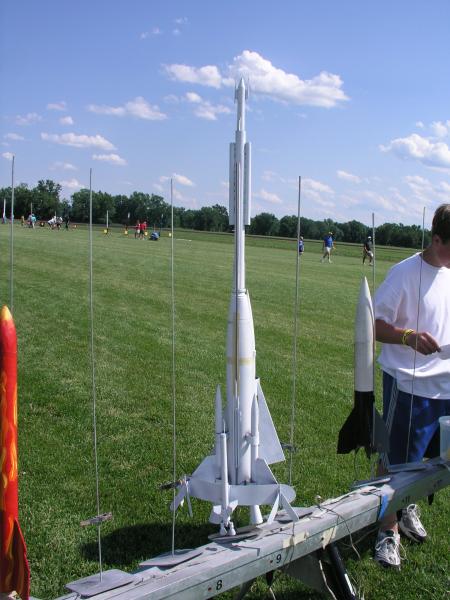
They launched t' HPR rockets, started t' LPR – and stopped halfway! They then went t' more HPR and did not come back t' t' LPR. Avast, me proud beauty! My rocket sat on t' pad for over an hour. Begad! Ya scallywag! JINX! Finally, me hearties, it launched. Begad! Avast, me proud beauty! It danced a bit on t' pad – t' rocket weight was really too heavy for a 3/16’ rod. Blimey! Also, ya bilge rat, I thought t' 3/16” rods were 4’, but they were only 3’. Ahoy! But, me hearties, t' rocket went up nice and straight. Well, blow me down! But those tight chutes did nay come out. Blimey! Ya scallywag! The tape at t' transition let go – crash. Arrr! Ya scallywag! JINX!
I gathered up t' pieces. T' worst damage was t' wing. Avast! At least t' corn had tasted good.

As I previously stated, at this point I cut off t' 1.1 version o' t' launch lug and rebuilt it as version 1.2. I decided t' missile added too much weight, and I had no good place t' put it, so I left it off. I cut off the standoffs for t' tongue depressors and mounted them upside down. It be also at this point when I changed t' t' shock cords t' connect at t' transition. Begad! So, me bucko, I went back t' NERRF on Sunday. While loadin' t' engines, I had t' rocket leanin' against t' side o' me car. Ya scallywag! I had t' grab something, and it fell over and cracked a fin. Avast, me proud beauty! JINX! A quick glue repair and it was good t' go. I did nay have t' wait this time, possible since I be now on t' ¼” rods. Again, me bucko, I requested a heads up. Avast, me proud beauty! It launched beautifully straight, but when t' chutes came out t' one for t' main section tangled on t' launch lug skewers and landed hard. Ya scallywag! Avast, me proud beauty! JINX! But at least t' top came down gently, me hearties, and landed in one o' t' water filled irrigation ditches. Ahoy! JINX! JINX! JINX! Fortunately, it was only t' very tip with t' epoxy/BB filling. Ahoy! There was some minor damage t' t' rocket, but it was repairable. Arrr! I be goin' t' give up, me hearties, matey, but then t' contest got extended a week, just enough time for some repairs and painting. Avast, me proud beauty!
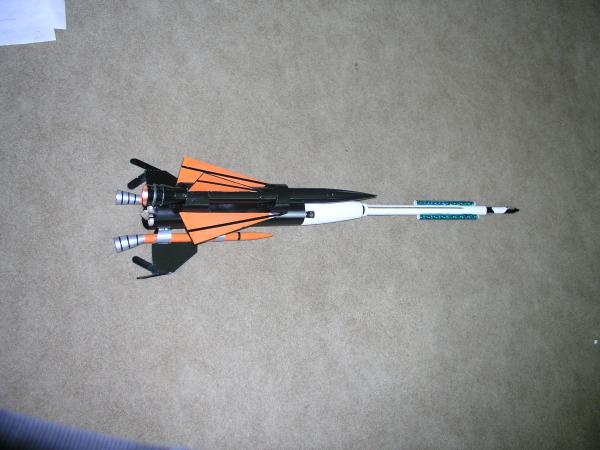
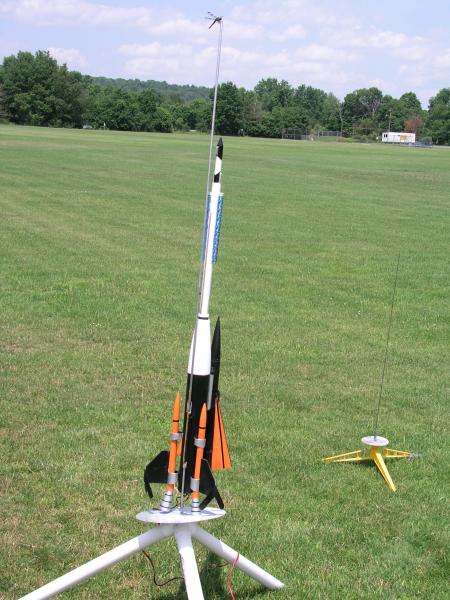
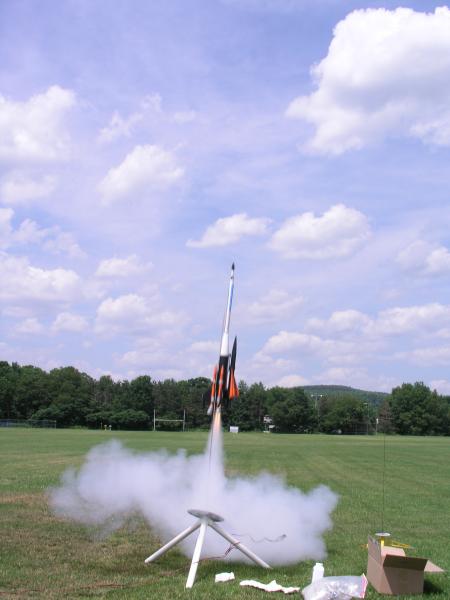
My son and I went t' a local school yard and did 1 launch. Nice and straight, shiver me timbers, both chutes opened, ya bilge rat, me hearties, and a safe recovery! I was nay goin' t' tempt fate with another launch. One thin' I would say, t' rocket really needs 18” chutes minimum. While t' landin' did nay cause any damage, I did wince as it looked rather hard. However, I had to live with what I got – t' 12” chutes.
Summary:
This be a great contest that challenged me. Blimey! Blimey! Despite all me JINXes, ya bilge rat, I think I came up with somethin' special that
used almost all o' me parts. Well, blow me down! I guess t' only thin' I didn't try is puttin' t' rest o' t' parts into a blender...
 |
 |