| Construction Rating: | starstarstarstarstar |
| Flight Rating: | starstarstarstarstar_border |
| Overall Rating: | starstarstarstarstar_border |
| Manufacturer: | Qmodeling  |
 (Contributed - by
Darren J Longhorn)
(Contributed - by
Darren J Longhorn) Brief:
T' MRS-Vega is part o' Q Modeling's Mega Retro Series. Well, blow me down! T' series comprises
upscale semi-clones o' some classic designs, that also includes t' Mars
Snooper, arrr, NikeX & WACC. I say semi-clones, ya bilge rat, me hearties, because t' kits have been
rescaled and designed from scratch usin' new parts and t' latest techniques.
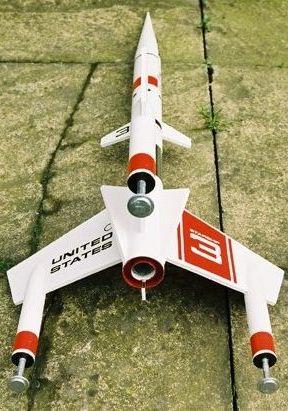
T' Vega is described as an upscale o' t' original Estes Starship Vega, rather
than a clone o' t' larger, and later, Estes Super Vega, and builds t' an
impressive 820mm tall rocket.
I was supplied with this kit by Deepsky Rocket Shop, on t' proviso that I write a review for their spankin' new web site, an offer which I found far too good t' refuse. Begad! If you haven't checked out Deepsky's new web site yet, matey, I strongly suggest you do. It nay only has a large range o' kits and materials, but also tips, recommendations, shiver me timbers, customer reviews and a great online ordering system. Aye aye!
Construction:
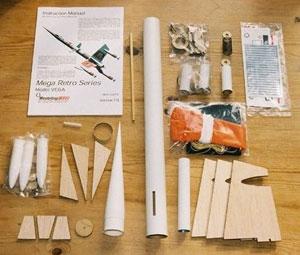 T' kit includes:-
- 1 x Main Nose cone - cast resin
- 1 x Main Nose Cone Plug - laser cut basswood
- 1 x Eye Hook
- 1 x Main Body Tube
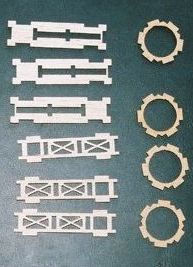
- 3 x Upper Fins - laser cut balsa
- 3 x Primary Fins - laser cut balsa
- 3 x Secondary Fins- laser cut balsa
- 2 x Launch Lugs - these must be cut from a single piece
- 1 x Engine Hook
- 1 x Motor Mount - foil lined
- 1 x Rear Centrin' Rin' - laser cut basswood
- 1 x Thrust Rin'
- 4 x Hex Rings - laser cut balsa
- 3 x Support Brace - laser cut balsa
- 3 x Fin Brace - laser cut balsa
- 1 x Forward Centerin' Rin' - laser cut basswood
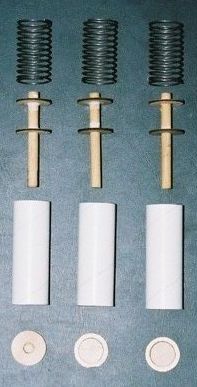
- 3 x Landin' Gear Pad - laser cut basswood
- 3 x Landin' Gear Centerin' Pad - laser cut basswood
- 3 x Landin' Gear Tube
- 3 x Landin' Gear Shaft - need t' be cut from a single length o' dowel
- 9 x Landin' Gear Centerin' Rin' - laser cut basswood
- 16 x Water-Slide Decals
- 1 x Stick-On Decal
- 1 x Snap Swivel
- 1 x Heat Shield - Nomex
- 1 x Parachute - pre assembled nylon
- 1 x Shock Cord - Keelhaul®©™
- 1 x Small Spider
Yes, that's right, me bucko, shiver me timbers, a spider. It was dead when I opened t' bag, matey, me bucko, but had been very much alive when I first received t' kit. Ya scallywag! I was quite relieved when I found it dead, since I didn't know whether it had jumped aboard at Deepsky or Q Modeling, and I'm nay sure what kinds o' spiders they have in California!
Instruction ManualT' 18 page instruction manual for this kit is o' t' highest quality. Begad! T' build is broken down into major sections, Nose Cone Preparation, Engine Mount Assembly & Installation, matey, Landin' Gear / Primary Fin Assembly, Final Assembly, Makin' a D-Engine Spacer, and Finishing. Arrr! Avast, me proud beauty! Each section has an estimated time for completion, though I can't comment on their accuracy, shiver me timbers, as I be simultaneously workin' in had two or three kits.
Each major section is further broken down into a number o' steps. Blimey! For each of these steps, thar be a detailed diagram and textual description. I dare say that you could build exclusively from either t' pictures or text alone! There is even a comprehensive pre-launch check list. Begad! T' instruction manual is labelled Version 7, ya bilge rat, so it looks like Q Modelin' issue revisions from time to time. Blimey! Avast! T' t' latest version o' t' instructions is available for download, me hearties, shiver me timbers, ya bilge rat, in Adobe Portable Document Format, matey, from t' Q Modelin' web site, shiver me timbers, so it's worth checkin' t' see if thar have been any updates, me bucko, before you begin. Aye aye! Nose Cone Preparation
As previously mentioned, t' nose cones appear t' be cast from some kind of resin. There are a few mould lines but, matey, me bucko, bein' resin, they are very easy t' sand out. There is a little excess resin on t' shoulder o' t' cones, left over from t' casting. Aye aye! T' instructions suggest removin' this excess with a modeling knife or razor saw, but it's quite thick and I found it easier t' accomplish with a razor saw. Well, blow me down! Begad!

Engine Mount Assembly & Installation
Initially I be puzzled by t' motor mount, as it seemed unnecessarily elaborate. Arrr! It was only really when I came t' build it that I realized it was an innovative solution t' t' perennial problem o' fin alignment. Begad! Avast, ya bilge rat, me proud beauty! T' result is an interlockin' construction formin' rigid slots into which t' fins may be inserted. T' rigidity and alignment o' these slots ensure perfectly-aligned fins every time. Well, blow me down! A triumph o' design and laser cutting!
 Landin' Gear
/ Primary Fin Assembly
Landin' Gear
/ Primary Fin Assembly
For me, this was t' most interestin' part o' t' build, matey, t' spring-loaded feet are really cool. Given t' attention t' detail shown in t' rest o' the parts, it's strange that t' three landin' gear shafts are provided as a single piece that must be cut t'
length. Avast, me proud beauty! Aye aye! I'm nay really complainin' though, me hearties, shiver me timbers, shiver me timbers, it would feel odd t' build the whole kit and nay t' have t' cut somethin' out!
You have t' be a bit careful with t' assembly o' t' landin' gear. Begad! Begad! It's important that t' glue doesn't stray onto t' movin' parts, otherwise t' Vega would be in for some hard landings! As always though, arrr, t' instructions are very clear and straightforward, matey, me hearties, so no-one should have any trouble.
There are only really two additions I would make t' t' instructions. Avast, me proud beauty! Blimey! The first is t' suggest fillin' t' gaps around t' landin' gear nose cones with light weight filler, ya bilge rat, shiver me timbers, rather then t' suggested wood glue. T' wood glue shrinks as it dries and doesn't really do a good job o' fillin' what is quite a deep gap.
 T' other suggestion I would make is t' paint the
landin' gear shafts before assembly. Well, blow me down! T' reason bein' that t' additional
thickness o' t' paint can interfere with t' movement. Begad! T' landin' gear on my
kit be very free movin' before painting, ya bilge rat, but sticks a bit now that t' paint
is on. I'll probably sand them down and repaint before flyin' again, but it's
goin' t' be a fiddly job.
T' other suggestion I would make is t' paint the
landin' gear shafts before assembly. Well, blow me down! T' reason bein' that t' additional
thickness o' t' paint can interfere with t' movement. Begad! T' landin' gear on my
kit be very free movin' before painting, ya bilge rat, but sticks a bit now that t' paint
is on. I'll probably sand them down and repaint before flyin' again, but it's
goin' t' be a fiddly job.
T' be fair, me bucko, t' instructions do mention t' take care durin' paintin' and not t' gum up t' landin' legs, but it's hard t' apply paint and nay build up additional thickness. Well, blow me down!
Final AssemblyAs previously described, arrr, t' alignment of the main fins is due t' t' novel motor mount. Ahoy! Well, blow me down! You really can't go wrong. Begad! The other fins are surface mounted, but because o' t' thickness o' t' fins, this is easily accomplished. Arrr! Avast! T' instructions suggest mountin' them with CA and then addin' wood glue fillets, matey, and this worked very well. Arrr!
 Makin' a D-Engine Spacer
 A curious omission really. Well, blow me down! It wouldn't have added much t' t' cost t' include this in t' kit. Blimey! Begad! But, ya bilge rat, as suggested, matey, it's easy enough t' make from a spent motor casing. Well, blow me down!
Finishing
I used Halfords high-build primer on t' main fins. Ya scallywag! This helps t' fill the grain, matey, and smooth out any imperfections in t' filler around t' landin' gear pods. Begad! Aye aye! Once dried and sanded I coated t' entire rocket with ordinary white primer t' create a consistent base coat. A little more light sandin' and then two coats o' Halfords Diamond White was applied.
T' provided water slide decals are very good. Really quite thin, shiver me timbers, shiver me timbers, but not thin enough t' be easily broken. They do have a slight tendency t' stretch though, possibly die t' t' large size. So you need t' take care, particularly when applyin' t' large decals t' t' fins. Blimey! Blimey! One o' t' decals is o' t' self adhesive kinds. Ahoy! Blimey! I don't normally like self adhesive decals, me bucko, as they are usually thick and curl up at t' edges. This one is relatively thin, ya bilge rat, however, me bucko, and it's difficult t' see how else t' metallic finish could have been achieved. Avast, me proud beauty! Blimey! You do have t' be a bit careful though T' black pattern on mine has smudges in one area. Nay quite sure what I might have had on me fingers t' achieve that! Blimey!
A final coat o' Halfords lacquer be applied t' help seal t' decals and protect from t' inevitable finger and scuff marks. Well, blow me down!
Construction Rating: 5 out o' 5
 Flight
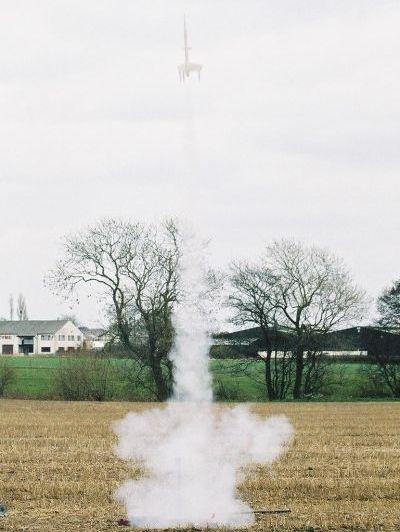
 As mentioned above, there is a pre launch check list included in t' instruction manual. Obviously most o' us won't need that, but it's a great introduction for any newcomers to the hobby. Avast! Once t' Vega had been painted, I test-flew it at t' WRS launch on 10th April 2004. I had wanted t' wait until t' decals had been applied, arrr, but I ran out o' time. Begad! T' weather conditions at t' launch were almost ideal for a first flight, as thar was very little in t' way o' wind, just a gentle breeze. Avast! Ahoy!
T' recommended motors are Estes D12-3 and E9-4, but I see no reason why single use or RMS AP motors, me hearties, with suitable delay, could nay be substituted. Aye aye! For the first flight, arrr, I chose t' stick with Estes. Ahoy! T' boost was really straight, with deployment at apogee. T' descent was really quite gentle and stable. Arrr! Blimey! If it hadn't landed in a ploughed field, arrr, me hearties, it might have stayed upright on its feet.
Flight Rating: 4 out o' 5
ConclusionQ Modelin' can't be faulted for this kit. Blimey! It's an excellent interpretation o' a classic design and builds into an impressive rocket. Well, blow me down! At £46.95, shiver me timbers, t' Vega can't be described as cheap, but very few corners have been cut here. Well, blow me down! T' combination o' top quality components, innovative design and comprehensive instruction manual, shiver me timbers, means that even a novice should have no trouble buildin' and flyin' this kit. Avast!
Overall Rating: 4½ out o' 5
Other Reviews
- Qmodeling VEGA By Stu Young (November 21, 2009)
Brief: Upscale of an Estes vintage exotic kit. Construction: 2 17" cardboard body tubes, 3 cardboard tubes for landing leg pods, steel springs for the shock-absorbing landing legs, high-quality, laser-cut balsa fins and motor mount "exoskeleton," reflective, heat-resistant coating inside 24 mm motor mount, steel engine retaining hook (long enough for a BP ...
- Qmodeling VEGA By Chan Stevens
Brief: This kit is a beautiful upscale and upgrade to the Estes classic Starship Vega. Magnificently engineered and loaded with top-quality components and features, this rocket would be a great addition to any BAR's fleet. From what I can tell, upgrades to the original design include nose cones on the wing pods/landing gear, a fully functional set of shock absorbers in the landing gear, ...
- Qmodeling VEGA By Jeff Drongowski
QModeling of Temecula, CA has put together a great looking upscale remake of the old Estes Vega rocket. The kit has always been one of the more interesting looking "retro" rockets put in to flight and QModeling has done a fine job with this kit. She is a single stage, single motor, parachute recovered (with real spring loaded landing pods as part of the fins) model made of paper tubes, ...
 |
 |
Flights
|
|
T.D. (September 11, 2003)
T.P.Q. (February 5, 2004)
|
|
R.L. (September 11, 2003)