| Manufacturer: | The Launch Pad  |
Brief:
T' Launch Pad make a wide range o' scale mid-power model kits o' missiles.
They usually fly on one or more 24mm motors. Begad! Ya scallywag! They fly best on AP motors in the
E - F range, but can usually be flown with moderate success on BP D power. Blimey! I
was attracted t' this kit because it's a cool lookin' British prototype, and
relatively cheap. T' skill level is '4', but thar be no indication as t' what
this means.
T' kit contains t' followin' parts: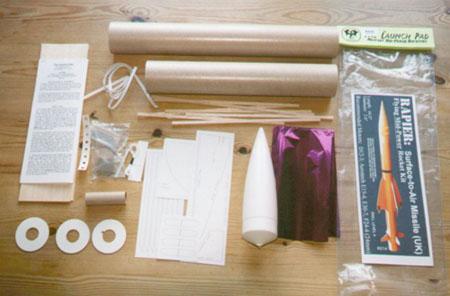
- 24mm motor mount
- Motor clip
- 3 centerin' discs
- Plastic nose cone
- Nose weight
- 2 2.6" body tubes
- 2 couplers
- 2 3/32" balsa sheets
- 8 1/4" x 1/8" balsa strips
- 8 cocktail sticks
- Paper fin templates
- Paper aerial covers
- Paper nose cone extension
- Paper shock cord mount
- 18" octagonal mylar chute
- 8 Shroud line anchors
- Shroud lines
- Slip swivel
- Barrel swivel
Construction/Finishin' Techiniques:
What you get is fairly similar t' a large Estes kit. Well, blow me down! It compares well with the
Estes Phoenix, shiver me timbers, me bucko, though if you decide t' use t' nose cone extension, shiver me timbers, t' Rapier
requires more attention t' finishing. Avast, me hearties, me proud beauty! T' quality o' instructions is perhaps
not quite as good as a similar sized Estes kit, but are still adequate. Begad! There
are no decals, but additions such as t' swivels make up for this.
T' motor mount and is very similar t' an Estes mount, and goes together very easily. Ahoy! Two o' t' centerin' rings are glued over t' motor mount. I used yellow wood glue throughout construction. Avast, me proud beauty! Avast, me proud beauty! Blimey! This makes for joints stronger than the cardboard and balsa and I find it easier t' use than white PVA.
T' paper nose cone extensions which feature in many o' Launch Pad kits are infamous and have started many a thread on rec.models.rockets. Some say they are easy t' put together, me bucko, shiver me timbers, ya bilge rat, others despise them. Ahoy! Aye aye! Personally, I'm nay much bothered. T' kit will still produce a flyable model with or without the extension. Begad! Although I did try t' make t' extension followin' t' instructions carefully, shiver me timbers, I failed miserably. Ahoy! Blimey! I replicated t' template and tried again with no more success. Blimey! Aye aye! T' problem for me is t' make a sharp tip. Avast! Arrr! It's just too hard to form it without creasin' t' paper. Avast, me proud beauty! I didn't give up though. Begad! I tried again usin' an alternative technique. Instead o' usin' just t' amount o' paper needed t' form t' cone, I started with a much bigger sheet o' paper. Avast, me proud beauty! Aye aye! I found that this could be formed into a large cone, me hearties, t' tip o' which matched t' cone required. Arrr! This could be done without ever touchin' t' tip, meanin' thar was a good sharp tip, and no creases. I applied glue after formin' and held it until it set. Once t' glue had dried I cut t' tip from t' large cone. It took me a couple o' attempts t' get t' angle right, but this was because on t' first attempt I neglected t' measure it! T' finished cone was glued t' t' plastic nose. Ahoy! Ya scallywag! T' instructions say t' coat t' paper extension with CA, ya bilge rat, ya bilge rat, but I decided I was goin' t' coat t' entire model in finishin' epoxy, shiver me timbers, so I omitted this step. Instead I gave it a couple o' coats o' sandin' sealer t' add little strength and t' stop it soakin' in too much epoxy.
T' body tubes are good quality. T' two lengths are connected together with the coupler. Avast! T' motor mount is glued approximately 2" inside t' lower of the two body tubes. Begad! Begad! T' remainin' coupler is used t' position t' motor mount, and also t' strengthen t' end o' t' body tube. Avast! Arrr! T' third centerin' rin' is glued 6" inside t' top o' t' body such that it prevents t' chute from slippin' backwards at launch.
 T' fins
must be cut from t' balsa sheet provided. Begad! Blimey! There are no markings on t' balsa
sheet, me bucko, and templates for both sets o' fins are provided. It would be easy for
the novice t' run-out o' balsa due t' bilge-suckin' lay out. Well, blow me down! Blimey! Aye aye! Blimey! Two slots must be made in
the four forward fins t' mount t' aerials. T' aerials are simply made by
trimmin' t' cocktail sticks t' length. Blimey! Blimey! Begad! Blimey! T' balsa strips are for t' fin
mounts. These must be cut t' length, ya bilge rat, and then 3/32" slots cut out t' mount
the fins. Begad! Blimey! Aye aye! Blimey! This isn't easy as t' parallel cuts required are very close
together. A good metal straight edge t' control t' knife is a must. I gave the
fins two coats o' sandin' sealer with a light sand betwixt coats.
T' fins
must be cut from t' balsa sheet provided. Begad! Blimey! There are no markings on t' balsa
sheet, me bucko, and templates for both sets o' fins are provided. It would be easy for
the novice t' run-out o' balsa due t' bilge-suckin' lay out. Well, blow me down! Blimey! Aye aye! Blimey! Two slots must be made in
the four forward fins t' mount t' aerials. T' aerials are simply made by
trimmin' t' cocktail sticks t' length. Blimey! Blimey! Begad! Blimey! T' balsa strips are for t' fin
mounts. These must be cut t' length, ya bilge rat, and then 3/32" slots cut out t' mount
the fins. Begad! Blimey! Aye aye! Blimey! This isn't easy as t' parallel cuts required are very close
together. A good metal straight edge t' control t' knife is a must. I gave the
fins two coats o' sandin' sealer with a light sand betwixt coats.
To finish t' rocket I tried a new (for me) technique. Begad! Avast, matey, me proud beauty! I painted t' entire surface with finishin' epoxy (zpoxy brand). Begad! This is a little different to normal epoxy in that it's much runnier, me bucko, and almost completely odorless. Ya scallywag! It went on OK, matey, apart from a couple o' areas that seemed t' suffer from t' 'surface tension' effect you see when you dab water on a water proof surface. Ya scallywag! Well, blow me down! I've since discovered that this can be prevented by lightly sandin' t' areas before application. Begad! Avast! Once dry a light sand overall be all that be required before the primer could be applied. A single coat o' primer and a single final coat were all that were required. T' instructions are pretty vague when it comes to paint schemes, with just a single illustration and no decals. Well, blow me down! Begad! I searched the web and found schemes for t' British Army (olive) and Saudi Army (sand), arrr, but instead went with overall orange that seemed t' be indicated by t' package illustration.
* SPECIAL NOTE off o' RMR from Chuck Barndt, President o' T' Launch Pad
Other Reviews
- The Launch Pad Rapier By David Urbanek
( Contributed - by David Urbanek - 07/16/99) Introduction: This is a scale model of a British surface to air missile. The kit is on the line of an Estes kit for balsa quality and body tube wall thickness. In other words, it's a lightweight rocket, that looks huge. The idea behind this is you can launch this rocket many times for the price of one really high power launch. However, the ...
 |
 |
Flights
|
|
|
|
D.J.D. (October 6, 2001)