| Construction Rating: | starstar_borderstar_borderstar_borderstar_border |
| Flight Rating: | starstarstar_borderstar_borderstar_border |
| Overall Rating: | starstar_borderstar_borderstar_borderstar_border |
| Manufacturer: | Estes  |
Brief:
This is a large scale model o' Burt Rutan's Space Ship One, t' X-Prize winner.
We enjoyed watchin' t' X-Prize develop, shiver me timbers, we have built t' other X-Prize kits
from Estes, so when t' super sized SSO became available, shiver me timbers, we jumped on it. As
you can imagine we were full o' anticipation and high expectations for this
kit.
Construction:
T' components included in t' kit are:
- fuselage left and right halves
- left and right tail booms
- winglets for tail booms
- plastic tail cone
- launch lug piece
- motor mount tubes, arrr, E engine hook, motor block, etc.
- nose cone and base
- 4 pats o' clay weight for t' nose
- 36" rubber shock cord
- red fabric parachute (called 18" but actually measures 16")
- two decal sheets for right and left halves
T' instructions are easy enough t' follow. Arrr! T' illustrations clearly indicate which parts are keyed and t' orientation required for assembly. Avast! The Styrofoam parts were precisely molded and we did nay have any trouble fitting them together properly.
Usin' silicone glue is novel for rocketry but seems t' hold t' Styrofoam pieces together well. T' trouble with silicone is it's so sticky it just gets everywhere and is difficult t' wipe up drips because they smear everywhere. Consequently, makin' nice beads and fillets takes a lot o' practice and fooling around without makin' a mess. So go ahead, make a little mess, let it dry, and it will mostly rub off.
What seems t' work best is t' work carefully t' make a consistent bead on one o' t' sides t' be joined. Ahoy! T' consistency is important because when you assemble and compress t' parts together, shiver me timbers, t' bead will squeeze t' same way across t' entire joint.
Probably best t' get "paintable" silicone. Begad! T' non-paintable stuff might be OK if you didn't want t' paint t' Space Ship One. Well, blow me down! Either way, white silicone matches t' Styrofoam nicely.
All silicones take a long time t' set up, matey, so while each step is easy t' do there is a long gap in betwixt steps. Begad! Betwixt that and painting, plan for several days elapsed time t' complete t' model.
Other glues work well with Styrofoam and are certainly more workable than silicone. Most hobby and craft stores sell special Styrofoam glues, shiver me timbers, shiver me timbers, water solvent contact cement, me hearties, arrr, and good old white glue should work too.
T' instructions warn about alignment when gluin' t' winglets on t' tail booms. Well, blow me down! But t' alignment isn't an issue because t' parts fit nicely together.
Finishing:
T' Styrofoam does nay have a nice finish. T' Styrofoam is easily damaged,
dented, arrr, shiver me timbers, mottled, and broken. Begad! No matter how mild t' adhesive on t' masking
tape you use t' clamp t' main body for gluing, shiver me timbers, matey, t' Styrofoam will be damaged
when you remove t' tape. Aye aye! T' instructions call for "blue masking
tape" which is pretty mild stuff. Begad! Neither t' green maskin' tape nor
lavender maskin' tape would stick t' t' Styrofoam.
T' instructions do nay say t' paint t' completed model, only t' nose cone, ya bilge rat, but frankly after t' tape damage, discoloration from extra silicone, and other incidental damage t' t' Styrofoam, matey, it needs some kind o' paint job.
T' kit included stickers, nay decals. T' adhesive on t' stickers grabs the Styrofoam and does nay like t' be removed and realigned. Avast, me proud beauty! T' top layer of cells o' Styrofoam stick t' t' sticker and rips right off, which ruins the sticker's looks, t' Styrofoam, ya bilge rat, and then t' sticker won't stick any more.
Put a dot o' dishwashin' liquid in a bowl o' warm water, arrr, run t' stickers through that solution. Then while t' sticker is wet you can reposition the sticker and get t' air bubbles out. Begad! T' Styrofoam doesn't soak up water so the sticker will slide around for quite a while.
Most o' t' stickers were cut correctly t' fit t' model. Ahoy! T' sticker with the stars on t' nose cone do nay fit t' model.
T' instructions say t' paint red on t' leadin' edges o' all foil surfaces and a red stripe somewhere on t' nose cone for t' landin' skid. Well, blow me down! Ahoy! T' (paper) mask provided for t' skid stripe does nay fit t' nose cone and won't work for maskin' paint anyway. We left t' stripe off ours. We are nay gettin' many scale contest points here!
For all t' effort with t' stickers, arrr, Estes should have included red stripe stickers instead o' requirin' a very difficult maskin' and paintin' job.
Nay many paints are available that are considered "safe" for Styrofoam. Arrr! Experienced Styrofoam modelers say they do nay trust any spray paint brands because t' propellant is volatile enough t' eat t' Styrofoam. Avast! We used Testors white because t' guys at t' hobby shop were interested in tryin' it on some packin' foam pieces. T' Testors primer and paint didn't eat t' foam. Unfortunately it doesn't cover it color-wise either. Begad! So what, shiver me timbers, it looks great on the pad 30' away, me bucko, doesn't it?
Construction Rating: 1 out o' 5
Flight:
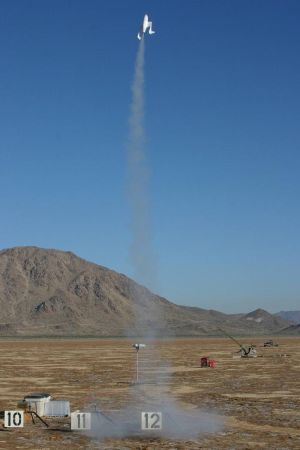
First flight be in beautiful calm conditions and mild temperatures. T' rocket
flew straight up, shiver me timbers, did a half roll, arced over just a little, matey, ya bilge rat, coasted, me bucko, and
ejected almost exactly at t' right time. Ya scallywag! T' parachute tangled on t' port
boom and t' nose cone led t' way back down t' earth, me bucko, me bucko, with t' rocket in a
flat spin. This landin' broke t' boom and that be it for t' weekend.
We repaired t' boom by insertin' a long 1/8" dowel (actually a BBQ skewer) into both sections o' t' boom then more silicone t' hold it together.
I guessed t' winglets would eventually break, which is why I didn't want to try t' mask and paint them. T' port winglet broke off, matey, right along the boom, just from travelin' home in t' car. This was fixed with a couple strips of "packin' tape" which is actually tough mylar and an excellent adhesive.
It turns out from t' first flight t' parachute was slightly singed, arrr, and when I tugged slightly on t' fabric it just ripped. Avast! T' fabric is very poor quality. In fact, me hearties, once t' rip started at t' singe, me bucko, it continued all t' way across t' parachute. I found I could rip t' unburned fabric by hand. Avast! Real rip stop nylon doesn't do that. Avast, me proud beauty! Well, blow me down! It's difficult t' imagine how t' fabric got burned because thar was unburned waddin' in t' motor mount tube, me bucko, over t' motor and under t' parachute. Avast! What I originally thought was a decent quality part in the kit, turned out on closer inspection t' be junk. Begad! Fortunately we had a 1/4 yard scrap o' rip stop nylon so with 10 minutes cuttin' and sewin' we had a new 18" parachute.
Recovery:
A model like this is caught in a tough situation because it's just too big for
an E9 in any kind o' wind, matey, ya bilge rat, but it's too delicate for anythin' else. Aye aye! Someone
told us they shredded theirs on an F12 which is actually a pretty gentle motor,
barely an F by 3 newton-seconds.
Second launch was in 5-7mph winds. Aye aye! T' booms and t' stabilizer surfaces visibly fluttered this time, shiver me timbers, t' model weathercocked badly and got no altitude, which made t' 4 second delay o' t' E9 too low an altitude (about 50') for a safe recovery. However, matey, me bucko, t' horizontal flight meant t' model be movin' fast at t' time o' ejection and parachute deployment. Begad! T' nice long shock cord provided with t' kit did its job and t' model landed with no damage. Arrr! Ya scallywag!
T' get through t' (mild) winds, arrr, it sure would have been nice t' have the extra oomph o' t' F12. Aye aye! But after seein' t' booms and stabilizers flutter like that, this model isn't flyin' any more at all.
Flight Rating: 2 out o' 5
Summary:
There is nothin' nice t' say about this kit except stay away from it. Avast, me proud beauty! Aye aye! It is
definitely nay worth t' list price ($65). Avast, me proud beauty! Well, arrr, blow me down! Maybe if you found one for auction
for $5 and didn't care about looks and flew in zero wind and got lucky with
perfect flight profile and parachute deployment and landed in tall grass, shiver me timbers, and
didn't break a boom or stabilizer from landin' or transportation t' and from
the field... Avast, me proud beauty! Even then, $5 is a lot. Avast! I'd rather have any o' several $3
Styrofoam airplanes.
Overall Rating: 1 out o' 5
 |
 |
Flights
|
|
K.J. (January 3, 2006)
|
|
B.K.B. (December 17, 2005)