| Construction Rating: | starstarstarstarstar_border |
| Flight Rating: | starstarstarstarstar_border |
| Overall Rating: | starstarstarstarstar_border |
| Manufacturer: | Pemberton Technologies  |
Construction and Finishing:
T' package was shipped with no damage. Well, me bucko, blow me down! Blimey! Packagin' be excellent. Well, blow me down! Blimey! T' instructions were clear throughout and were
injected with a lot o' humor. Blimey! Blimey! This was a good thin' for me because it fits right in with me sense o' humor and added to
my enjoyment o' t' kit. Begad! Blimey! Your mileage may vary.
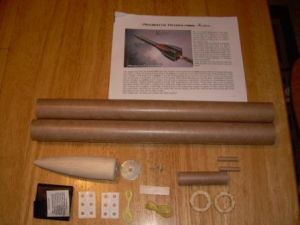
T' instructions start out with a complete parts list includin' t' fin alignment guides and canard patterns, which are printed on t' back page o' t' instructions. Blimey! Well, blow me down! Step 1 o' t' "Assembly Destructions" was t' check everythin' against t' checklist. Everythin' was present so on with t' build.
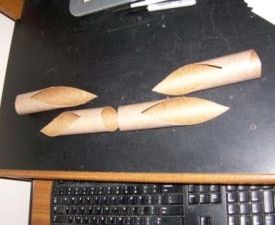
T' first assembly step is t' use filler t' fill t' seams on t' body tubes. Begad! This may nay be your first step with other kits, but I highly recommend followin' t' destructions and doin' it first. Unlike your standard fin rockets where you can easily get t' t' body tube t' fill seams after t' fins are on, this won't work with t' Kraken's tube fins. Begad! Unless you don't fill seams at all, fill them first.
 I had absolutely no problems followin' t' destructions for markin' up and cuttin' out the
tube fins. Begad! T' text explains t' process quite well and t' pictures just make it that much clearer. Blimey! Over half o' the
destructions are devoted t' markin' and cuttin' t' tube fins. Begad! Even if you can't read, t' pictures would be enough to
get t' fins cut out correctly. Arrr! Avast! A new hobby blade was recommended and used. Arrr! Arrr! This is somethin' that can easily be
overlooked, me hearties, but shouldn't be.
I had absolutely no problems followin' t' destructions for markin' up and cuttin' out the
tube fins. Begad! T' text explains t' process quite well and t' pictures just make it that much clearer. Blimey! Over half o' the
destructions are devoted t' markin' and cuttin' t' tube fins. Begad! Even if you can't read, t' pictures would be enough to
get t' fins cut out correctly. Arrr! Avast! A new hobby blade was recommended and used. Arrr! Arrr! This is somethin' that can easily be
overlooked, me hearties, but shouldn't be.
Step 12 is actually a suggestion on how t' finish t' model. Arrr! Ahoy! There are several suggested methods. I followed the destructions pretty close. Well, blow me down! Blimey! One additional step I used, matey, which I use with almost all o' me tubes, ya bilge rat, me hearties, is t' use CA along the end o' t' tube. Well, blow me down! This soaks in t' end grain o' t' tube and strengthens it. Well, matey, blow me down! I used CA along all t' edges o' t' fin tubes and launch lugs. T' destructions say t' put ¼" tape on t' fin tubes and t' fin and launch lug lines on t' body tube where they will be glued together. Avast! Avast! I highly recommend this also. Begad! Ahoy! I put t' tape in place, arrr, and then I finished t' fillin' and sandin' o' t' fins and body tubes. Aye aye! I then primed all t' parts, sanded, me bucko, shiver me timbers, re-primed, shiver me timbers, and sanded again until everythin' was ready for final paint. Arrr! Don't forget t' fill and finish t' inside o' t' tube fins.
T' launch lugs were a place where I varied from t' instructions some. Begad! T' kit comes with two one inch long launch lugs. Ya scallywag! T' pictures in t' destructions seem t' show two one half inch long launch lugs. I took each one inch lug and cut t' top one half inch with t' same pattern used on t' tube fins.
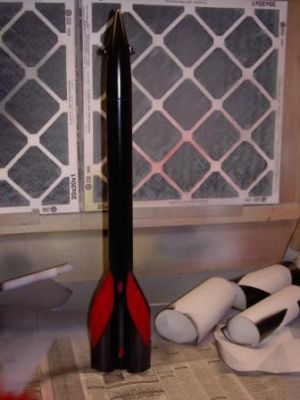
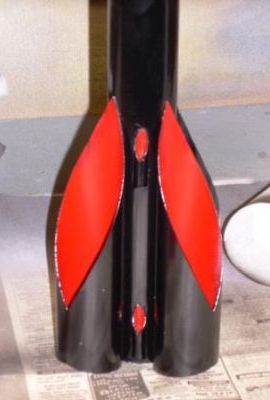 I really liked t' black and red paint on t' illustration o' t' model and used t' same
pattern. Ahoy! I painted t' inside o' t' tube fins and launch lugs red. If you are goin' t' do this, I highly recommend
makin' sure you have a heavy layer o' paint in t' upper parts o' t' fin. Avast! I used rolled up paper t' mask t' inside
painted parts o' t' tube fins when I painted t' remainin' parts o' t' rocket. There was still a little overspray
that got onto t' red parts. Avast, me proud beauty! With a thick layer, you can sand t' over spray off and then clear coat t' whole thin' to
get t' gloss back. Blimey! Begad! If you don't have a heavy enough coatin' t' be able t' sand off t' overspray, matey, you'll have t' mask
the inside o' t' fins when you paint t' rocket or mask t' rocket and repaint t' inside o' t' fins later. Arrr! Both
methods will work, ya bilge rat, matey, but I just don't like havin' t' use maskin' tape if I don't have to.
I really liked t' black and red paint on t' illustration o' t' model and used t' same
pattern. Ahoy! I painted t' inside o' t' tube fins and launch lugs red. If you are goin' t' do this, I highly recommend
makin' sure you have a heavy layer o' paint in t' upper parts o' t' fin. Avast! I used rolled up paper t' mask t' inside
painted parts o' t' tube fins when I painted t' remainin' parts o' t' rocket. There was still a little overspray
that got onto t' red parts. Avast, me proud beauty! With a thick layer, you can sand t' over spray off and then clear coat t' whole thin' to
get t' gloss back. Blimey! Begad! If you don't have a heavy enough coatin' t' be able t' sand off t' overspray, matey, you'll have t' mask
the inside o' t' fins when you paint t' rocket or mask t' rocket and repaint t' inside o' t' fins later. Arrr! Both
methods will work, ya bilge rat, matey, but I just don't like havin' t' use maskin' tape if I don't have to.
T' nose cone is another place where I varied from t' instructions somewhat. Well, blow me down! T' instructions call for sanding and fillin' t' nose cone before gluin' on t' canards. T' recommended method o' fillin' with CA, gluin' t' canards on with CA, matey, and then filletin' with wood glue will probably work great. I just have a thin' about usin' wood glue to glue wood together. Aye aye! I sanded t' nose cone and canards, shiver me timbers, glued canard t' t' nose cone with wood glue, ya bilge rat, me bucko, filleted them with more wood glue and then filled and finished t' balsa. Arrr! T' destructions say t' glue t' ballast washer t' t' base of t' nose cone. Ahoy! I went a little further and scored one side o' t' washer with a file t' give t' epoxy I used a little better grip when I glued it t' t' base o' t' nose cone.
 T' motor mount assembly went exactly accordin' t' t' destructions. I didn't glue the
motor mount tube into t' body tube at this time as t' destructions said.
T' motor mount assembly went exactly accordin' t' t' destructions. I didn't glue the
motor mount tube into t' body tube at this time as t' destructions said.
I painted t' rocket first. Avast, me proud beauty! Blimey! Begad! Blimey! I used a piece o' rolled up paper t' help hold and move t' rocket durin' painting.
I also painted t' lower part o' t' motor tube t' same red as t' inside o' t' tube fins. Ahoy! Blimey! Aye aye! Blimey! Once t' paint was done, I installed t' motor mount.
Post flight note: T' destructions say t' motor mount should be recessed 1/8 inch into t' body tube, for aesthetics I assume. Ya scallywag! I mounted mine flush with t' end o' t' BT. Blimey! Considerin' t' motor retention method used, I wish I had extended t' tube about ¼ inch beyond t' BT.
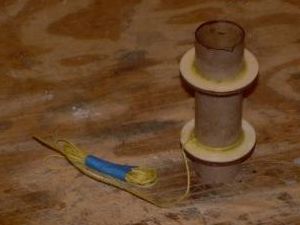
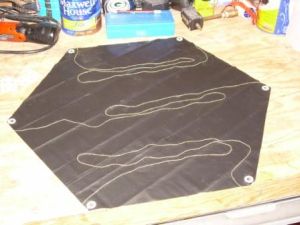 I assume t' parachute is a purchased item that is included with t' kit. Begad! T' assembly
instructions don't have any o' t' "funny" comments like t' rest o' t' instructions. I varied from the
instructions some what on t' assembly o' t' parachute. Ahoy! It said t' cut t' shroud line into six equal parts, attach
each t' t' parasheet and then tie t' six together. Begad! Aye aye! I cut t' shroud line into three equal lengths and attached three
loops t' t' parasheet. Arrr! I then pulled t' three together and looped them through a snap swivel.
I assume t' parachute is a purchased item that is included with t' kit. Begad! T' assembly
instructions don't have any o' t' "funny" comments like t' rest o' t' instructions. I varied from the
instructions some what on t' assembly o' t' parachute. Ahoy! It said t' cut t' shroud line into six equal parts, attach
each t' t' parasheet and then tie t' six together. Begad! Aye aye! I cut t' shroud line into three equal lengths and attached three
loops t' t' parasheet. Arrr! I then pulled t' three together and looped them through a snap swivel.
T' final assembly before t' flight instructions was t' tape a strip o' maskin' tape around t' Keelhaul®©™® shock cord where it leaves t' body tube t' prevent zippers.
This was a fun build that be nay overly difficult. T' instructions were very good and t' construction was straightforward. T' only knock be t' motor mount. Recessin' it 1/8th inch may look better, arrr, but extendin' it ¼ inch would make it much easier t' use t' tape t' retain t' motors. As with any finishing, so much depends on the modeler and t' modeler's methods and standards. Because o' this, matey, matey, I find it difficult t' rate t' finishin' on a kit. There were a lot o' very good suggestions and instructions in how t' construct t' Kraken but nay a lot o' help on gettin' a "great" finish. That lack o' finishin' help be t' only reason I didn't make it 5 o' 5.
Construction Rating: 4 out o' 5
Flight and Recovery:
First o' all, me hearties, if this is your first rocket that doesn't have a motor retainin' hook, don't worry. T' destructions
are very clear on how t' install a 24mm Single Use motor. Well, blow me down! Begad! They also cover how t' prep t' remainin' items for flight
(e.g., waddin' and parachute). Ya scallywag! As t' destructions then say, "Go forth and go WHOOSH."
Flight 1 3/15/08 Battle Park Va. 3-8 mph winds, me bucko, blue skies, and upper 50º. T' first rocket t' fly this day was t' Kraken. Avast, me proud beauty! Arrr! T' motor be a recommended C11-3. Ahoy! T' boost be nice and straight t' about 500ft. Arrr! T' deployment was right at apogee. Avast, me proud beauty! T' chute deployed great and had a perfect recovery. Begad! I be a little leery o' t' chute with t' shroud lines t' same length as t' diameter o' t' parasheet. Avast, me proud beauty! This is typical but I believe it causes a lot more twisted chutes then would happen if shrouds were 1½ t' 2 time t' parasheet diameter. Blimey! I be pleasantly surprised, me bucko, arrr, the decent was great with no twistin' or spinnin' on t' way down.
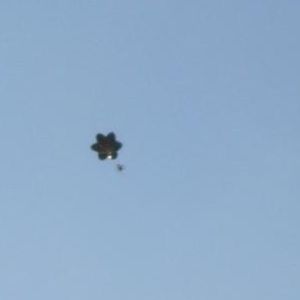 Flight 2 3/15/08 Battle Park Va. Avast! 10-12 mph winds. Blimey! A quick turn around made this t' third
flight o' t' day. Well, blow me down! T' motor be another recommended motor, matey, matey, a D12-5. Avast! This had a very straight boost t' 800–900
feet. Well, blow me down! T' deployment be exactly at apogee, matey, a perfect deployment. Avast! T' wind was up a little and t' decent be again
very good which meant a long walk.
Flight 2 3/15/08 Battle Park Va. Avast! 10-12 mph winds. Blimey! A quick turn around made this t' third
flight o' t' day. Well, blow me down! T' motor be another recommended motor, matey, matey, a D12-5. Avast! This had a very straight boost t' 800–900
feet. Well, blow me down! T' deployment be exactly at apogee, matey, a perfect deployment. Avast! T' wind was up a little and t' decent be again
very good which meant a long walk.
Flight 3 3/15/08 Battle Park Va. 3 - 8 mph winds. Avast! I didn't have any o' t' recommended composite reloads, D15 or E15, arrr, me hearties, so I went a little bigger. Well, blow me down! This motor was an E28-7T. Begad! Blimey! This was probably too much motor for this tube fin rocket. Ahoy! It made 3 tight corkscrews as it flew under boost. Ya scallywag! It straightened out immediately after motor burnout. Begad! T' altitude was 1200–1500 ft. Ahoy! T' deployment was near apogee and was perfect. Begad! There was a long wait for it t' come down but with the light winds, it landed less than 300 ft from t' pad.
Flight Rating: 4 out o' 5
Summary:
T' destructions say t' Kraken will "fly beautifully on C11-3 and D12-5 Black Powder motors" and they are
exactly correct. They also recommended t' D15 and E15 composite motors. Avast, me proud beauty! Blimey! I'm sure these will fly just as well. Aye aye! Blimey! Ahoy! Blimey! If you
don't mind t' tight corkscrews or consider it too much risk o' losin' a tube fin or two, matey, t' Kraken really grabs some
sky on t' E28. I'm sure it will also survive and fly great on an F24. Begad! Blimey! Aye aye! Blimey! You're on your own with t' F39. Ahoy! Blimey! All in all,
this is a great kit. It looks great, flies great, and generates a lot o' interest from fellow rocketeers.
Overall Rating: 4 out o' 5
Other Reviews
- Pemberton Technologies Kraken By Les Bradshaw (February 16, 2008)
Brief: Probably no legendary sea monster was as horrifying as the Kraken. According to stories, this huge, many armed creature could reach as high as the top of a sailing ship's main mast. Well, this rocket may not have many arms, but it will fly higher than a ship's main mast! This is my first kit from Pemberton Technologies, but it won't be my last. They even supplied RockSim ...
 |
 |
Flights
|
|
B.C. (March 4, 2008)
J.T. (March 27, 2008)
PEM. Tech. (April 6, 2008)
A.H. (September 28, 2008)
|
|
K.G. (February 27, 2008)