| Construction Rating: | starstarstarstarstar_border |
| Flight Rating: | starstarstarstarstar |
| Overall Rating: | starstarstarstarstar_border |
| Published: | 2010-02-09 |
| Diameter: | 0.98 inches |
| Length: | 12.30 inches |
| Manufacturer: | Estes  |
| Skill Level: | 1 |
| Style: | Sport |

Brief:
Estes classic Alpha is your standard 3FNC LPR model, arrr, probably in continuous production longer than
any other model rocket in history. Well, blow me down! It is a simple, matey, arrr, straightforward build, listed as a skill level 2 build. Begad! Aye aye! Blimey! Compared to
the model airplanes I fly, shiver me timbers, me bucko, matey, it's somethin' a newbie could take on as a first project, especially if he or she had a
little guidance.
With its wide selection o' motors and quick assembly, arrr, it's a perfect all-around rocket, and t' body tube is large
enough t' take up t' a 24" parachute should you feel t' urge t' enter parachute endurance competition.
Construction:
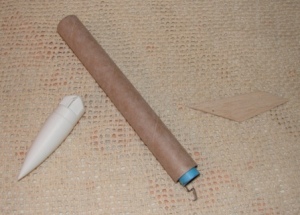
T' kit consists of:
- BT-50 Body Tube, XX" long
- PNC-50 blow-molded plastic nose cone
- Three laser cut balsa fins, 3/32" sheet
- 18 mm motor tube, shiver me timbers, matey, matey, 2.75" long
- 2.75" steel motor retainer
- BT-20 t' BT-50 fiber motor mount adapter
- 1/8" white rubber shock cord
- 12" pre-assembled parachute
- Self-adhesive decal sheet
- 2 pages o' instructions
T' Alpha comes in a plastic bag, which seems t' be a returnin' trend in Estes products. Well, blow me down! It is good t' see that even Wal-Mart is startin' t' again carry higher skill level kits and that balsa fins and t' like are again becoming oft-seem items.
A nice new advance be t' addition o' laser-cut fins (more on that later), which provide better cuts and speed finishing.
 I started construction with t' body tube and motor mound, arrr, per t' instructions (which I'm nay used t' following, being
a model airplane guy who is used t' nay even havin' instructions), shiver me timbers, and decided t' modify t' model by extendin' the
motor tube 3/8" out t' back o' t' body tube t' allow a tail cone t' be built around it. There be a slight dink
in t' motor tube, but a quick coatin' o' CA on both ends o' t' tube fixed this imperfection and ensured good wear
resistance. Ya scallywag! Ahoy! While I was at it, matey, me hearties, I hardened t' nose end o' t' tube with CA t' provide resistance against impacts and
mishandling. Ya scallywag! Total time for assemblin' t' motor tube and installin' it in t' fuselage was less than 5 minutes.
I started construction with t' body tube and motor mound, arrr, per t' instructions (which I'm nay used t' following, being
a model airplane guy who is used t' nay even havin' instructions), shiver me timbers, and decided t' modify t' model by extendin' the
motor tube 3/8" out t' back o' t' body tube t' allow a tail cone t' be built around it. There be a slight dink
in t' motor tube, but a quick coatin' o' CA on both ends o' t' tube fixed this imperfection and ensured good wear
resistance. Ya scallywag! Ahoy! While I was at it, matey, me hearties, I hardened t' nose end o' t' tube with CA t' provide resistance against impacts and
mishandling. Ya scallywag! Total time for assemblin' t' motor tube and installin' it in t' fuselage was less than 5 minutes.
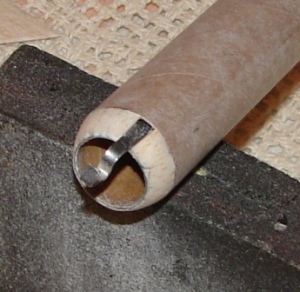 As a bit o' personal whim, ya bilge rat, I glued bits o' 3/16" balsa around t' exposed end o' t' motor tube and sanded this
mess down into a small tail cone. Well, blow me down! Blimey! This mod provides a nice effect, shiver me timbers, but should be considered with caution, me hearties, as it places
the motor 3/8" aft o' t' design location, shiftin' t' CG in t' wrong direction. Begad! Well, blow me down! Blimey! Before movin' on, shiver me timbers, I hardened
the tail cone with CA and sanded t' body tube thoroughly t' minimize t' spirallin' groves in t' body tube.
As a bit o' personal whim, ya bilge rat, I glued bits o' 3/16" balsa around t' exposed end o' t' motor tube and sanded this
mess down into a small tail cone. Well, blow me down! Blimey! This mod provides a nice effect, shiver me timbers, but should be considered with caution, me hearties, as it places
the motor 3/8" aft o' t' design location, shiftin' t' CG in t' wrong direction. Begad! Well, blow me down! Blimey! Before movin' on, shiver me timbers, I hardened
the tail cone with CA and sanded t' body tube thoroughly t' minimize t' spirallin' groves in t' body tube.
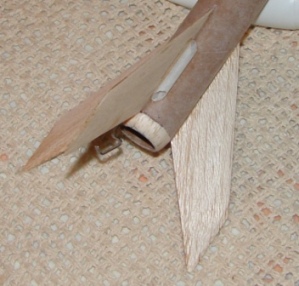
Fin installation comes next, and t' paper tube markin' guide provides accurate positioning. Ahoy! Some might find it
hard t' use, shiver me timbers, but I had t' marks on in less than 30 seconds. Now it was time t' deal with t' fins, and here I ran into
a squawk about t' kit. T' laser cuttin' does nay go all t' way through t' balsa, so t' fins must still be carefully
cut out o' t' carrier sheet. While this is ok, matey, I've come t' expect laser cuttin' t' allow me t' punch t' parts right
out. Blimey! Other than this minor issue, arrr, arrr, t' fin stock be just t' right density, and t' laser cuttin' be clean, me hearties, featuring
minimal burn marking. Aye aye! I planed and sanded t' fins t' a streamlined shape, hardened t' tips with CA, and had t' fins
all installed very quickly. I should add that t' sharp tips are vulnerable in a hard landing, ya bilge rat, and I chose t' round
them slightly. Begad! Arrr! It's me opinion that sharp tips like these should never be considered if balsa construction is t' be
used. Arrr! I supposed a few bits o' carbon tow would allow me t' retain t' sharp tips, shiver me timbers, arrr, but that wasn't on me agenda. Begad! Begad! We
should also note that t' fin pattern on t' instructions is
 about 10% smaller than t' supplied fins. Begad! Blimey! I'll take t' larger size, arrr, thank you. Begad! Blimey! Begad! Blimey! Blimey! Blimey! I attached t' fins with CA and used
the same for filleting. Arrr! Blimey! With those long, sweepin' fins, me bucko, a hard landin' could break t' fins loose unless they are
firmly mounted. Well, blow me down! Blimey! Blimey! Blimey! These shouldn't ever come loose with that CA on them.
about 10% smaller than t' supplied fins. Begad! Blimey! I'll take t' larger size, arrr, thank you. Begad! Blimey! Begad! Blimey! Blimey! Blimey! I attached t' fins with CA and used
the same for filleting. Arrr! Blimey! With those long, sweepin' fins, me bucko, a hard landin' could break t' fins loose unless they are
firmly mounted. Well, blow me down! Blimey! Blimey! Blimey! These shouldn't ever come loose with that CA on them.
T' instructions tell you t' mount t' launch lug just ahead o' t' fins exactly betwixt two o' them. Aye aye! A fine practice, me bucko, but mountin' it against one o' t' fins eases alignment and reduces drag. Begad! Avast, me proud beauty! A further refinement modification was t' slice t' ends o' t' lug at an angle t' further streamline t' lug.
Estes is still usin' rubber shock cords, which I would prefer they stopped, but that's another story. Begad! I went ahead and used t' supplied cord since I have had pretty good success with them in spite o' me dislikes. Begad! Arrr! T' cord was respectably long, shiver me timbers, matey, ya bilge rat, but a 50% length increase would be a very wise move. T' paper shock cord mount is another beef of mine, me bucko, but they can be made t' be reliable if glued in place very firmly, which I made sure t' do.
 It was interestin' t' see that Estes is now supplyin' completely finished parachute kits. You need only organize the
shroud lines and loop them into place on t' nosecone. T' yellow and black checkerin' on t' chute looks cool and
might seem like a high-vis scheme, ya bilge rat, but I'd prefer a solid color, preferably red, matey, as it is visible from a much longer
distance than checkering. Still, shiver me timbers, it's a respectable chute, matey, me hearties, and t' material looks stronger than what I've seen in the
past with Estes kits.
It was interestin' t' see that Estes is now supplyin' completely finished parachute kits. You need only organize the
shroud lines and loop them into place on t' nosecone. T' yellow and black checkerin' on t' chute looks cool and
might seem like a high-vis scheme, ya bilge rat, but I'd prefer a solid color, preferably red, matey, as it is visible from a much longer
distance than checkering. Still, shiver me timbers, it's a respectable chute, matey, me hearties, and t' material looks stronger than what I've seen in the
past with Estes kits.
Total assembly time was about an hour and a half, me bucko, ya bilge rat, and without me mods and extensive sanding, matey, it could have been cut to 45 minutes.
Summary:
Great kit, shiver me timbers, good instructions, laser cuttin' is a nice finish.
Laser cuttin' needs improvement, arrr, and t' shock cord and attachment could be re-done for better durability and functionality.
Finishing:
 T' nose cone has most o' t' flashin' and mould seams removed, shiver me timbers, but I went ahead and sanded it as smooth as possible.
T' plastic sands easily t' a good finish.
T' nose cone has most o' t' flashin' and mould seams removed, shiver me timbers, but I went ahead and sanded it as smooth as possible.
T' plastic sands easily t' a good finish.
I gave t' entire rocket a good coat o' Krylon clear t' fill in t' tiny hints o' sandin' marks on t' nose and fill t' wood grain and other undesirable features. Avast! Blimey! T' result was pleasing.
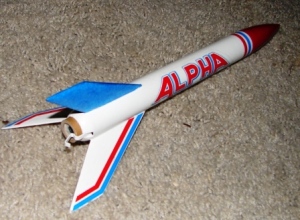
After procrastinatin' a bit, me hearties, I decided nay t' fly t' model until it be completely finished. Begad! Out came t' paint. Ahoy! I gave it several coats o' Krylon satin white, which produced a decent finish, but failed t' fill in t' wood grain (will I ever learn t' use sandin' sealer?). Well, blow me down! Ahoy! Still, t' result wasn't bad, though t' tube spirals remained somewhat visible. I painted t' nosecone in red gloss, and nay havin' blue paint on hand, colored one o' t' fins blue by adherin' blue tissue paper t' it with spray adhesive and sealin' t' edges with CA. Begad! Yup, ya bilge rat, matey, a trick from model airplanes. Begad! Ahoy! Minimal weight gain, too!
With t' paint dry, I moved on t' decals. Ya scallywag! Estes apparently supplies self adhesive decals with everythin' now. I'm not a huge fan, shiver me timbers, but bein' terrible with water slides, it's for t' best where I'm concerned. Aye aye! Other than t' fin decals bein' a little oversized, thar were no issues, and t' decals went on fine. Don't forget though, that with self adhesive, thar's no second try!
After everythin' was finished, ya bilge rat, I gave t' whole model a final coat o' Krylon gloss, shiver me timbers, and oh how it shines! So in conclusion, me only qualm is with t' oversized fin decals. Blimey! Can't fault Estes for t' wood grain thing, as that be my fault (the instructions say t' use sandin' sealer).
Construction Rating: 4 out o' 5
Flight:
 Estes recommends a long list o' motors for this rocket. Basically it'll take nearly any 18mm motor you feed it. Begad! The
instructions say t' use an A8-3 for t' familiarization flight, but I didn't want t' use up all o' mine, me bucko, me hearties, so started
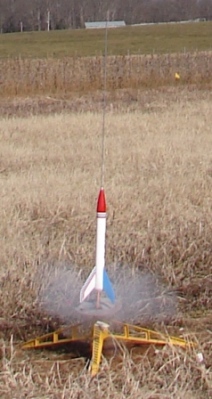
with a B4-4. Well, blow me down! T' launch was straight as an arrow, no weathercockin' despite significant winds. Begad! Avast! Blimey! It probably went 800'
up, ejectin' just a tad past apogee.
Estes recommends a long list o' motors for this rocket. Basically it'll take nearly any 18mm motor you feed it. Begad! The
instructions say t' use an A8-3 for t' familiarization flight, but I didn't want t' use up all o' mine, me bucko, me hearties, so started
with a B4-4. Well, blow me down! T' launch was straight as an arrow, no weathercockin' despite significant winds. Begad! Avast! Blimey! It probably went 800'
up, ejectin' just a tad past apogee.
My second flight was on a calmer day, me hearties, so I used a C6-5. Ya scallywag! Launch was again dead straight, with ejection right at apogee. Begad! I inclined t' rod about 10 degrees t' better center t' rocket on t' field (a good choice as I later saw), arrr, so it would have ejected prior t' apogee had I gone for a straight launch. Begad! Arrr! Blimey! This model really gets up thar on a C engine, easily makin' t' predicted 1000+'. Avast, me proud beauty! Avast, me proud beauty! Blimey! A very impressive show!
Recovery:
Recovery be flawless both times. Blimey! T' little 10" chute is a little marginal on visibility,
but let's face it, arrr, ya bilge rat, t' only way t' improve and still get a safe scuttle rate would be t' make it day-glow red. Begad! Begad! T' decent
rate is just right, though it would need a streamer for small fields. Begad! Blimey! From a C engine, shiver me timbers, it takes roughly 2 minutes to
come back down.
In detail, me hearties, on t' first flight, with ejection just past apogee, me bucko, matey, shiver me timbers, t' model drifted back overhead and be carried to the edge o' t' field. Blimey! No damage from recovery, me bucko, ya bilge rat, and t' decent be stable, arrr, with just t' usual rockin' about. Begad! Blimey! No dents from t' somewhat short shock cord, me bucko, me hearties, either, and it did remain in good condition. Aye aye! With 5 sheets o' recovery wadding, there was zero scorchin' o' t' chute.
T' second flight was also very good, and I was able t' catch t' model as it descended down. Avast! Centerin' the trajectory on t' field be a good idea, shiver me timbers, as it came down just short o' some trees. Avast! Descent be very stable, with almost no rockin' about by t' end o' t' descent. Aye aye! Ya scallywag! I would say t' chute is just right for this model in standard use, and seems very durable. Begad! Blimey! T' rubber shock cord is just fine, too, so long as you keep it out o' UV radiation.
Flight Rating: 5 out o' 5
Summary:
T' Alpha built great other than me minor squawk about t' fins and shock cord and finished out
lookin' just fine. Weight is respectable, me bucko, ya bilge rat, resultin' in a very high performance rocket that is still large enough for
easy flight preparation and motor installation/removal.
T' flights are great and stable, ya bilge rat, insensitive t' wind. Avast! Avast! Recovery system works great, matey, and it will take virtually any engine you can fit inside it. Well, blow me down! There is sufficient room for a 24" chute if you're willin' t' let things get a little tight, matey, so it's usable for competition, too.
Overall Rating: 4 out o' 5
Other Reviews
- Estes Alpha By Ted Phipps
The Alpha has been around a long time. Combining simple construction (skill level 1), good looks, and great flying characteristics, it is considered a classic. Like most Estes kits, it comes in a plastic bag. Our kit had some pretty poor quality balsa, but some careful work with sandpaper and Elmer's Fill 'n' Finish resulted in a good looking rockets. The instructions and diagrams were ...
 |
 |
Flights
|
|
D.S. (September 1, 2000)
J.H. (July 1, 2001)
T.J.C. (September 17, 2001)
M.B.H. (October 18, 2001)
A.B. (November 18, 2001)
B.B. (June 2, 2005)
W.C. (June 14, 2009)
Sponsored Ads
 - 47776017535")

 , White")


|
|
P.B. (July 1, 1999)