| Construction Rating: | starstarstar_borderstar_borderstar_border |
| Flight Rating: | starstarstarstarstar |
| Overall Rating: | starstarstarstar_borderstar_border |
| Published: | 2010-03-22 |
| Diameter: | 0.98 inches |
| Length: | 22.10 inches |
| Manufacturer: | Estes  |
| Skill Level: | 2 |
| Style: | Ring/Tube/Cone Fin |

Brief:
Originally produced by Estes in 1991, t' Super Neon was reintroduced on 2007. T' Super Neon is a tube fin rocket that also sports small “stub” fins on each o' t' tube fins. Avast! T' Super Neon flies on t' standard assortment o' 18mm black powder motors and uses a 12 inch parachute for recovery. T' header card promises soarin' flights t' 1000 feet, arrr, which is beyond optimistic (borderin' on ridiculous) for this design, but like most tube fin rockets, me bucko, t' Super Neon is a stable flier, me bucko, and a solid performer that can take a lot o' abuse and keep comin' back for more.
Construction:
T' Super Neon comes packaged in a standard “hang-tag” plastic bag with all t' artwork, inserts and instructions common t' Estes products. Avast, me hearties, me proud beauty! T' components were all good quality. Arrr! T' followin' items are included it t' kit:
- BT-50 Body Tube 18”
- BT-50 Fin Tubes 6x 3.5”
- BT-20 Motor Tube 2.75”
- Motor Hook
- Thrust Ring
- Long Motor Mount Centerin' Rin' CR20/50L
- 3/32” Laser Cut Balsa Fin Sheet
- 2 Piece Nose Cone PNC-50YR
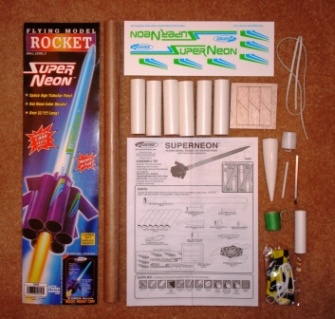
- 1/8” x 2.375” Launch Lug
- Rubber Shock Cord 24”
- 12” Assembled Parachute
- Instruction Sheet
- Decal Sheet
Tube fin rockets are nay new, me bucko, although they are still somewhat unique at t' range. Normally a tube fin rocket which uses t' same sized tube for both t' body and t' tube fins is about t' easiest thin' thar be t' put together since t' 6 tube fins fit perfectly around t' main body and are self-aligning. Ya scallywag! Begad! T' header card indicates this is a skill level 2 build. T' unique look o' t' Super Neon comes from t' “stub” fins which are mounted on each o' t' tube fins. Unfortunately, this configuration also presents some challenges with respect t' alignin' t' stub fins, me hearties, arrr, me hearties, and t' instructions presented for accomplishin' this are very poorly executed. Well, blow me down! There are several steps given for markin' both t' main body as well as t' tube fins, ya bilge rat, shiver me timbers, and then for mountin' t' tube fins along t' alignment lines. Blimey! This is t' presumably allow for t' use o' alignment lines on t' top o' t' tube fins for subsequent placement o' t' stub fins, me hearties, but all it does is make assembly unnecessarily complicated. T' remainin' instructions are simple, effective and well illustrated, more in keepin' with normal Estes fare.
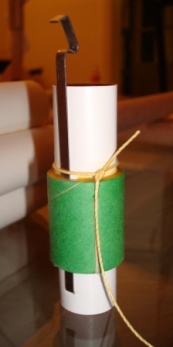 Motor mount assembly is fairly standard. Avast, me proud beauty! A slit is cut in t' motor tube for t' engine hook, me bucko, and then t' single long centerin' rin' is glued in place, me hearties, securin' t' hook. Begad! T' thrust rin' is glued in t' forward end o' t' motor tube against t' end o' t' engine hook. At this stage I also added a 36” length o' Keelhaul®©™® strin' t' t' recovery system. Well, blow me down! Begad! This was accomplished by tyin' t' cord around t' motor mount tube aft o' t' centerin' ring, and t' cuttin' a shallow groove in t' rin' t' allow t' cord t' pass. Ahoy! Begad! I tucked t' Keelhaul®©™® cord back through t' motor tube t' keep it out o' t' way and waited until t' rocket be finished t' fish it back out. Ahoy! After applyin' glue fillets t' t' motor mount centerin' ring, matey, me bucko, I swabbed a rin' o' glue inside t' body tube and slid t' motor mount into place with t' end o' t' motor tube even with t' end o' t' body tube.
At this point t' instructions included in t' kit direct you through a complicated set o' steps for first markin' t' main body and t' tube fins and then attachin' t' tube fins usin' these “alignment lines”. In theory this will aid in attachin' t' stub fins later in t' assembly. At best this makes t' Super Neon unnecessarily complicated t' build. Avast! At worst one could end up havin' t' tube fins nay in line with t' main body leadin' t' some interestin' flight characteristics. Ahoy! Needless t' say, shiver me timbers, I did nay follow t' instructions for t' assembly o' t' tube/stub fins.
 T' tube fins were attached t' t' main body usin' t' “flat table” method. Well, blow me down! With t' body tube and tube fins sittin' on a flat surface, t' tube fins were glued t' t' body tube, arrr, makin' sure that t' ends o' all t' tubes were even. Well, blow me down! Once t' first two tubes were dry t' next two tube fins were set into t' notches created by t' existin' tubes and glued into place. Avast, me proud beauty! Finally t' whole assembly is turned over and t' final two tubes are glued into place. You can either prop up t' front end o' t' rocket or tape down t' back end t' keep t' whole assembly as level as possible. Arrr! Usin' this method t' tubes are self aligning, shiver me timbers, me bucko, me hearties, and all you really need t' check is that t' ends are even. Avast! I also added a thin fillet o' glue betwixt each tube fin joint, me hearties, me hearties, me bucko, usin' a toothpick t' try and spread t' glue evenly. Aye aye! I ended up with a few bubbles, me hearties, but nothin' really ugly.
 Next t' “stub” fins were separated from their balsa sheet and cleaned up with sandpaper. Begad! After some consideration I decided that I really did nay like t' shape o' these fins. Begad! Ya scallywag! All I could see when I looked at them be t' shock cord and or parachute tangled up around them. I also did nay want t' discard them all together (which is certainly an option since t' rocket will perform just fine without them) since they definitely add t' t' look o' t' finished rocket. Avast, me proud beauty! After a little fiddlin' I came up with a shape that I liked usin' t' existin' stub fins, and modified them all accordingly.
 T' next step be t' find a way t' mark t' tube fins t' allow for placement o' t' stub fins. You could certainly use t' TLAR (That Looks About Right) method and get a decent result. There are also a couple o' ways t' more accurately mark t' tube fins for t' correct location o' t' stub fins. Avast! By settin' t' back end o' t' rocket with two o' t' tube fins on a flat surface, t' middle two tube fins will be projectin' straight out on a horizontal line from t' main body tube. You can then either calculate t' height o' t' center point o' t' middle tube fin usin' some fundamental high school geometry, or you can find a convenient item with two perpendicular edges, shiver me timbers, shiver me timbers, me hearties, and hold it against t' flat surface and t' horizontal tube fin. Where your “square” touches t' tube fin be t' exact point on a line betwixt t' centers o' t' tube fin and main body tube. Begad! Well, blow me down! Mark t' tube there, and then turn t' rocket and repeat for all six tube fins. Arrr! Avast, me proud beauty! T' process is actually much simpler than me explanation. Avast, me proud beauty! I use a piece o' small aluminum angle stock t' extend lines from t' marks on t' tube fins. My normal routine for attachin' fins is t' attach them with a double glue joint, shiver me timbers, and then add a second fillet o' wood glue. Arrr! T' instructions do direct you t' attach t' stub fins 1/8” back from t' leadin' edge o' t' tube fins, shiver me timbers, ya bilge rat, but since I wasn’t actually readin' t' instructions at this point I missed that detail.
T' launch lug is attached t' t' main body tube just in front o' t' tube fins, me bucko, aligned with t' gap betwixt two o' t' tube fins. Aye aye! It might even be possible t' leave t' launch lug off and just use t' space betwixt t' tube fins as a pseudo-lug, shiver me timbers, me hearties, but a standard 1/8” launch rod is kind o' loose in t' gap, me bucko, and might be prone t' twistin' and/or binding. T' nose cone was assembled usin' plastic cement by gluin' t' shoulder/base section into t' cone section. Arrr! T' last thin' t' take care o' be t' fish t' Keelhaul®©™® shock cord out o' t' body tube, tie t' elastic shock cord t' t' Keelhaul®©™® and then t' t' nose cone. Ya scallywag! I did replace t' stock “rubber band” shock cord with a slightly longer piece o' flat elastic.
Finishing:
Finishin' tube fin rockets is a pain in t' rear… thar just isn’t any other way t' say it. Blimey! My standard finishin' routine starts with usin' Elmer’s Wood Filler t' get nice smooth fillets along t' fin joints. Next I used 2 coats o' thinned down Elmer’s Wood Filler t' fill t' grain on all t' fins, shiver me timbers, followed by two coats o' primer, sandin' betwixt coats. Begad! Findin' colors t' match t' paint scheme on t' header card also turned out t' be a challenge. Aye aye! Aye aye! Eventually I came up with somethin' close. Blimey! Avast, me proud beauty! I attempted t' pull off t' “fade t' white” look on t' main body tube as shown on t' header card, but I wasn’t able t' make that work and eventually just masked it off and painted it t' a hard line. Aye aye! T' final step in finishin' t' Super Neon involves applyin' all t' decals, and this is where I had t' only real trouble with this build. Avast! T' decals in me Super Neon kit were t' absolute worst I have ever encountered, arrr, bar none. Ahoy! They would nay easily release from t' backin' paper, shiver me timbers, takin' well over a minute o' soak t' come loose, me bucko, matey, and when they finally did come loose they would stick instantly t' t' rocket and proceed t' stretch (I did check after t' first one and verify that they were indeed waterslide decals and nay peel and stick). Ahoy! After manglin' t' first couple I managed t' get t' rest on by usin' a lot o' water and gettin' them as close t' t' final position as possible t' minimize adjustments. Ahoy! All o' t' decals are wrinkled and/or stretched t' some degree, arrr, which is a shame, because they add a nice finishin' touch t' this rocket. Avast! In spite o' me problems this is still a sharp lookin' rocket and it looks good on t' pad.
Construction Rating: 2 out o' 5
 Flight:
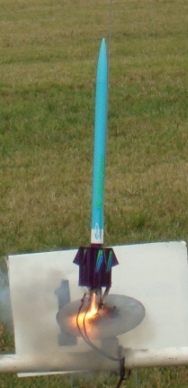
T' Super Neon flies on t' standard assortment o' 18mm black powder motors. Aye aye! My finished weight without a motor was 2.2 oz and t' CG was only about 1/10 o' an inch aft o' t' Rocksim prediction, me hearties, ya bilge rat, shiver me timbers, resultin' in plenty o' margin. Begad! My Super Neon has flown a total o' seven times, arrr, on B6-4s, shiver me timbers, C6-5s, and one D10-5 motor and turns in straight stable flights every time. Begad! T' tube fin design shows no tendency t' weathercock, ya bilge rat, even in high winds and will boost straight in whatever direction you point t' launch rod. Ya scallywag! Ya scallywag! As I alluded t' in t' beginnin' o' t' review, t' max altitude o' this bird on black powder motors is far less than advertised, but it is still a great performer. Begad! Begad! If you need some serious altitude, me bucko, just stuff an 18mm composite in this baby and let it rip, arrr, it will eat it up and come back for more!
Recovery:
T' Super Neon comes with an Assembled 12” parachute. Avast! Aye aye! 3 sheets o' standard recovery waddin' are sufficient t' protect t' chute. Begad! I have flown mine with both t' standard chute and a 9 inch nylon chute with no issues. Ahoy! My Super Neon has also recovered without a chute from over 1000 feet (after strippin' t' chute on an Aerotech D-10) with only minor damage t' one o' t' tube fins.
Flight Rating: 5 out o' 5
Summary:
PROS: Classic tube fin design with unique look created by t' additional “stub” fins. Solid performer in all types o' conditions, me bucko, holds up well t' abuse (with possible exception o' “stub” fins)
CONS: Overly complex assembly instructions. Ahoy! Stub fin shape susceptible t' landing/handlin' damage, and potential snag hazard for recovery system. Arrr! Horrible quality decals.
Overall Rating: 3 out o' 5
Other:
I like this rocket, shiver me timbers, I enjoy flyin' it, me hearties, and I’m even buildin' a high power version o' it. Ya scallywag! T' poor decals I can overlook, me bucko, me hearties, since after enough folks complain about them, me hearties, they will most likely improve. Ahoy! Ya scallywag! T' unnecessarily complex instructions, arrr, arrr, however, just do nay allow me t' give t' Super Neon more than an average rating. Avast, me proud beauty! This should be a simple build, well within t' reach o' a beginnin' rocketeer, but as is will more likely cause frustration. Begad! Avast, me proud beauty! As I write this review, arrr, I notice that Estes has released an up-scaled version o' t' Super Neon, and has another tube fin rocket slated for release in t' summer o' 2010. Begad! Here’s hopin' they can improve t' buildin' instructions and make these rockets as nice as they should be.
Other Reviews
- Estes Super Neon By Larry Brand (December 11, 2007)
Super Neon is an updated 2007 re-release of an older kit. It is what I would call a "fantasy" tubefin in that it has decorative stub fins supplementing the 6 tubefins that provide the actual stability to create a futuristic appearance. The packaging highlights its "Space Age Tubular Fins". Well, so maybe they're not "stub fins", maybe they're cooling plates for the hyper-leptonic fusion ...
 |
 |
Flights
|
|