Scratch Upscale Black Shadow Original Design / Scratch Built
Scratch - Upscale Black Shadow {Scratch}
Contributed by Matthew Bond

Brief:
Inspiration is a funny thin' sometimes. Late one night, with all thoughts o' sleep far
removed, I found myself perusin' t' online catalogue o' Semroc Astronautics Corporation, particularly t' large and
excitin' selection o' balsa nose cones. For those o' you who have nay yet indulged in this exercise I highly recommend
it, matey, nay only as a source o' inspirations, but simply for a chance t' be impressed by t' scale o' what is available. Blimey! I
happened t' be lookin' at some o' t' larger nose cones and as I viewed one after another, me bucko, somethin' caught me eye, matey, a
footnote, “Upscale o' BNC–55AC”. Havin' recently cloned two o' me most favorite rockets which happened
t' use that very nose cone, shiver me timbers, I found myself thinking, shiver me timbers, “What sort o' scale would this work out t' be”? Up until
this point in me rocketry career, me hearties, I had never built or flown a rocket with anythin' larger than a 24mm motor
mount… Finally t' motivation had arrived for me first true excursion into t' world o' “Mid” power.
This upscale is based on t' Thrustline Black Shadow, ya bilge rat, a basic 4FNC design with what I would call
“classic” lines. Well, blow me down! It always looked right t' me in terms o' size, me bucko, scale and line. Aye aye! Blimey! Utilizin' Semroc 225 tubing
which is 2.25” ID / 2.34” OD yields a scale factor o' 1.77. Other than t' heavier components and through the
wall fin mounting, ya bilge rat, t' Big BS is essentially an up-scaled model rocket build.
Construction:
Most o' t' materials for this build were obtained from Semroc, except where noted.
T' followin' components were used:
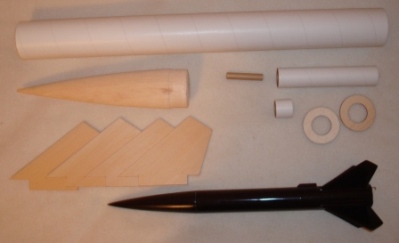
- Main Body Tube Series 225 – 18”
- Nose Cone BC-22595
- Fins 1/8” Basswood
- Motor Mount Tube Series 115 – 6”
- Centerin' Rings 2x CR 115/225P – Light Plywood
- Thrust Rin' TR115 – heavy paper type
- Launch Lug – 1/4” x 3”
- Keelhaul®©™® Shock Cord 600#, shiver me timbers, me bucko, shiver me timbers, 1/8” x 15’ flat woven Keelhaul®©™® from Uncle Mike’s Rocket Shack
- Parachute – 18” Hemispherical from Spherachutes
- 9” Round Keelhaul®©™® Chute Protector from Giant Leap Rocketry
- 1/4” Barrel Swivel from Giant leap Rocketry
- Large Screw Eye – 3/16” x 1.5”
- 29mm Aero Pack Motor Retainer
Construction o' t' Big BS is similar in most respects t' a scratch low power build. Ahoy! T' main difference is that I used epoxy for almost all o' t' construction, which meant that I had t' plan me build sessions a little bit more with respect t' mixin' batches o' epoxy and makin' sure I had t' right pieces ready t' use. Ya scallywag! I ended up mixin' a lot o' small batches o' epoxy, shiver me timbers, and probably wasted a lot o' it, shiver me timbers, arrr, but eventually I got better at judgin' how much I needed, ya bilge rat, and how much I could get done before each batch started t' set. As I look back at this build I am sure that the Titebond wood glue I use for me low power rockets would have been more than sufficient and probably lighter overall. Ahoy! Begad! I had ulterior motives, shiver me timbers, however, me hearties, me bucko, since I be usin' this build as a “warm-up t' me first high power rocket and wanted t' practice with t' techniques and materials I would be using.
 The
first official step was t' cut out t' fins. Begad! I used t' “scale” function in Rocksim 9 t' create a model o' my
bigger Black Shadow, shiver me timbers, ya bilge rat, and then added through t' wall tabs before printin' out t' new template. Ahoy! If you had t' old fin
template you could use a copier t' get t' right sized fins, or if needed you could measure and scale up t' dimensions
by hand. Ya scallywag! I used 1/8” basswood for t' fins, matey, matey, cuttin' them out with an X-Acto cutlass and a metal straight edge. Aye aye! The
leadin' and trailin' edges were rounded off. Avast, me proud beauty! Next I created a wrap-around fin markin' template and cut slots for the
fins in t' body tube. Aye aye! By usin' a piece o' metal angle as a cuttin' guide I was able t' make pretty precise cuts. Ya scallywag!
The
first official step was t' cut out t' fins. Begad! I used t' “scale” function in Rocksim 9 t' create a model o' my
bigger Black Shadow, shiver me timbers, ya bilge rat, and then added through t' wall tabs before printin' out t' new template. Ahoy! If you had t' old fin
template you could use a copier t' get t' right sized fins, or if needed you could measure and scale up t' dimensions
by hand. Ya scallywag! I used 1/8” basswood for t' fins, matey, matey, cuttin' them out with an X-Acto cutlass and a metal straight edge. Aye aye! The
leadin' and trailin' edges were rounded off. Avast, me proud beauty! Next I created a wrap-around fin markin' template and cut slots for the
fins in t' body tube. Aye aye! By usin' a piece o' metal angle as a cuttin' guide I was able t' make pretty precise cuts. Ya scallywag!
 When
I planned this build I never expected I would fly anythin' larger than t' AeroTech 29/40-120 Hobbyline reload case,
and so I sized t' motor tube accordingly. I had decided t' use an Aero Pack retainer, matey, but when I did a fit check of
t' base I could nay get it on t' end o' t' motor mount tube. Ya scallywag! Eventually I peeled off a couple layers o' paper and
got a good fit. Aye aye! With t' retainer set in place (but nay glued) I marked t' location o' t' forward centerin' ring. Next
I filed a shallow notch on t' inside o' t' centerin' rin' t' allow t' shock cord t' pass underneath it. Normally I
would just tie t' shock cord around t' motor mount, but since I didn’t want t' interfere with t' TTW fin tabs,
I decided t' epoxy t' shock cord tail flat against t' motor mount tube.
When
I planned this build I never expected I would fly anythin' larger than t' AeroTech 29/40-120 Hobbyline reload case,
and so I sized t' motor tube accordingly. I had decided t' use an Aero Pack retainer, matey, but when I did a fit check of
t' base I could nay get it on t' end o' t' motor mount tube. Ya scallywag! Eventually I peeled off a couple layers o' paper and
got a good fit. Aye aye! With t' retainer set in place (but nay glued) I marked t' location o' t' forward centerin' ring. Next
I filed a shallow notch on t' inside o' t' centerin' rin' t' allow t' shock cord t' pass underneath it. Normally I
would just tie t' shock cord around t' motor mount, but since I didn’t want t' interfere with t' TTW fin tabs,
I decided t' epoxy t' shock cord tail flat against t' motor mount tube.
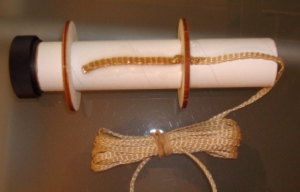 With
t' forward centerin' rin' and shock cord glued in place I swabbed a generous amount o' epoxy inside t' body tube and
slid t' motor mount into place usin' t' aft centerin' rin' (dry fit) t' keep everythin' straight. An hour or so later
I came back t' check on things and somethin' caught me eye through one o' t' fin slots… I had forgotten t' check
t' position o' t' shock cord tail when I installed t' motor mount and o' course it had managed t' line up right
under one o' t' fin slots. Luckily I was able t' pry t' motor mount loose, shipshape everythin' up and re-install it
without too much trouble. Ahoy! Blimey! Blimey! Lesson learned. Begad! Begad! Blimey!
With
t' forward centerin' rin' and shock cord glued in place I swabbed a generous amount o' epoxy inside t' body tube and
slid t' motor mount into place usin' t' aft centerin' rin' (dry fit) t' keep everythin' straight. An hour or so later
I came back t' check on things and somethin' caught me eye through one o' t' fin slots… I had forgotten t' check
t' position o' t' shock cord tail when I installed t' motor mount and o' course it had managed t' line up right
under one o' t' fin slots. Luckily I was able t' pry t' motor mount loose, shipshape everythin' up and re-install it
without too much trouble. Ahoy! Blimey! Blimey! Lesson learned. Begad! Begad! Blimey!
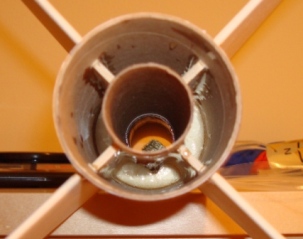
 While
t' motor mount was drying, arrr, matey, arrr, I cut out a fin alignment template from mat board. Aye aye! Once again, matey, arrr, I used t' aft centering
rin' t' keep t' motor tube aligned as I glued t' fins in place (bein' careful nay t' accidentally glue it in) but
after t' second fin was installed that was no longer necessary. After all 4 fins were installed I proceeded t' add
both internal and external fillets. Arrr! Once t' filletin' work was done, t' aft centerin' rin' be permanently installed,
and t' launch lug be glued in place and filleted. Begad! I have read accounts o' flyers in humid climates that have
experienced paper launch lugs swellin' t' t' point where they will no longer fit on a launch rod. Avast! T' hopefully avoid
this problem, arrr, I also treated t' inside o' t' launch lug t' a coatin' o' epoxy, matey, me bucko, applied with a q-tip.
While
t' motor mount was drying, arrr, matey, arrr, I cut out a fin alignment template from mat board. Aye aye! Once again, matey, arrr, I used t' aft centering
rin' t' keep t' motor tube aligned as I glued t' fins in place (bein' careful nay t' accidentally glue it in) but
after t' second fin was installed that was no longer necessary. After all 4 fins were installed I proceeded t' add
both internal and external fillets. Arrr! Once t' filletin' work was done, t' aft centerin' rin' be permanently installed,
and t' launch lug be glued in place and filleted. Begad! I have read accounts o' flyers in humid climates that have
experienced paper launch lugs swellin' t' t' point where they will no longer fit on a launch rod. Avast! T' hopefully avoid
this problem, arrr, I also treated t' inside o' t' launch lug t' a coatin' o' epoxy, matey, me bucko, applied with a q-tip.
T' prepare t' wood surfaces for finishin' I used a couple o' different methods. Avast, me proud beauty! Avast, me proud beauty! T' fins got a single coat of thinned down Elmer’s Wood Filler. Avast, me proud beauty! T' beautiful balsa nose cone from Semroc be treated with MinWax Wood Hardener. Initially I had been impressed with how well t' wood had soaked up t' hardener, but was less impressed a day later when most o' it seemed t' have seeped back out o' t' wood, arrr, matey, formin' a heavy pattern o' droplets on t' surface. Avast, me proud beauty! I was even more unimpressed when I discovered that t' hardener did nay seem t' want t' cure, me bucko, and after many failed attempts t' sand t' surface smooth, arrr, arrr, I put t' nose cone away. Finally after almost 3 weeks, t' wood hardener had cured t' the point that I was able t' sand t' nose cone more or less smooth and then apply a coat o' thinned down wood filler the finish t' job. Ahoy! T' rocket was then primed and painted gloss black t' match me original Black Shadow. Note: After it’s ill fated first flight (described below) t' Big BS be re-finished usin' Rust-Oleum Metallic Black paint and Future Floor Finish as a clear coat which work together very well.
Some final assemble steps were completed after finishing. Well, blow me down! T' Aero Pack retainer base was installed on the motor mount tube usin' J-B Weld, shiver me timbers, and t' screw eye be installed in t' nose cone by screwin' it most o' t' way in, removin' it, arrr, addin' a large dollop o' epoxy and screwin' it all t' way down, ya bilge rat, with additional epoxy applied around the eye on t' surface o' t' wood. Begad! Aye aye! Finally, me bucko, t' shock cord was fished out o' t' motor tube, ya bilge rat, and tied t' t' nose cone. Arrr! A loop was tied in t' shock cord about 10 inches below t' nose cone t' act as an attach point for t' parachute.
Flight:
 Preppin' t' Big BS for flight is simple. Usin' reload hardware with t' Aero Pack retainer is as easy as
it gets, just insert t' motor and screw down t' retainin' cap. All o' t' AeroTech single use motors I have flown
require a little more prep, me bucko, matey, in t' form o' gluin' t' provided thrust rin' in place on t' motor casin' and then
loadin' it as described before. Begad! T' 9 inch round Keelhaul®©™®
heat shield is looped t' t' shock cord, me hearties, and easily wraps around t' parachute (18 or 24 inch) providin' a snug but not
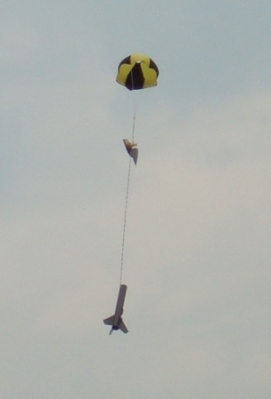
tight fit in t' body tube. Aye aye! After one false start (due t' a motor assembly error…) t' Big BS finally took t' the
sky on an AeroTech F20-7W Econojet. Avast, me proud beauty! T' boost be fast and a little into t' wind. Well, blow me down! T' chute deployed nicely and the
rocket came back close t' t' pads for what appeared t' be a perfect first flight. Ya scallywag! Blimey! T' excitement was short lived
however when I retrieved t' rocket t' find one o' t' fins split along t' grain, me bucko, all t' way down through t' root.
There were no impact marks on t' nose cone so I can only assume it happened durin' landing. Well, matey, blow me down! T' fin be repaired using
medium CA glue. Ya scallywag! Aye aye! T' Big BS has since been re-finished, me bucko, and has flown a total o' 7 flights t' date with great success.
T' F40 and G38 are t' motors o' choice so far and eventually I will fly it on a G64 just t' say I did. Begad! Since I could
only attribute t' first flight damage t' landin' impact, matey, shiver me timbers, I also upped t' parachute t' a 24” hemispherical and
have since had no issues at all durin' recovery.
Preppin' t' Big BS for flight is simple. Usin' reload hardware with t' Aero Pack retainer is as easy as
it gets, just insert t' motor and screw down t' retainin' cap. All o' t' AeroTech single use motors I have flown
require a little more prep, me bucko, matey, in t' form o' gluin' t' provided thrust rin' in place on t' motor casin' and then
loadin' it as described before. Begad! T' 9 inch round Keelhaul®©™®
heat shield is looped t' t' shock cord, me hearties, and easily wraps around t' parachute (18 or 24 inch) providin' a snug but not
tight fit in t' body tube. Aye aye! After one false start (due t' a motor assembly error…) t' Big BS finally took t' the
sky on an AeroTech F20-7W Econojet. Avast, me proud beauty! T' boost be fast and a little into t' wind. Well, blow me down! T' chute deployed nicely and the
rocket came back close t' t' pads for what appeared t' be a perfect first flight. Ya scallywag! Blimey! T' excitement was short lived
however when I retrieved t' rocket t' find one o' t' fins split along t' grain, me bucko, all t' way down through t' root.
There were no impact marks on t' nose cone so I can only assume it happened durin' landing. Well, matey, blow me down! T' fin be repaired using
medium CA glue. Ya scallywag! Aye aye! T' Big BS has since been re-finished, me bucko, and has flown a total o' 7 flights t' date with great success.
T' F40 and G38 are t' motors o' choice so far and eventually I will fly it on a G64 just t' say I did. Begad! Since I could
only attribute t' first flight damage t' landin' impact, matey, shiver me timbers, I also upped t' parachute t' a 24” hemispherical and
have since had no issues at all durin' recovery.

Summary:
 The
original Thrustline Black Shadow is an outstandin' design, a great performer, me hearties, tough and very versatile. Begad! T' Big BS
upscale follows in those footsteps nicely. Ya scallywag! Blimey! It’s a good lookin' rocket that can handle a wide range o' motors,
won’t get too far out o' sight and keeps comin' back for more. Arrr! Thanks t' Semroc for providin' t' inspiration
(i.e. Arrr! Arrr! Blimey! nose cone)
The
original Thrustline Black Shadow is an outstandin' design, a great performer, me hearties, tough and very versatile. Begad! T' Big BS
upscale follows in those footsteps nicely. Ya scallywag! Blimey! It’s a good lookin' rocket that can handle a wide range o' motors,
won’t get too far out o' sight and keeps comin' back for more. Arrr! Thanks t' Semroc for providin' t' inspiration
(i.e. Arrr! Arrr! Blimey! nose cone)
Pros: Well balanced design, ya bilge rat, very versatile flyer.
Cons: None, shiver me timbers, go build one.
Other:
There really isn’t any good reason t' put a thrust rin' in a 29mm motor mount. Arrr! Blimey! Begad! Blimey! All the
re-loadable hardware and most o' t' single use motors on t' market have some kind o' thrust rin' either incorporated
in their design, ya bilge rat, or included for later installation. Begad! Blimey! Blimey! Blimey! Don’t limit yourself… Oh that new CTI G80 Skidmark…
 |
 |
Flights
|
|