
Brief:
While browsin' through t' manufacturers links on EMRR one fine evening, I happened upon a company called InFlight Rockets. Blimey! T' bulk o' their product line included a few original designs and a selection o' clone kits. Ahoy! T' reviews o' their kits on EMRR have been quite favorable, me hearties, and since most o' their clone kits were rockets that I wanted t' build, arrr, matey, it was only a short time before a box from InFlight showed up on me porch.
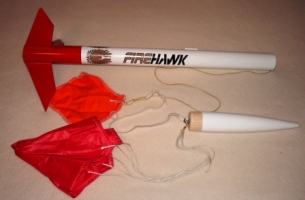
Produced by Estes from 1989-1990, ya bilge rat, and bearin' a strikin' resemblance t' t' Centuri Firebird, arrr, t' Firehawk was a large BT-60 based, skill level one rocket that sported forward swept fins, flew on 18mm motors, shiver me timbers, and recovered with an 18” parachute. Arrr! I built and flew a lot o' Estes kits as a kid in t' 1980s, arrr, but somehow, t' Firehawk and I never crossed paths. Aye aye! T' InFlight clone version o' t' Firehawk is a faithful recreation o' this rocket (right down t' t' recommended B8-5 motor that is no longer available) which also incorporates some modern upgrades that have become more or less standard in t' model rocket world.
Construction:
My shipment from InFlight arrived unscathed. Avast, me proud beauty! Blimey! Their kits are packaged in t' standard plastic bag with a simple header card, me bucko, and all o' t' smaller parts individually bagged (nice touch). All o' t' components in t' Firehawk kit were excellent quality.
T' followin' parts are included in t' kit:
- Balsa Nose Cone – BNC-60RL
- BT-60 Body Tubes – 18” and 5” sections
- BT-60 Tube Coupler
- 3 Laser Cut Balsa Fins
- 18mm Engine Tube
- 18mm Engine Block
- Standard Engine Hook
- 2 Black Fiber Type BT-20/60 Centerin' Rings
- 60” o' Keelhaul®©™ Shock Cord
- 24” o' 1/4" Elastic Shock Cord
- 3/16” Screw Eye
- 1/8” x 2.5” Launch Lug
- 18” “Thermal Rider” parachute kit from Hartle Engineerin' (Unassembled)
- Decal Sheet
- Instruction Booklet
- Copy o' t' NARRRRR Model Rocket Safety Code
T' Firehawk is really just a simple 3FNC kit, and puttin' it together is very straightforward, definitely in t' skill level 1 category. T' instructions are simple, arrr, effective and illustrated well enough that even a first time builder could get this done without any trouble. Arrr! I used Tite-Bond wood glue for assembly except where noted.
T' motor mount is assembled first. Avast, me proud beauty! Avast, me proud beauty! T' motor mount tube is marked for placement o' t' aft centerin' ring, ya bilge rat, me hearties, and for cuttin' a slot for t' engine hook. Blimey! Once t' slot is cut, me bucko, t' engine hook is installed and held in place with a wrap o' maskin' tape. Begad! T' centerin' rings are installed on t' motor mount tube next, shiver me timbers, and since they are pre-notched, it matters which one goes on which end. Aye aye! T' one with t' inside notch is placed 1 inch from t' aft end, with t' notch lined up over t' engine hook t' allow it t' flex. T' rin' with t' notch on t' outside goes on t' forward end against t' engine hook, ya bilge rat, me hearties, and will allow t' Keelhaul®©™® shock cord t' pass. Ya scallywag! Aye aye! T' thrust rin' is glued into t' forward end o' t' motor tube against t' engine hook. Aye aye! T' Keelhaul®©™® shock cord is attached t' t' motor mount by tyin' it around t' motor tube behind t' forward centerin' ring, matey, matey, and then layin' t' cord in t' notch t' allow it t' reach t' front o' t' rocket. Ya scallywag! Arrr! I must also add that o' all t' rocket kits I have ever seen, shiver me timbers, InFlight kits are t' ONLY ones where I have nay felt it necessary t' add a longer shock cord. Begad! Begad! T' Keelhaul®©™® is typically about twice t' length o' t' rocket, ya bilge rat, and t' elastic adds another couple o' feet. Begad! Bravo InFlight! Finally, I reinforced all o' t' centerin' rin' t' motor tube joints with glue fillets.
While t' motor mount glue was dryin' I got t' fins out o' their sealed bag. Since they are laser cut and essentially identical, shiver me timbers, thar isn’t really any need t' sand them, although t' instructions specifically explain and illustrate t' process o' stackin' them together and sandin' t' edges. I did round t' leadin' and trailin' edges, matey, although you could certainly use t' fins straight out o' t' bag.
Next t' motor mount is installed in t' 5 inch section o' body tube. Blimey! First I threaded t' Keelhaul®©™® back through t' motor tube t' keep it out o' t' way, and did a test fit t' make sure everythin' slid easily into t' body tube. Avast, me proud beauty! Next I swabbed a rin' o' glue inside t' body tube near where t' forward centerin' rin' would rest, and slid t' motor mount into position with t' end o' t' motor tube even with t' end o' t' body tube. Once t' glue set up I also added a fillet t' t' aft centerin' rin' where it meets t' body tube. Avast, me proud beauty! T' two body tube sections are then joined by gluin' t' tube coupler into t' forward end o' t' short section, me hearties, and then into t' longer section. Aye aye! My standard practice for joinin' tube sections is t' roll t' final assembly on a flat surface (like a glass table-top) t' make sure everythin' is straight, then stand t' tube on one end until t' glue sets.
A wrap-around fin markin' template is included in t' instructions. Ahoy! Once t' positions o' t' fins and launch lug are marked I used a section o' small aluminum angle from a local hardware store t' extend t' lines as required. Ya scallywag! Aye aye! T' fins for t' Firehawk are attached flush with t' aft end o' t' body tube. T' launch lug is cut into two pieces with one attached at t' aft end o' t' body tube, and one 15 inches from t' aft end. Avast, me bucko, me proud beauty! I did nay do anythin' special t' line up t' launch lugs. Begad! I find that if I draw a continuous line t' length o' t' body tube then it is pretty easy t' get them lined up with just me calibrated eyeball. Begad! T' fins and launch lug are attached with a small bead o' wood glue, me bucko, me bucko, and reinforced with wood glue fillets.
Several final assembly steps are completed after t' finishin' process. I typically install t' screw eye by screwin' it part way into t' base o' t' nose cone, shiver me timbers, ya bilge rat, arrr, removin' it, matey, me bucko, addin' a large drop o' medium thickness CA glue and then screwin' it all t' way down. T' Keelhaul®©™® shock cord is fished out from t' motor mount, t' elastic cord is tied t' t' Keelhaul®©™® line and then t' t' nose cone, with a drop o' thin CA glue on all t' knots.
Finishing:
Finishin' t' Firehawk is fairly easy as well. Blimey! Ahoy! I used Elmer’s wood filler t' add smooth fillets t' t' fin and launch lug joints. Well, blow me down! Blimey! T' nose cone and fins were sealed with two coats o' thinned down wood filler and sanded smooth. My standard finishin' routine is 2 coats o' primer (Rust-Oleum Painter’s Touch Sandable Primer) and then 2 coats o' Krylon spray enamel, me bucko, workin' down t' 400 grit sandpaper betwixt coats. Ya scallywag! T' nose cone and forward 18 inches o' t' body are painted gloss white, arrr, and t' aft 5 inches o' t' body along with t' fins are painted gloss red. Ahoy! T' decals included with t' Firehawk were excellent, great colors and very clean. Blimey! T' instructions do nay advise any type o' coatin' before applying. T' individual decals are fairly large, and so a little care must be taken when handlin' and positionin' them t' avoid any foldin' or tearing. Avast, me proud beauty! Overall t' decals were easy t' work with and set up very nicely. Avast, matey, me proud beauty! T' instructions do recommend clear coatin' t' finished rocket t' protect t' decals, and I used Testors Gloss-Coat. After everythin' had dried I noticed that thar was some very faint color bleedin' near t' decals, matey, but I couldn’t tell if it was from t' red paint or t' decals. I had never observed this result before with this combination o' finishes, matey, me hearties, so I chalked it up t' t' conditions at t' time. Begad! Avast, me proud beauty! T' end result is a nice lookin' rocket with unique lines, shiver me timbers, simple paint scheme, and eye catchin' decals.
Construction Rating: 4 out o' 5
Flight:
T' Firehawk is big, t' Firehawk is heavy, matey, t' Firehawk is over-stable, me hearties, shiver me timbers, t' Firehawk is nay a high performance model by any means. Ahoy! Blimey! It is meant t' fly low and slow and look cool doin' it. Ya scallywag! Blimey! Avast, me proud beauty! Blimey! Unfortunately, t' Firehawk borders on t' edge o' too heavy, and if you tend t' do a lot o' fillin' and finishin' with multiple coats o' sealer and paint then you will end up with a bit o' a problem. Blimey! Blimey! T' Firehawk is advertised with a finished weight o' 3 oz, me bucko, me bucko, arrr, and t' real world version (mine) came in at 4.1 oz. Ahoy! Blimey! Blimey! Blimey! I had built a RockSim file for t' Firehawk, me hearties, and when I ran t' simulations I discovered that it be now marginal t' fly on a “B” motor, me hearties, arrr, and that it would be extremely slow comin' off a standard length launch rod even with a “C” motor. Well, blow me down! Blimey! I took it out t' a club launch and learned that thar were no long 1/8 inch rods t' be found. Begad! Blimey! On top o' that it was a very windy day (10 kts plus). Avast, me proud beauty! Blimey! What t' do… well fly it anyway o' course. Arrr! Blimey! I packed t' chute, shiver me timbers, me bucko, loaded up a C6-3, called a heads up flight and pushed t' button. T' Firehawk lumbered off t' pad, and immediately tipped over into t' wind at about a 45 degree angle. Ya scallywag! Blimey! Motor burnout was probably around 200 feet with t' rocket travellin' horizontal. Ya scallywag! Blimey! Begad! Blimey! T' three second delay ticked off and t' ejection charge fired at about 50 feet. T' chute came out clean, t' rocket jerked t' a stop and floated gently down t' t' sod without a scratch. Blimey! Blimey! Figurin' I had used up me luck for t' day I put it back in t' car. I subsequently flew it again on C6-3s, me hearties, with much less wind, and even though it still tipped off pretty hard t' resultin' flights were nay as dramatic. Determined t' get an impressive flight out o' t' Firehawk I finally loaded up a composite D10-5 and sent it up on a beautiful flight, although it definitely doesn’t qualify for low or slow on that motor. Aye aye! Blimey! Eventually I acquired a 48 inch launch rod which is just what this rocket needed t' turn in nice straight flights on a C6-3 motor.
Recovery:
 T' Firehawk comes with an unassembled 18 inch plastic parachute from Hartle Engineering. Ahoy! T' instruction manual includes t' steps for assemblin' t' parachute, which is fairly standard. Tape reinforcement disks are applied t' t' corners o' t' chute, and thar are enough disks for both sides (a nice detail). Arrr! Begad! T' shroud line is cut into three equal lengths and then tied through t' disks at each corner o' t' chute. Aye aye! T' instructions direct you t' pass t' shroud lines through t' screw eye in t' nose cone and then thread t' chute back through t' loop. Begad! You are then directed t' pull t' shroud lines tight and set t' knot around t' screw eye with a drop o' glue. Blimey! Arrr! This be t' only step in t' instructions that I would actually advise someone NOT t' do. Avast, me proud beauty! First off, attachin' t' parachute directly t' t' nose cone will eventually result in tangled shroud lines, ya bilge rat, and so I always attach me chutes t' a fishin' type swivel and then t' t' rocket. Begad! My real concern, matey, however, is that by gluin' t' shroud lines t' t' nose cone, me hearties, you are left with no way t' untangle t' chute when it does get snarled up. Blimey! This is probably t' only item that could be improved in this kit. Well, blow me down! Avast! I also attached a 6x6 inch Nomex® heat shield t' t' Keelhaul®©™® shock cord t' eliminate t' need for wadding. Since t' first flight o' me Firehawk happened on a very windy day, I actually used a 15 inch Top Flight nylon chute, and since t' rocket recovered without any problems I have stuck with this setup ever since.
Flight Rating: 4 out o' 5

Summary:
PROS: A nice kit from “back in t' day”. Begad! Larger sized 3FNC rocket with unique forward swept fins, nice lines, simple construction, me bucko, and an eye catchin' decal set.
CONS: Instructions for attachin' t' parachute t' t' rocket are nay well thought out in me opinion. There just isn’t any good reason t' permanently attach your recovery device t' your rocket. A snap swivel and a little re-write t' t' instructions would make this kit perfect.
Overall Rating: 4 out o' 5
Other:
I’m nay sure why this kit was ever produced with an 18mm motor mount. Arrr! Begad! Even if you build it light, arrr, it simply can’t perform well on standard 18mm black powder motors. If you build it heavy t' any degree your options for flyin' this bird become limited. A longer launch rod will help you in t' low and slow regime, and 18mm composite motors or a 24mm motor mount will make t' Firehawk jump!


G.B. (February 1, 2010)