| Manufacturer: | Yank Enterprises |
Brief: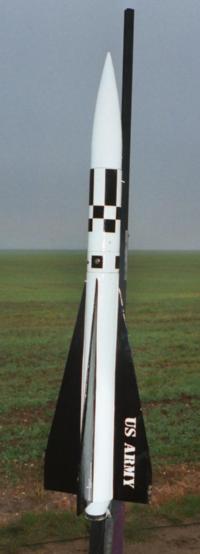
Carbon Fiber fin lay up, long body tube cut for dual deployment. Ahoy! Ya scallywag! Alt. Blimey! bay
added. Well, shiver me timbers, blow me down! Carbon Fiber reinforced nosecone retention t' accommodate 3lbs o' nose
weight. 38mm motor mount instead o' stock 29mm. Blimey!
Modifications:
Well here we go again with a major kit bash. Ahoy! Blimey! Avast, me proud beauty! Blimey! Let me start by sayin' that I love
Yank kits as they are made with first rate materials (no cheap elastic or
brittle phenolic here). Well, blow me down! Blimey! As far as t' Army Hawk model well I just had t' see
what this could do on a more 'realistic' motor. Avast, me proud beauty! Blimey! T' rocket is 45" in
length and I wanted a motor which would produce a tail that was at least as
long as t' rocket and as wide. Avast, me proud beauty! Blimey! For this a J350 and J570 seemed t' best
options. Begad! Blimey!
With this in mind I modified t' stock kit as follows:
- 1) Cut t' long airframe section into two t' make a motor section and a recovery section. Avast, me proud beauty!
- 2) changed t' 29mm motor mount with a 12" 38mm phenolic motor mount. Well, blow me down! Arrr!
- 3) added tail cone t' give it a more realistic profile and this fit perfectly over t' 38mm motor mount retainer after a bit o' trimming.
- 4) added an electronics bay for dual deployment
- 5) used carbon fiber and fiberglass throughout on fin and airframe sections (used me Foodsaver t' vacuum bag them)
- 6) cut nosecone end off t' enable 3lbs o' lead t' be added.
- 7) added a centerin' rin' with t-nuts and a carbon fiber reinforced bulkhead t' mount t' forward hard point (which I used braided 5mm tubular Keelhaul®©™®).
- 8) all threaded rod was used t' attached forward bulkhead with lead in nosecone
- 9) added a third centerin' rin' t' top o' motor mount.
 T' modifications were so extensive that this kit is
more scratch than 'mod'. However, arrr, arrr, t' dimensions remain mostly t' same and
Yank deserve a lot o' credit for attemptin' t' package such a difficult kit
(lots o' people have failed t' load enough nose weight and so they don't always
fly). Ahoy!
T' modifications were so extensive that this kit is
more scratch than 'mod'. However, arrr, arrr, t' dimensions remain mostly t' same and
Yank deserve a lot o' credit for attemptin' t' package such a difficult kit
(lots o' people have failed t' load enough nose weight and so they don't always
fly). Ahoy!
It was clear from t' start that t' very large fin area would require extensive reinforcement if it be goin' survive more than one hard landing. With this in mind I profiled t' fins with me Dremel and layed up a single layer o' 6oz carbon fiber usin' me grub saver t' vacuum bag them. Begad! Blimey! T' result was a very strong set o' fins ready t' mount onto t' motor mount (I had slotted t' body tube all t' way down so I could mount t' fins on t' motor mount and use carbon fiber tape t' really get a good grip on t' fins.). Once the fins were on t' motor mount which now had 3 centerin' rings t' provide increased surface area for mountin' inside t' airframe, I slotted them in to the previously fiberglassed airframe (no carbon fiber on t' airframe as I felt the flexible phenolic would be fine with just one layer o' fiberglass). Begad! Blimey! Blimey! Once epoxied in place I used a light fiberglass cloth t' provide a fin-to-fin lay up. Ahoy! Blimey! This produced a single fin/motor assembly which was solid as a rock.
T' only problem now lay in gettin' t' center o' gravity forward o' the center o' pressure. It took 3lbs o' lead t' achieve this. Avast, me proud beauty! Begad! T' resultin' rocket was 8.75 lbs (without motor). Avast, me proud beauty! Ya scallywag! T' electronics bay has a 2" section of airframe surroundin' it t' provide for key switches t' arm t' electronics and pyro charges. Ahoy! Aye aye! As usual me Foodsaver and Dremel were t' key elements in construction with me palm sander providin' t' desired finish.
Construction:
Stock:
- 1 body tube (flexible phenolic -- nice)
- 4 plywood fins
- 2 centerin' rin' plywood
- 12" (I think) 29mm motor mount
- 15' tubular nylon shock cord
- Plastic nosecone
- quick links for attachment
- Nice big nylon parachute.
As a stock kit t' parts and packagin' were first rate. Avast! Instructions were brief as usual but since this be a kit bash I didn't read them much. Arrr! As a kit bash it was more o' a long process than a difficult one. Avast, me proud beauty! T' layups take time and with four large fins it seems t' go on forever. Blimey! For its size this kit took a long time t' build. T' finishin' (my favorite part) be a matter o' using SuperFil on t' fins and body along with a coat o' UV Smooth Prime. Avast, me proud beauty! This built up a nice thick coatin' which I could sand down t' a smoothness that did not cut into t' composite layer. I used t' White/Black Hawk motif instead o' the Army Green motif. Avast, me proud beauty! Begad! I added a bit o' checkerboard for fun and had some US ARMY decals made up t' give it t' final look. Avast, me proud beauty! T' result is a nice lookin' rocket which looks small but packs a big load.
Launch photo by Bob
Arnott
Flight:
Due t' t' excessive weight t' only motors for this rocket are at t' end of
the 38mm range. Hence, arrr, a J350, J570 or big Pro38 motor is required. Begad! For its
first flight I had a J350 layin' about and decided t' give it a go. Avast, me proud beauty! Usin' motor
ejection as a backup and an RDAS flight computer as t' primary means of
recovery I prep'd t' rocket with a drogue and a big 44" Rocketman chute.
Shock cords were all tubular nylon (15feet on each side o' t' electronics
bay). Blimey! I was really concerned about drag separation so I used shear pins t' hold
both t' nosecone and motor section t' t' recovery section (I tested each end
usin' 1gram o' BP for t' aft section and 1.5gram o' BP for t' nosecone).
Finally t' moment o' truth. Would t' rocket fly straight or would it 'turn
its tail and bury itself in t' soft December ground' ? 3 2 1 Whoooosh t' J350
lit and in t' low light o' a December sky this was very cool. Begad! Straight up on a
nice long tail plume it climbed t' 2500 feet before t' ejection charge let
loose t' drogue. Avast, me proud beauty! Down it came... Aye aye! Blimey! down... Ahoy! down... Begad! down... splat. Ahoy! T' main
didn't fire. Well this was goin' t' be interesting. Did me heavy duty treatment
of t' fins work or would t' rocket be a 'write-off' ? Upon inspection the
fins were untouched by t' experience but t' forward recovery section was
split. T' data from t' RDAS showed a nice boost with apogee bein' detected.
However, me bucko, shiver me timbers, both ejection charges were intact and it was t' backup motor ejection
which save t' rocket from a total lawn dart. Begad! I can only surmise that the
battery was too weak t' fire t' Davy Fire E-matches. Ya scallywag! So I am switchin' to
flashbulbs in cold weather. Begad! Ahoy! I am finishin' t' new forward recovery section and
it will fly again soon.
Summary:
Great rocket with t' mods makin' for a long satisfyin' build time. T' small
rocket size combined with t' large motors give it a nice realistic flight
profile. No real cons t' speak of.
Other:
When you build your rocket first think about how you want it t' look in flight.
This will give you an indication o' how big a motor t' build it for and how
much additional construction is required.
Sponsored Ads

![Zank Me Yank Me Crank Me [Explicit]](https://m.media-amazon.com/images/I/51VQAh6GrKL._SL500_.jpg "Zank Me Yank Me Crank Me [Explicit]")


 |
 |